This post contains affiliate links. To learn more, hop over to our Disclosure page.
Your foundation is the foundation of your entire look. I mean, duh, right?
You wouldn’t build a house on a wobbly foundation. Yet building your makeup look on the wrong foundation is doing exactly that.
Foundations are no joke. Finding the perfect one for you is probably one of the most difficult aspects of makeup. Seriously, it’s almost as difficult as hunting down a bra that fits like a glove. Like bras, foundations all look relatively similar. But as we quickly learn when we bring the wrong one home, looks can be deceiving. And as we have all experienced, wearing the wrong foundation produces quite disastrous results.
After years of trying random foundations (and concealers, for that matter,) with little success, I’ve finally cracked the code of foundation picking. No, I’m not some sort of secret agent foundation huntress, (though that would be totally awesome,) but I have developed a system of questions, qualification, and tasks that all new foundations must go through before I take them home.
Sounds, extreme, I know, but it works. I almost never get it wrong anymore, and neither will you if you follow these steps! 
Foundations have long eluded me. Do you feel the same?
I have been wearing foundation since middle school. Now that I think of it, I’m not entirely sure how I got it passed my mom, but oh well.
I’ve come along way since then, (thank goodness,) and I have picked up some pretty helpful strategies when it comes to choosing the right foundation. Trust me, I know a thing or two about wrong foundations, having gone through just about every wrong foundation in the world.
From foundations that were the wrong formula for my skin type, too dark foundations, too light foundations, or foundations with the wrong amount of coverage, I have gone through them all. I had no concept of what would be the best foundation for my skin, so I just tried random foundations and hoped for the best.
I remember specifically when it “clicked”
In summer 2012, I started working a job in cosmetics sales. After working there for a while, dishing out whatever makeup advice I had on me, L’Oréal released their new True Match Lumi foundation. Not knowing any better, I basically chose my foundations based on what was popular at the time. Since L’Oréal Lumi was the next big thing, I had to try it.
It didn’t occur to me what L’Oréal meant by “lumi,” but I figured it out pretty quick.
As soon as I applied the foundation, I instantly resembled a runner at the end of marathon. And by the end of the day, well, I might as well have taken a bath in bacon grease. It was disgusting.
So I layered on more powder. Then I looked like a ball of cookie dough- slimy and lumpy with bits of powdery substance clumping together here, there, and everywhere.
This was around the same time when my store was sold out of the Revlon Colorstay Makeup for oily/combo skin that I usually used, so I went ahead and bought the one for dry skin instead. Needless to say, I had a similar result. Finally I figured out that not all foundations are created equal.
L’Oréal True Match Lumi Healthy Luminous Makeup >> Purchase on Amazon
Revlon Colorstay Makeup for Oily/Combination Skin >> Purchase on Amazon
Revlon Colorstay Makeup for Normal/Dry Skin >> Purchase on Amazon

After years of wearing the wrong foundation, this is the system I’ve developed.
Just about every foundation that I put through this rigorous system end up working out beautifully. And the ones I don’t, well, it’s hit or miss. Sometimes I get lucky. But most of the time I don’t.
Determine your skin’s undertone
As someone who used to be in the business of trying to help people find the right foundation (in a drugstore with no testers, no less,) and someone who has personally used every type of wrong foundation imaginable, I know how important it is that you know what undertone of foundation best matches your skin.
It’s step one is the search for your best foundation. There are three basic categories where skin tones fall- cool, neutral, and warm. Of course, not everybody fits snugly into one category, as skin tones fall on a huge spectrum.
There are a multitude of ways to determine where you fall, but my favorite is by far the vein test. I find that it helps to grab a green object and a blue object to help you compare. I recommend green and blue Sharpie markers just because the cap colors are vibrant and they are easy to handle. Find the area on your body where you can most clearly see your veins. The crease of your elbow, your wrist, and the innermost sides of your ankle/heel are good places to start.
Hold the blue object and the green object up to your skin and compare the color of your veins. If they appear more like the blue object, then you probably have cool undertones. If your veins look more like the green object, then warm undertones are more likely. But if you truly can’t decide whether the blue or green matches better, and your veins appear a teal color, then you can consider yourself neutral.
Just knowing your undertone already knocks out about 60% of your “wrong” foundations.
Sharpie Markers for comparison >> Find them on Amazon in Green & Blue
Understand your skin type
Next, think about the skin issues you frequently deal with. Do you have issues with oil melting away your foundation? Is primer an absolute must for keeping your makeup in place? Must you blot and touch up multiple times throughout the day? Do you often have clogged pores and breakouts?
If any of the above sound like you, then you probably have oily skin.
On the other hand, are you constantly having to moisturize? Is your skin often flaky and crackly? Does it feel uncomfortably tight and itchy? Do you have issues with your foundation looking powdery and mask-like?
If this sounds like you, then you probably have dry skin.
But what about if you’re both? For example, I have an oily t-zone, but dry and flaky around my mouth. Apparently it’s quite common. In this case, I suggest choosing the best foundation you can find that deals with the issue on the larger portion your face. Then, go after a primer that you can use just on the areas with other issues.
Recommended Primer — Laura Mercier Foundation Primer >> Purchase at Sephora
Decide what kind of coverage you want
In addition to not knowing what skin type I possessed, I also often didn’t think about what I wanted the end result to be. Foundations are categorized in three or four different coverage levels, depending on who you ask. I say there are four- Extra light, Light, Medium, and Full coverage.
Extra Light coverage foundations
Examples of foundations with Extra light coverage include tinted moisturizers and light BB creams. These give your skin a light tint to help even skin coloration, but all imperfections are still clearly visible. The Urban Decay One & Done Hybrid Skin Perfector is a good example. (Click the link for demo photos.) These are great options if you just want a hint of color and blurring on your skin, but you don’t have anything you absolutely want hidden.
Recommended — Urban Decay One & Done Hybrid Skin Perfector >> Purchase at Sephora
Light coverage foundations
Foundations with light coverage include heavier BB creams, CC creams, and many luminous foundations. These provide more coverage than the Extra light concoctions, but you’ll still need a good concealer to cover any specific spots. Light coverage foundations are perfect for those who want just a bit more coverage, but still want to look very natural.
Recommended — Maybelline Dream Pure BB Cream >> Purchase on Amazon
Medium coverage foundations
Medium coverage foundations start adding more visible coverage, so many smaller or lighter imperfections may not need additional concealer. I find these foundations to be a happy medium between wearing a full-face look, and still feeling light. The vast majority of foundations fall into this category. (Unless it’s labeled otherwise, of course.)
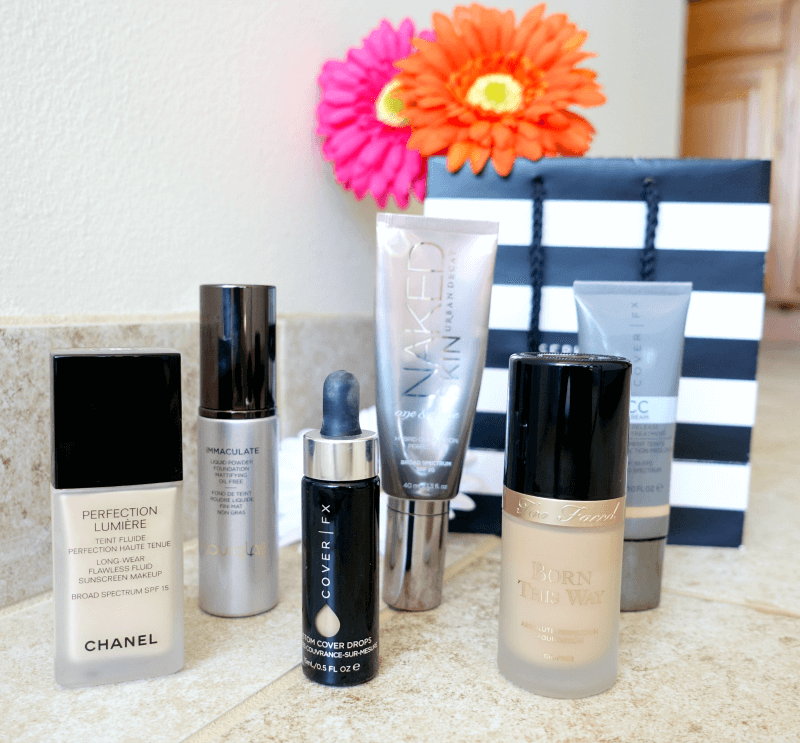
The coverage can be adapted in either direction, so they’re very versatile. I recommend starting with these. Hourglass Immaculate Liquid Powder Foundation is an example of a medium coverage foundation.
Recommended — Hourglass Immaculate Liquid Powder Foundation >> Purchase at Sephora
Full coverage foundations
Full coverage foundations typically aren’t for everyday wear, but of course, you do you. These give your skin the most flawless finish possible, but not without drawbacks. Applied incorrectly, full coverage foundations are prone to cakiness, cracking, and breaking up thanks to your skin’s natural oils. It’s also the most obvious with these foundations when things start going awry.
I recommend only going for a full coverage foundation if you absolutely need the coverage. Otherwise, a medium or light coverage foundation will work just fine along with a good concealer. Personally, I keep a full coverage foundation on hand for photos and special events, but I rarely wear it. however, I think so far this is the best, and most natural, full coverage foundation I’ve worn.
Recommended — Too Faced Born This Way Foundation >> Purchase at Sephora
Look for keywords on the packaging
As I learned the hard way, when the bottle says “lumi” or “for dry skin,” brands aren’t saying these things for their own entertainment.
Now that you know what you are looking for in a foundation, pay close attention to the descriptions on the packaging. It often provides many clues as to whether it’s the best foundation choice for you. Words like “luminous,” “dewy,” and “natural” often indicate a moister foundation.
If you’re already oily, you’ll only look oilier using these foundations. If you’ve got dry skin, then these types of foundation are what you need because they’ll help balance the dryness. Words such as “matte,” and “liquid to powder,” indicate a formula dedicated to controlling oil. These foundations can be drying and cakey looking on normal or dry skin, but they are amazing for oily skin.
To SPF or not to SPF?
Many foundations, (BB creams especially) include SPF in their formulas. Let’s break down the pros and cons.
On the plus side, extra SPF never hurts, and it can be especially helpful when you’re traveling or are going to be outside for extended periods of time. However, please don’t rely solely on your foundation to cover your sun protection needs. And don’t forget, just because your moisturizer says SPF 50 and your foundation says SPF 30, doesn’t mean you’re packing SPF 80. It doesn’t work like that.
However, SPF in foundation does tend to cause a white-cast in flash photography, especially at night. Although you dont’ really need SPF at night anyway. It’s really up to you, but I suggest picking up two foundations- one with no SPF but with a heavier coverage for night time, and one with lighter coverage and SPF for daytime. I like having both options on hand, and you probably will too.
Recommended — It Cosmetics Your Skin But Better CC Cream SPF 50 >> Purchase at Sephora
Swatch more than a few colors
Never purchase the first shade you swatch. Unless you’re a color ninja, it’s difficult to select the best foundation shade on the first try. Many times, I will swatch one color and decide it looks pretty good, only to go home and put it on my face to find that the shade doesn’t look quite right.
If at all possible, test several colors next to one another. This way, the differences in undertone will be super obvious, making it easy to pick out the one that best matches your own undertone.
Choosing the wrong undertone is the biggest killer of a great foundation look. Compare all your options while they’re all laid out in front of you. It’s much easier than holding one lone foundation at home and trying to figure out what’s wrong with it.
Color match to both your jawline and underside of your forearm
I find that testing in these areas gives me the most accurate overall match. On me, the underside of my forearm is a good representation of the color I want my face to be. Not as pasty as my coloration without any foundation, but also not as heavily bronzed as, say, my chest area is from being bombarded by the Hawaiian sun every day.
Once I have my contenders narrowed, then I’ll try one or two on my jawline so I can see how the colors match in real life. Because really, who wants to test 15 different shades all on their face? Ick.
Blend the swatches and leave the store
I know you’re in a hurry, but there are two major things about a foundation that only time will reveal- longevity and oxidization. Obviously, the foundation’s wear time is super important to whether you will ultimately be satisfied. The last thing you want is to leave the house looking fabulous only for your face to melt like an ice cream cone in the microwave 2 hours later.
Keep an eye on your swatch for the next few hours and notice when it starts breaking down. Then think, was that long enough?
Secondly, there are several factors involved in oxidizing foundations. Your skin type is one of them. Oily skin sometimes causes oxidization, though some foundations are simply more prone to it than others. You will only know if the foundation in question will remain its true color on your skin if you give it time to “show its true colors.” So be patient.
An oxidizing foundation is not the best foundation, no matter how great it makes your skin look. While it amy be tempting to purchase a lighter shade to compensate, just don’t do it. You deserve better, girl.
When in doubt, go a little lighter
I know being bronzed and glowy is the thing nowadays, but in my opinion, wearing a darker foundation to make yourself look tan is not a good look.
If you want that tanned look, I recommend going for the liquid bronzers such as the Nars Laguna Liquid Bronzer that can be mixed into your foundation for a sheer wash of bronzy color.
When faced with a choice, I always prefer to go slightly lighter. Then, I have room to build up my contour, bronzer, and blush without looking muddy. Of course, this is assuming that you will be wearing all the extras. If you don’t plan on wearing additional layers of color, then try to select as close of a match as possible for the most natural look.
Recommended — Nars Laguna Liquid Bronzer >> Purchase at Sephora
Purchase from stores with a good return policy
Sometimes, despite all your best efforts, you still end up with a dud. That’s okay! You’re not a failure! But you can return that, right?
Nothing sucks more than spending money on something, hating it, and then being stuck with it because the store won’t take it back. It’s like rubbing salt in the wound of makeup shame.
Fortunately, plenty of stores out there have great return policies that allow you to return opened items. I shop at Sephora for high-end items, and they’ll take back anything with a receipt.
Walgreens is great for drugstore items. They’ll take back anything even without a receipt, and give you store credit.
Of course, be honorable and don’t abuse the policy. Let’s keep it available for all of us when we really need it.
Recommended Shopping Destinations >> Sephora & Walgreens
Use these tips to find the best foundation you possibly can
I hope you find these tips helpful next time you are looking for the best foundation to suit your needs.
I know this is a lot to take in, which is why I’ve created a bonus cheatsheet to help you out. It’s like taking this post with you when you go shopping! Download it now! Happy shopping!
That’s all for today!
Like this post on choosing your best foundation? You’ll definitely enjoy this post too >> How To Choose The Best Concealer For Your Skin
If you enjoy this post and find it informative, interesting, or just plain entertaining, please tell me about it in the comments below. And don’t forget, sharing is caring. Share this post!
Till next time. ♥︎
Sign up for my free monthly e-journal, The Millennial Maven Love Letters for exclusive content + millennial inspiration and lifestyle hacks. Plus get instant access to my library of on-the-go style downloads!
FTC- Not sponsored. I purchased all products myself. All opinions are my own. Some links may be affiliated.
Leave a Reply