Hello Everyone!
Valentines’ Day is almost here. Yay!
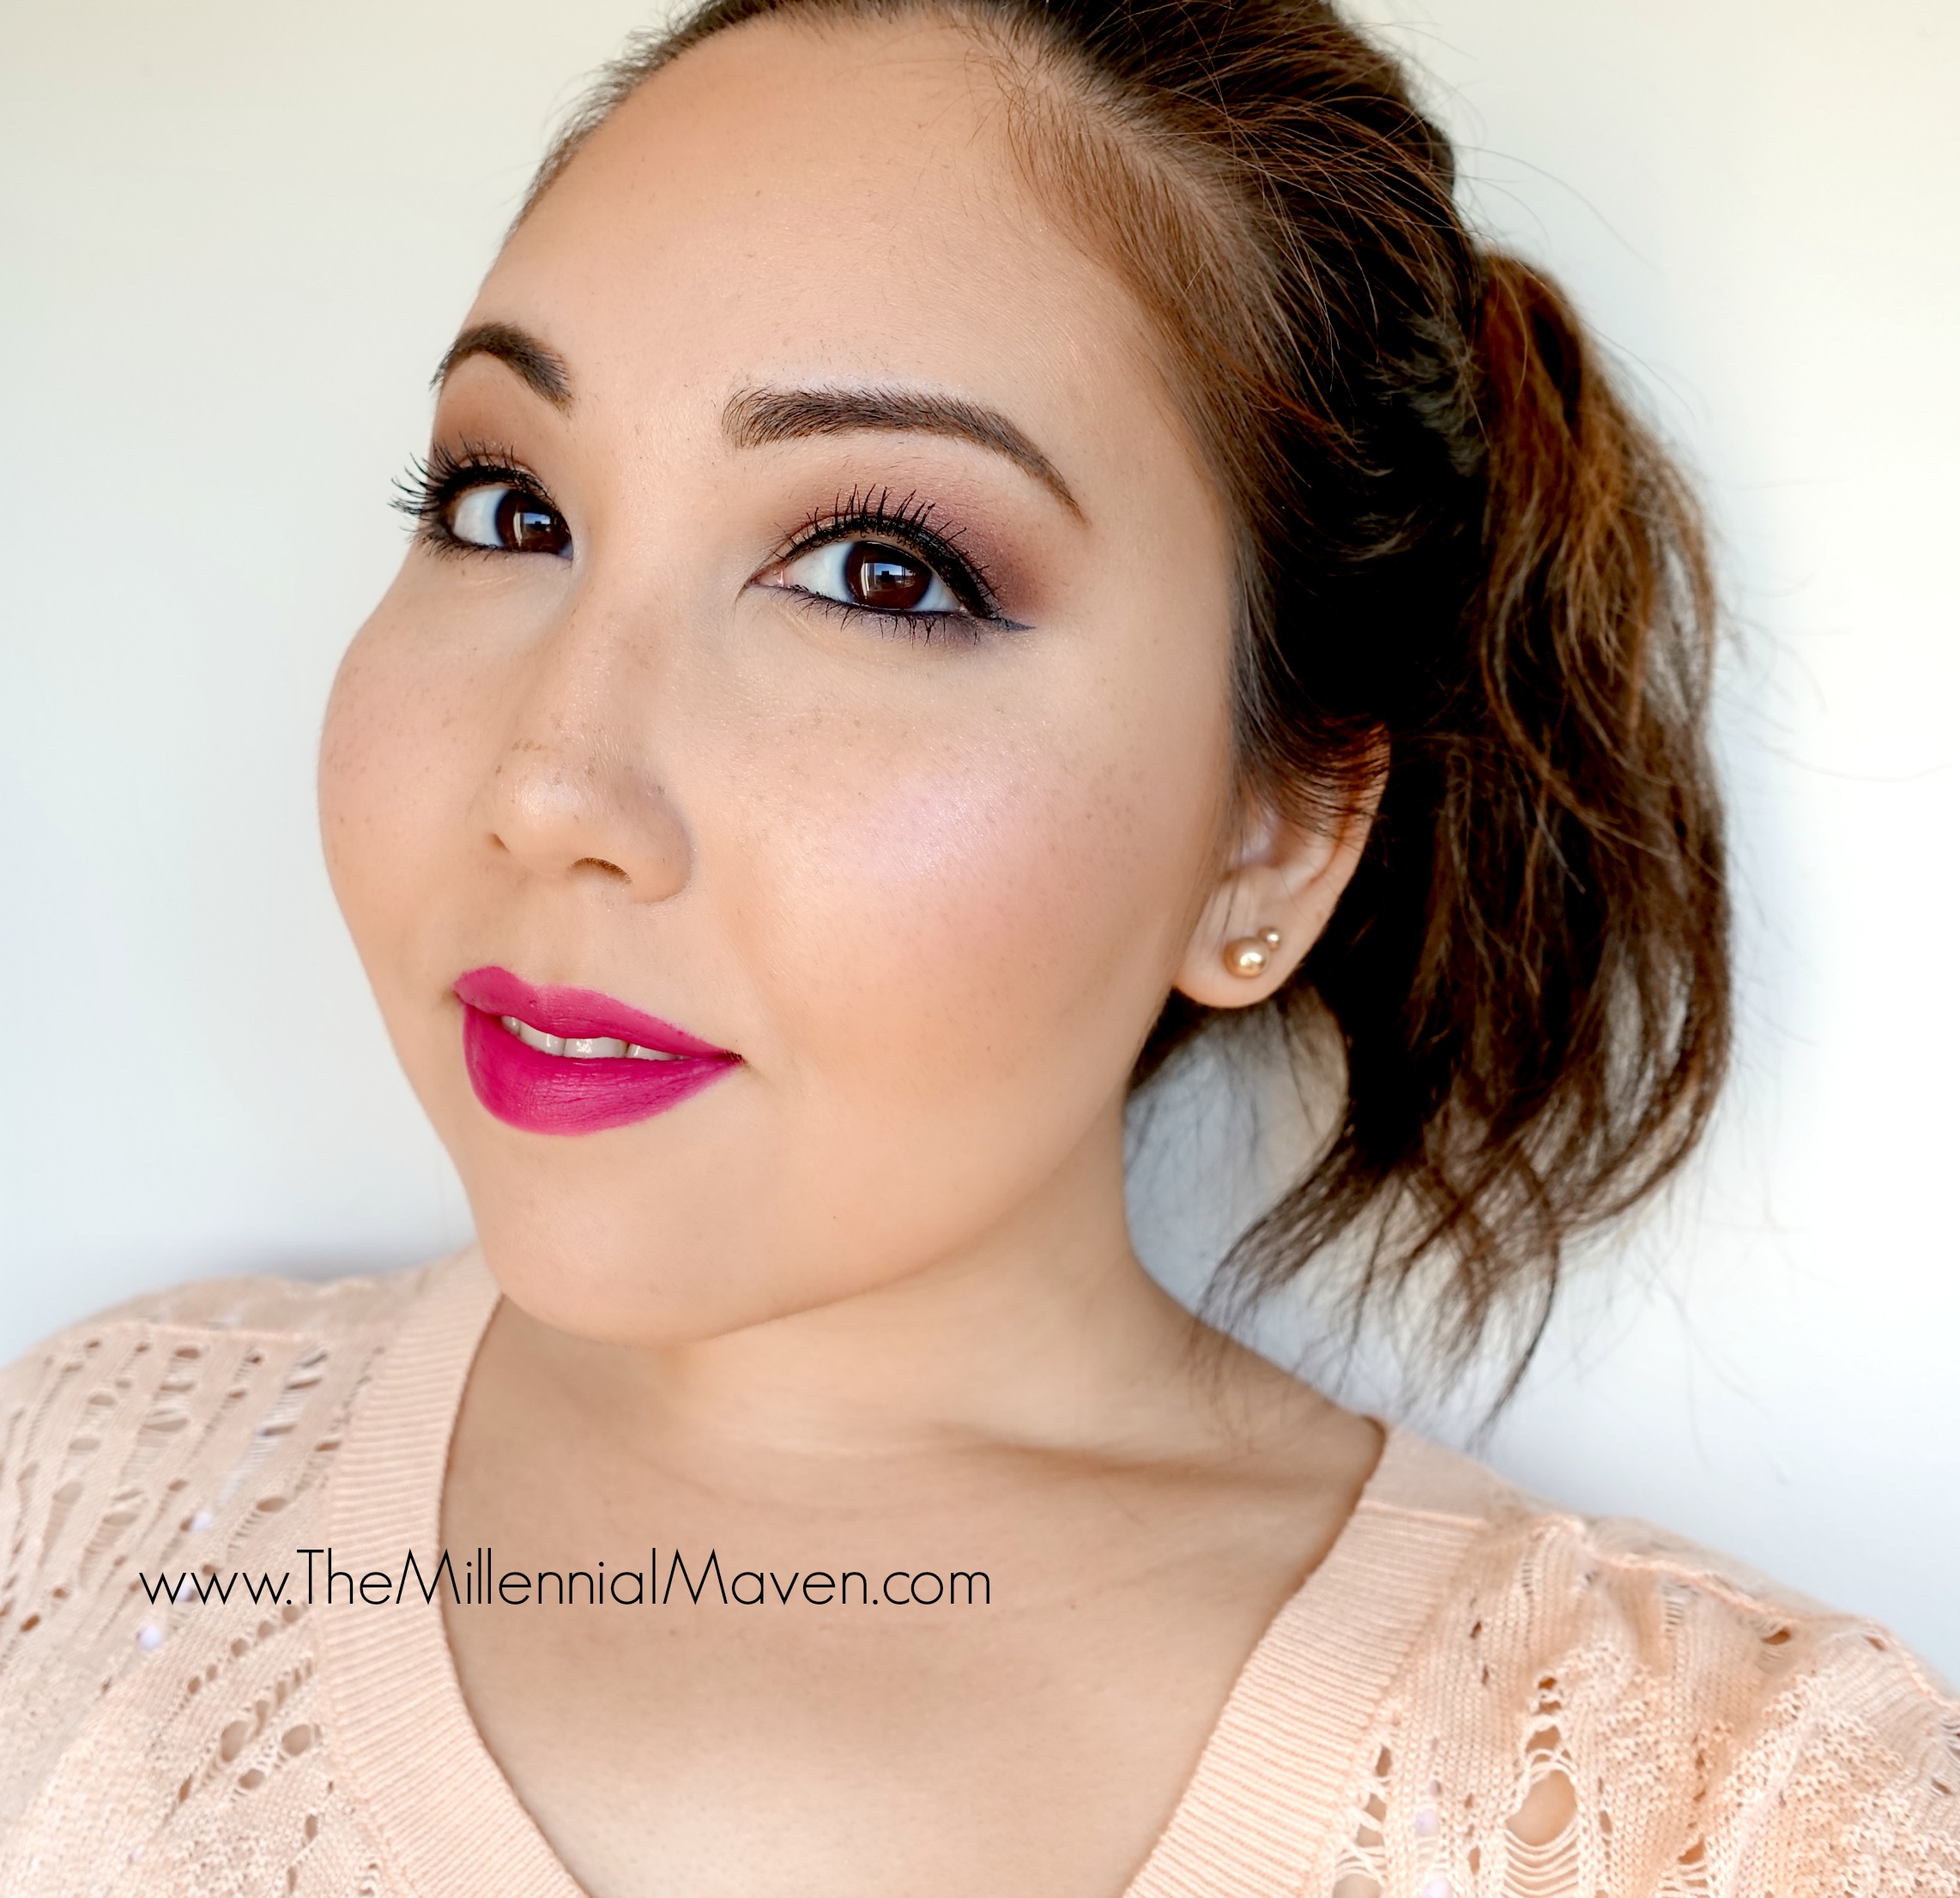
Okay, honestly, I’m not the biggest Valentines’ Day fan; I find it to be one of these consolation holidays that’s like, ‘Well, the real holidays are over, but look, you still have Valentines’ Day.” But, since I love makeup, why not take the ultimate-pink holiday and turn it into a soft, romantic makeup look that I’ll probably be wearing everyday until April… because that’s when I’ll start wearing pastels for Easter.
If you’d like to see how I got this rosy glow on my eyes, cheeks, and lips, click below to keep reading!
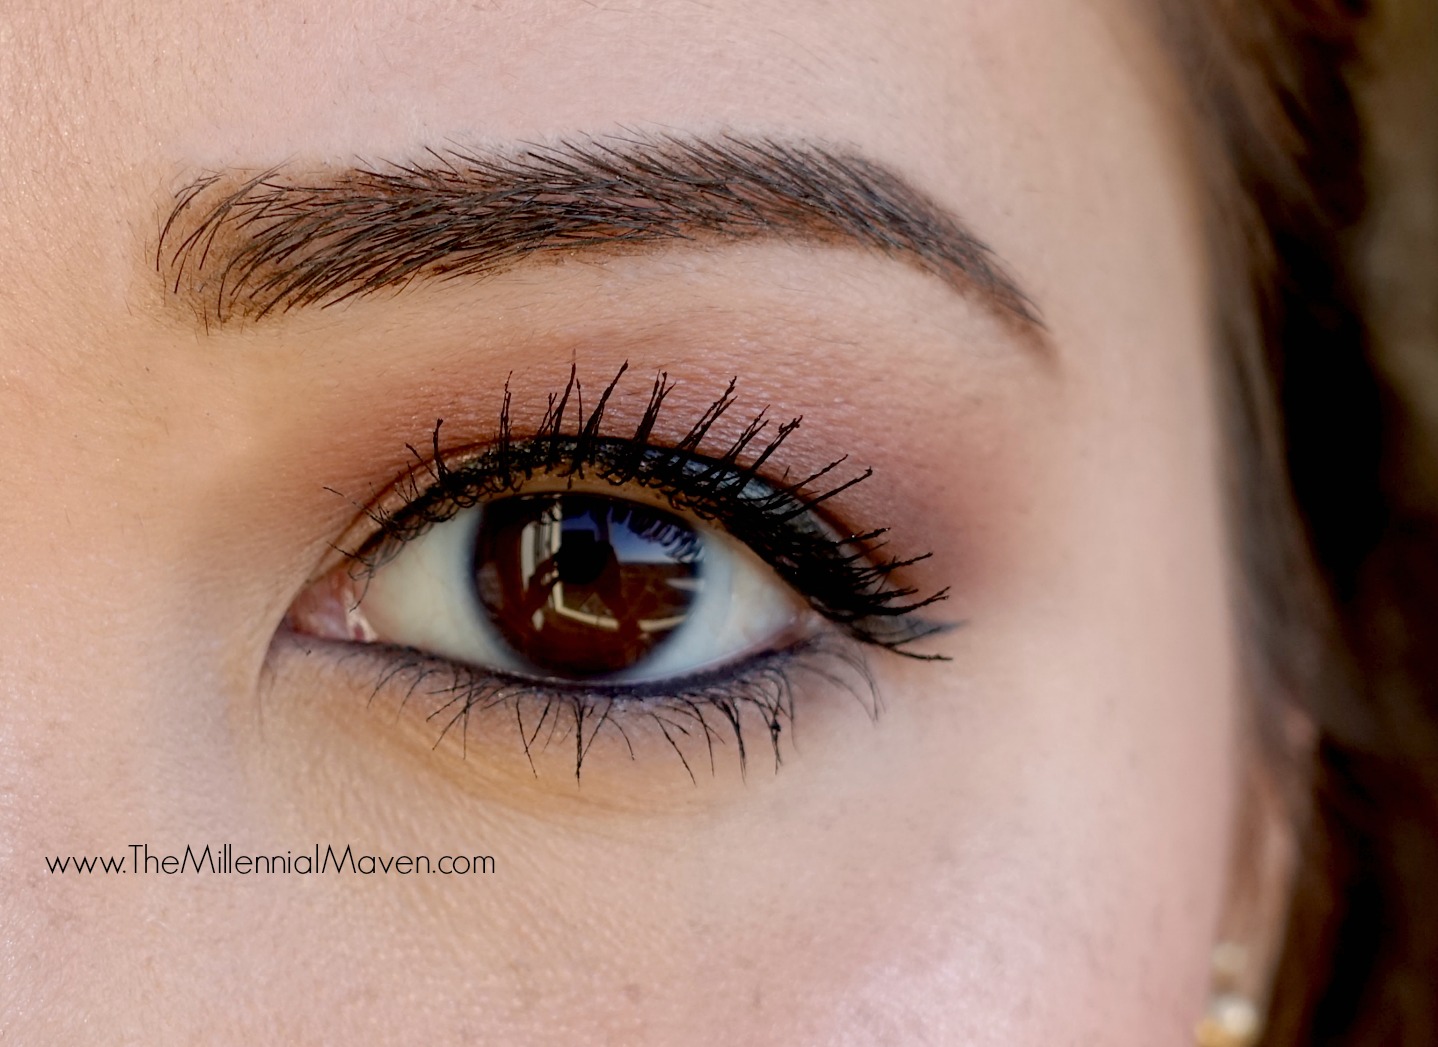
E Y E S
Starting with my eyes, I first primed my lids with my Elizabeth Mott Thank Me Later Eyeshadow Primer.
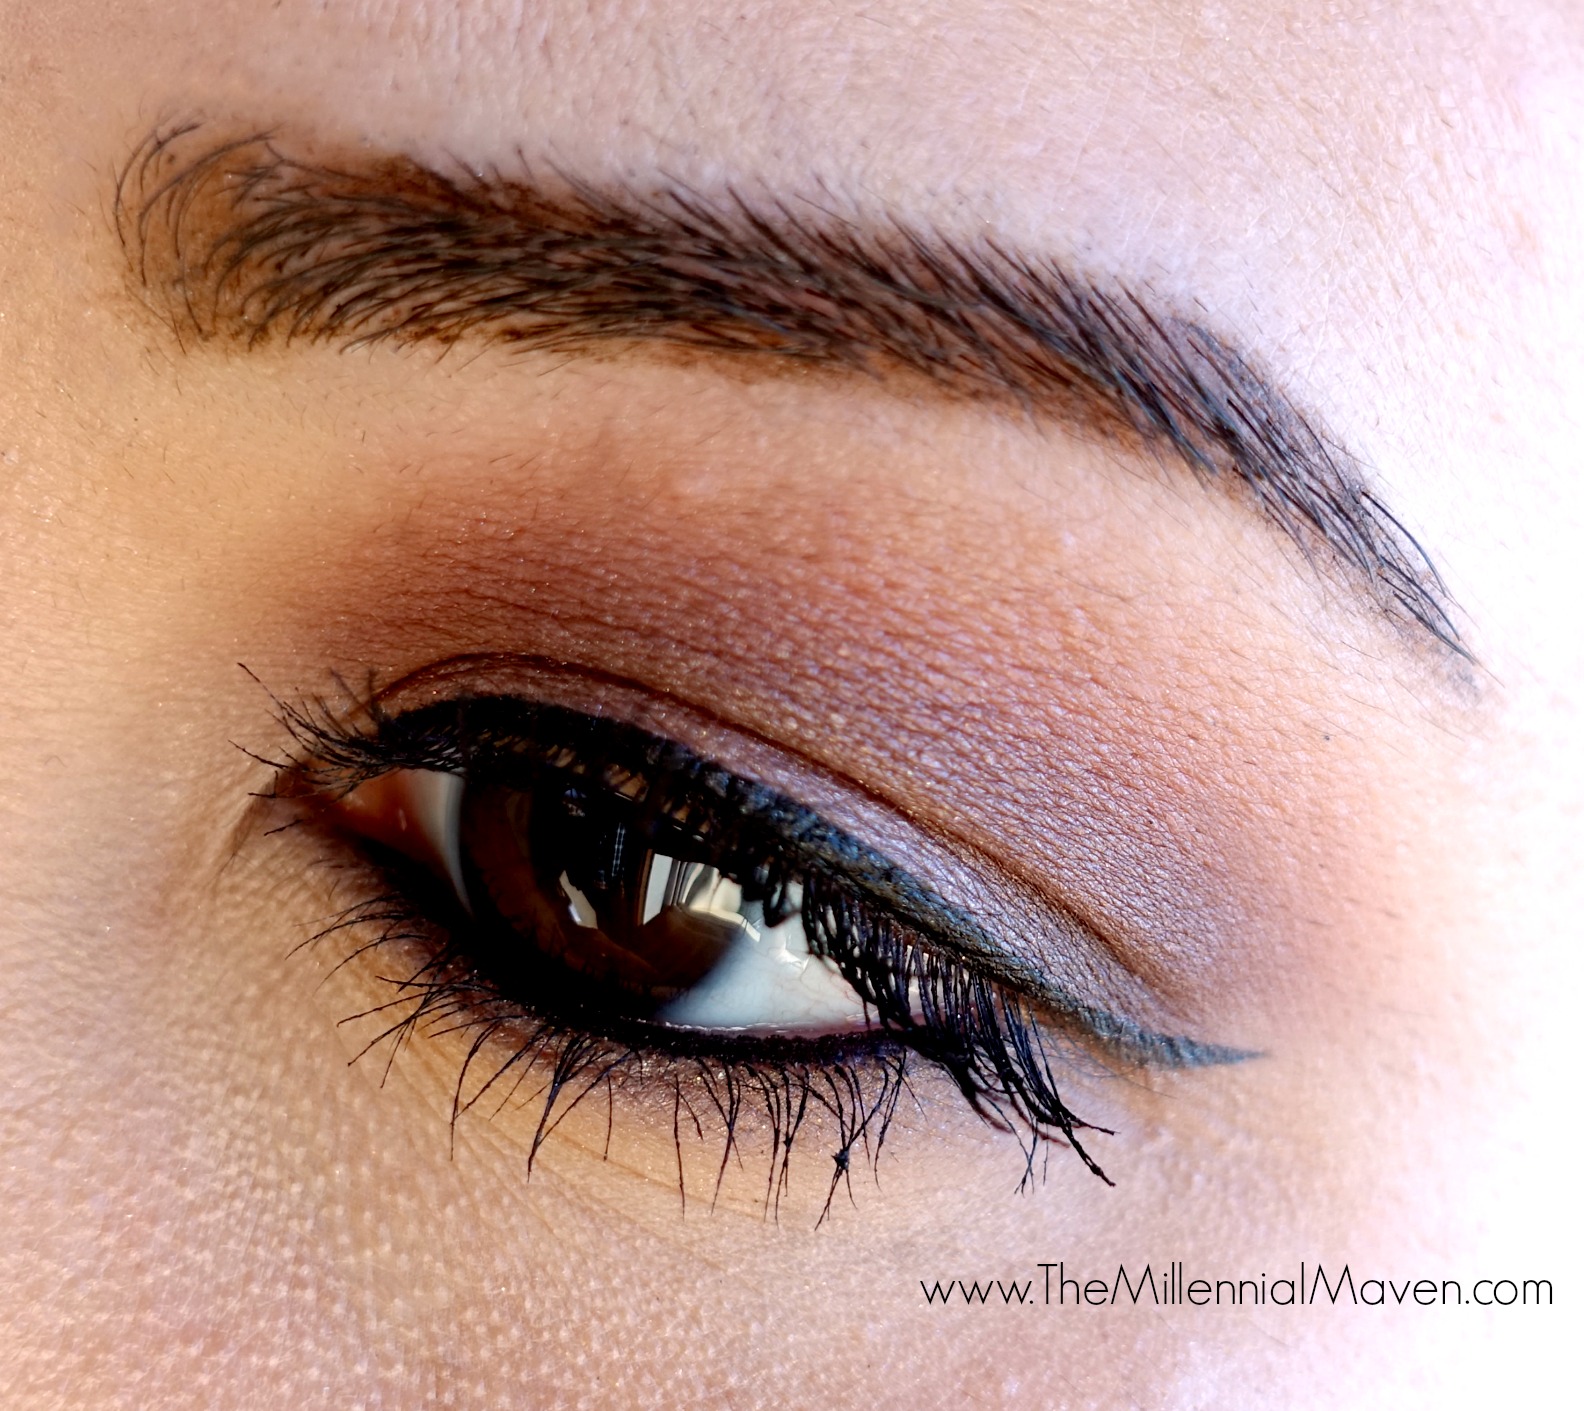
I then went in with my Urban Decay Naked 3 Palette, and used the shade Limit all over my crease. I was not careful at all with this one, as I blended it everywhere, and in every which direction. Next, I used Nooner to in my crease, slightly lower than Limit, and also in the outer corner. I dipped my brush very lightly into these colors, so I was able to get a very blown-out effect without worrying about getting too much color where I didn’t want it.
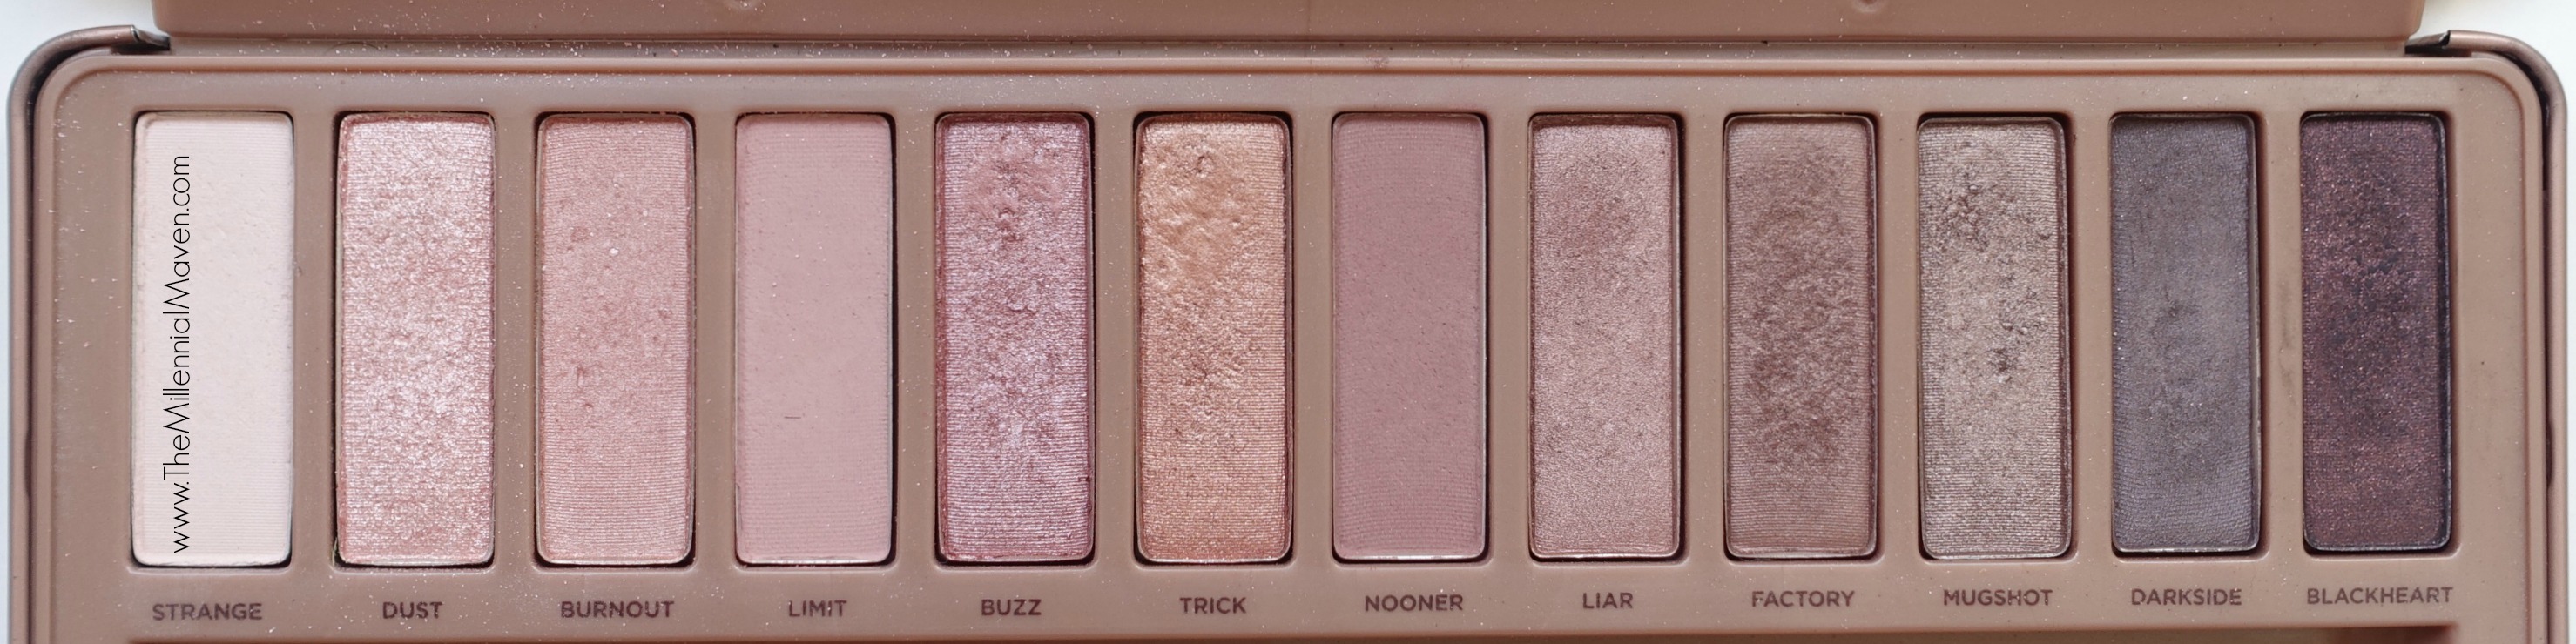
Once that was done, I applied Trick all over my lid. This color is different from all the rest, so it really stands out and makes your lids pop. If you don’t have hooded eyes, this will show up better on you than it does on me. To deepen things up, I picked up a bit of Mugshot on a medium pencil brush and placed that on the outer 1/3 of my eyelid, and blended it up slightly into the crease. I didn’t want the eyes to look too defined and harsh, so I kept the color only in the outer half of the crease.
To add a bit more dimension, I used Darkside on a very small flat shader brush to deepen the outer corner just a little bit. I was careful to not spread this color too far inward onto the lid, or up into the crease. I’ve noticed that these shadows have a tendency to become muddy if you over blend them.
To draw my wing, I used Kat Von D Tattoo Liner in Trooper, like I always do. (Tune in next week for a tutorial on how I apply my wings on hooded eyes.)
I leave my eyes at that while I go and work on the rest of my face, and then I finish them off after.

F A C E
I wanted a very natural, glowy, yet defined look for the face. In order to get the look without looking like I piled on the face makeup, I decided to go with a cream contour under a powder foundation, which is something I never do.
I started by applying E.l.f. Poreless Face Primer to make sure everything was nice and smooth. To start my contour, I applied stripes of E.l.f. Contouring Blush and Bronzing Cream in St. Lucia (the bronzing shade) to the hollows of my cheekbones, the perimeter of my forehead, and little down the sides of my nose and under my chin. I blended this out with a foundation buffing brush. I find that using a slightly slippery primer like the E.l.f. one really helps to make things blend better when you are using a dark contour cream on bare skin.
Once that was reasonably blended, I applied my Make Up For Ever Ultra HD Concealer to disguise my under eye dark circles, and to highlight the high points of my face. Since I have a huge forehead, I apply my highlight only between my eyebrows, then I blend it upward a little bit. I also applied a stripe down my nose to balance the nose contour, and then a bit in my smile-line area, and on my chin. To blend, I used a smaller powder blending brush.
Now that the base was on, I went over everything with a thin layer of MAC Mineralize Loose Powder Foundation to even everything out and add coverage in areas that weren’t covered well with the contour or highlighting products.
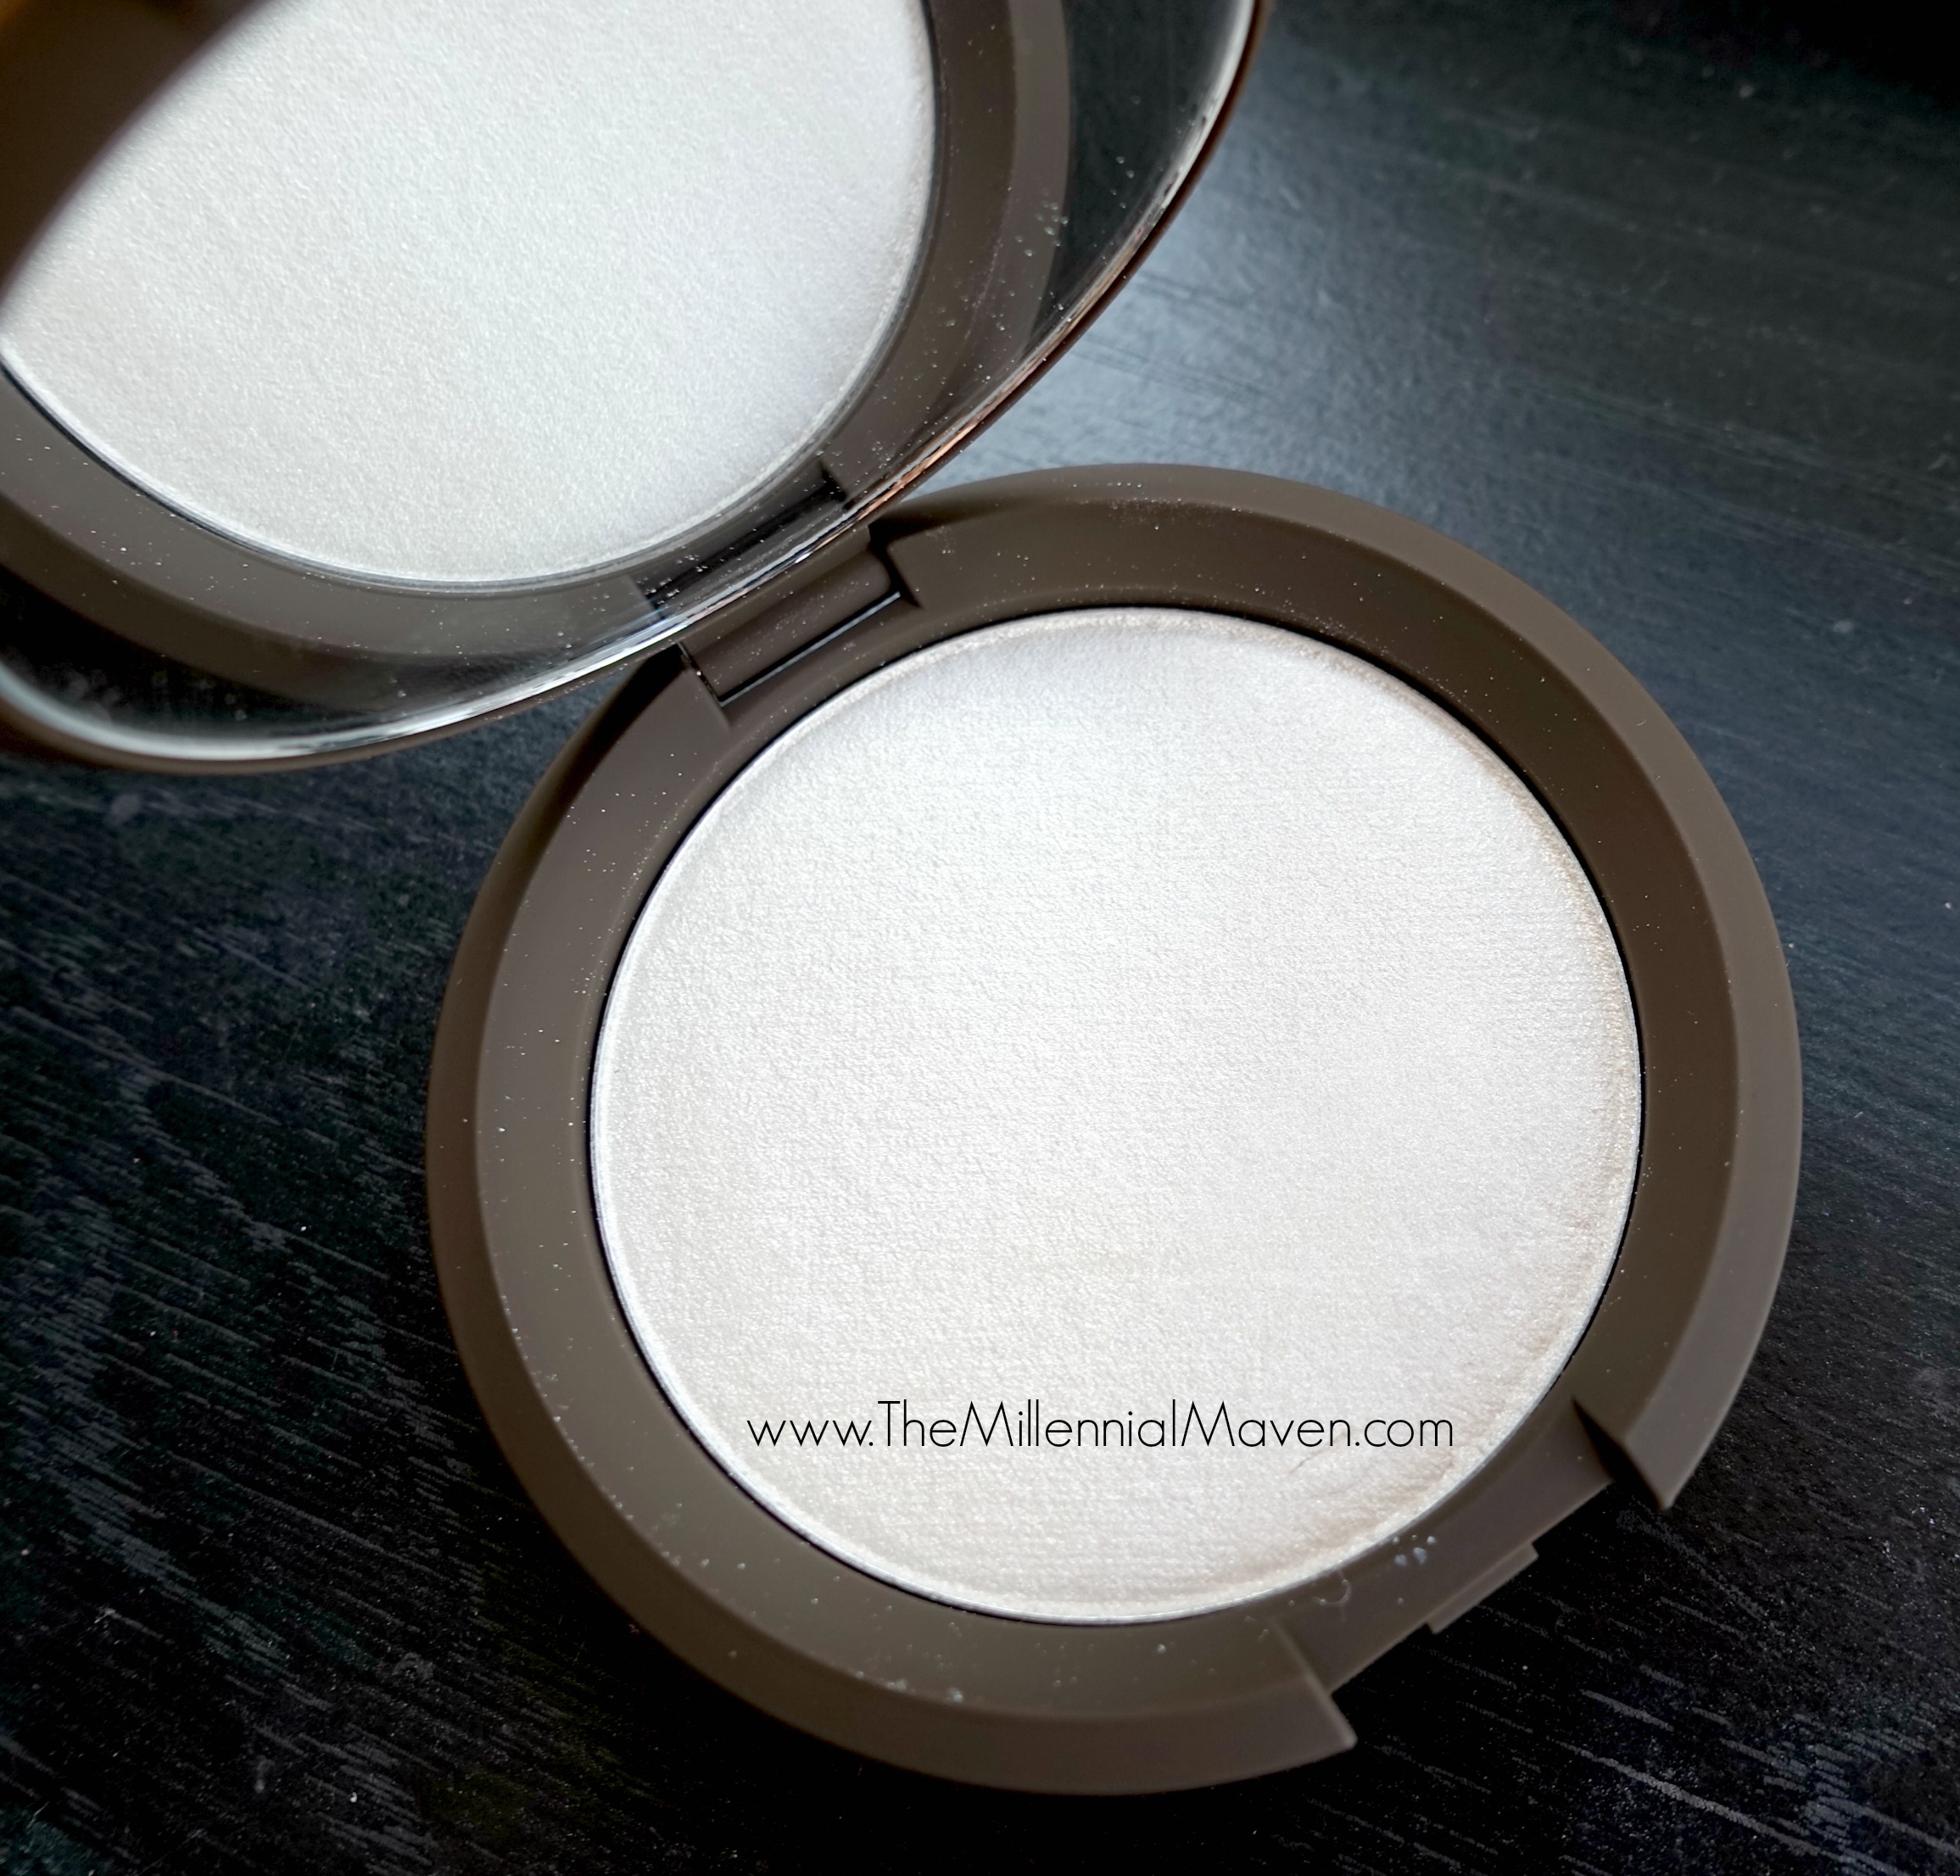
To finish off the face, I used my Pixi Bronzer in Summertime to warm up the face where I usually apply bronzer, and rosied up my cheeks with Milani Baked Blush in Dolce Pink. Finally, I went with the new Becca Shimmering Skin Perfector in Pearl to give my cheekbones an ethereal glow.
Going back to my eyes, I lined my lower waterline with Sephora Retractable Eyeliner in Black, and then blended Mugshot along most of my lower lash line, almost to the inner corner. I then used Limit to soften the line. To finish the look, I used Strange for my brow bone and inner corner highlight, topped the lashes with Urban Decay Perversion Mascara.
For my brows, I used my Maybelline Define + Fill Duo in Soft Brown. I wanted a somewhat softer brow to go with this look, so I went with a lighter color that I usually would.
L I P S
Can’t forget the lips! You may recognize these lips from my previous post on the L’Oréal Pro-Matte Glosses. I really do love those things, and if you’d like to learn more, check out that post HERE. For this look, I am wearing the shade Forbidden Kiss. It’s almost like a convertible lip product; you can apply it and wear it as-is, which is a semi-glossy finish, or do as I did and blot off the excess on a tissue to achieve the matte-stained look in total comfort.
This look is perfect for Valentines’ Day, as it is soft and natural, but it still looks like your put some effort into your look. I almost never do a cream contour or powder foundation separately, let alone together, but i love the way it turned out so much in this look, I think it’s going to be my new favorite thing!
That’s all for now!
If your found this post, informative, interesting, or just plain entertaining, please write me a comment below, and share this post with your friends.
Till next time.
Sign up for my free monthly e-journal, The Millennial Maven Love Letters for exclusive content + millennial inspiration and lifestyle hacks. Plus get instant access to my library of on-the-go style downloads!
FTC- This post is not sponsored by any of the brands mentioned. I purchased all products myself. All opinions are my own.
Leave a Reply