This post contains affiliate links. To learn more, hop over to our Disclosure page.
So, you’re curious about how to highlight the right way. As if there is a wrong way?
Highlighting your face is the art of putting your best features on display. Think of it like putting your best foot forward at an interview or first meeting. Today I’m showing you how I do it and how you can do it too, whether you’ve got a chunk of time to spare, or hardly any at all!
Just a little disclaimer– Of course you can do whatever your heart desires when it comes to makeup. Makeup is fun, it’s creative, and it’s not permanent, so there is absolutely no shame in trying out new things.
If you want to learn how to highlight in ways that puts your best features forward, keep on reading!
My Top Highlighting Products
Keep on the lookout for these products throughout the post! I’ll be showing you exactly how I use them and why I love them so much.
Hourglass Ambient Lighting Palette >> [Sephora]
Sephora Collection Bright Future Gel Serum Concealer >> [Sephora]
Maybelline Instant Age Rewind Eraser >> [Ulta] [Amazon]
Laura Mercier Secret Brightening Powder >> [Sephora]
E.l.f. High Definition Powder >> [E.l.f. Cosmetics] [Amazon]
Why Highlight?
Highlight is more than just adding light spots to your face, it adds dimension and brings out your best features. Heaven knows I need both.
When combined with contouring (darkening certain areas of the face,) it’s possible to give yourself a completely different look. If you’ve ever seen those celebrity transformation makeup looks, then you’ve seen the magic of highlighting and contouring. (Contouring is a whole ‘nother post, so we’ll put that on hold for now.)
Now, suppose you like your face, (and I sincerely hope you do.) You can highlight too! You’ll just highlight your best attributes, rather than imitating somebody else’s best attributes.
In a nutshell, you’ll just look more put together, even if you’re not wearing a full face of makeup. Doesn’t that sound great? Of course it does.
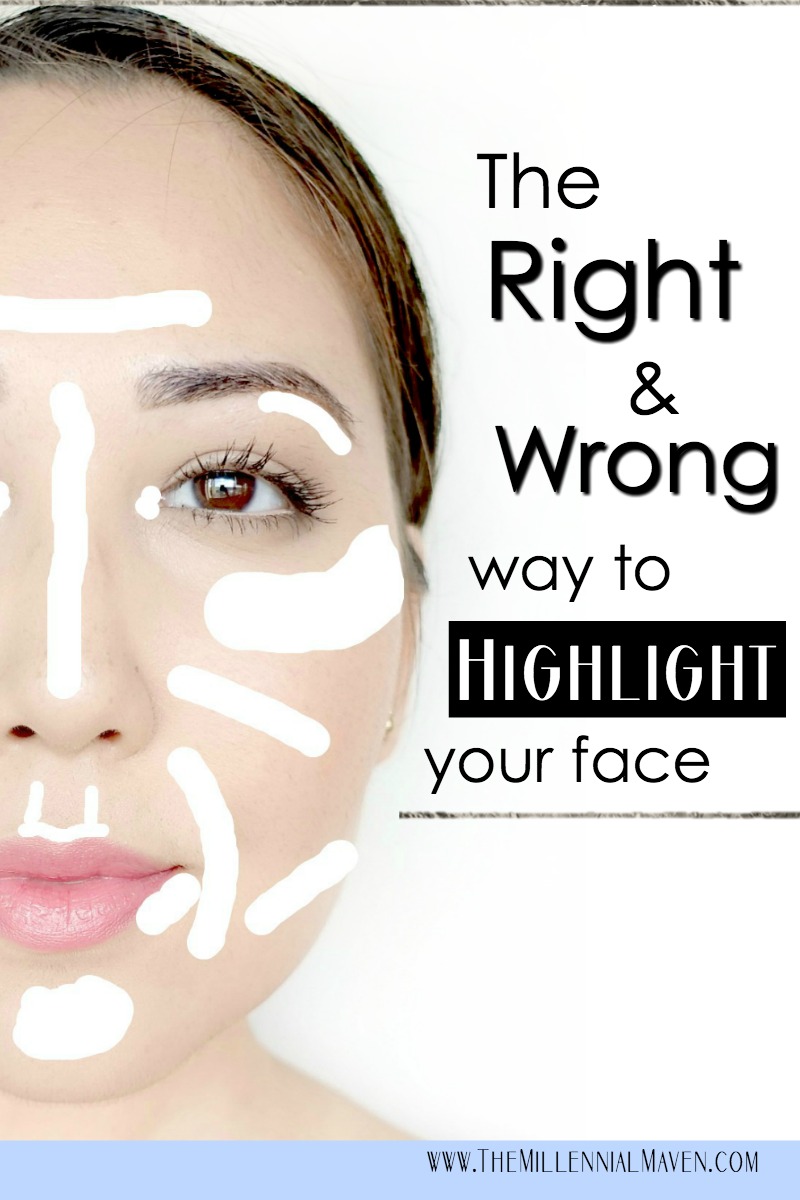
How to Highlight the Right Way
Highlighting is all about subtly, unless of course, you are doing a transformation, then by all means, paint away.
You want your highlights to be barely visible. They should be just bold enough so that they make a difference in your overall look, without being so obvious where people can fill in a face chart documenting your highlight placement.
Avoid These Mistakes – How NOT to Highlight
These are some common mistakes I see people making when highlighting. While they aren’t absolutely bad, you could be missing out on your best look by making these mistakes.
>> Mistake #1: Highlighting only your cheekbones and nose.
I’m not saying you shouldn’t highlight these areas, but plenty of other areas on your face deserve love too! Keep this in mind, and we’ll get into just where you should also be highlighting in a bit.
>> Mistake #2: Not highlighting strategically for your face.
Everybody’s faces are clearly not the same, so why should we be highlighting the same? In order to get your best look, it’s important that you take a hard look at your features and think about what you want to bring forward and what you want to send back into the shadows, (literally!)
>> Mistake #3: Only using sparkly, powdered highlighters.
There is a huge difference between adding sparkle to your face, versus bringing light to your best features. Sparkle has it’s place, but it’s not the only component in a great highlighting routine.
The problem with trendy “highlighters”
Now, I’m not saying that those beautiful, ultra-sparkly powder highlighters aren’t great, because they are. I myself own a ton of them.
But they are misleading makeup users into thinking “highlighting” is achieved with sparkle alone. As if matte products don’t make the cut.
While adding a touch of sparkly highlighting powder gives your face a beautiful glow, you can’t possibly use it in all the places you should be highlighting. If you did, it would be way too much and you’ll end up looking like a disco ball.
So what’s a girl to do?
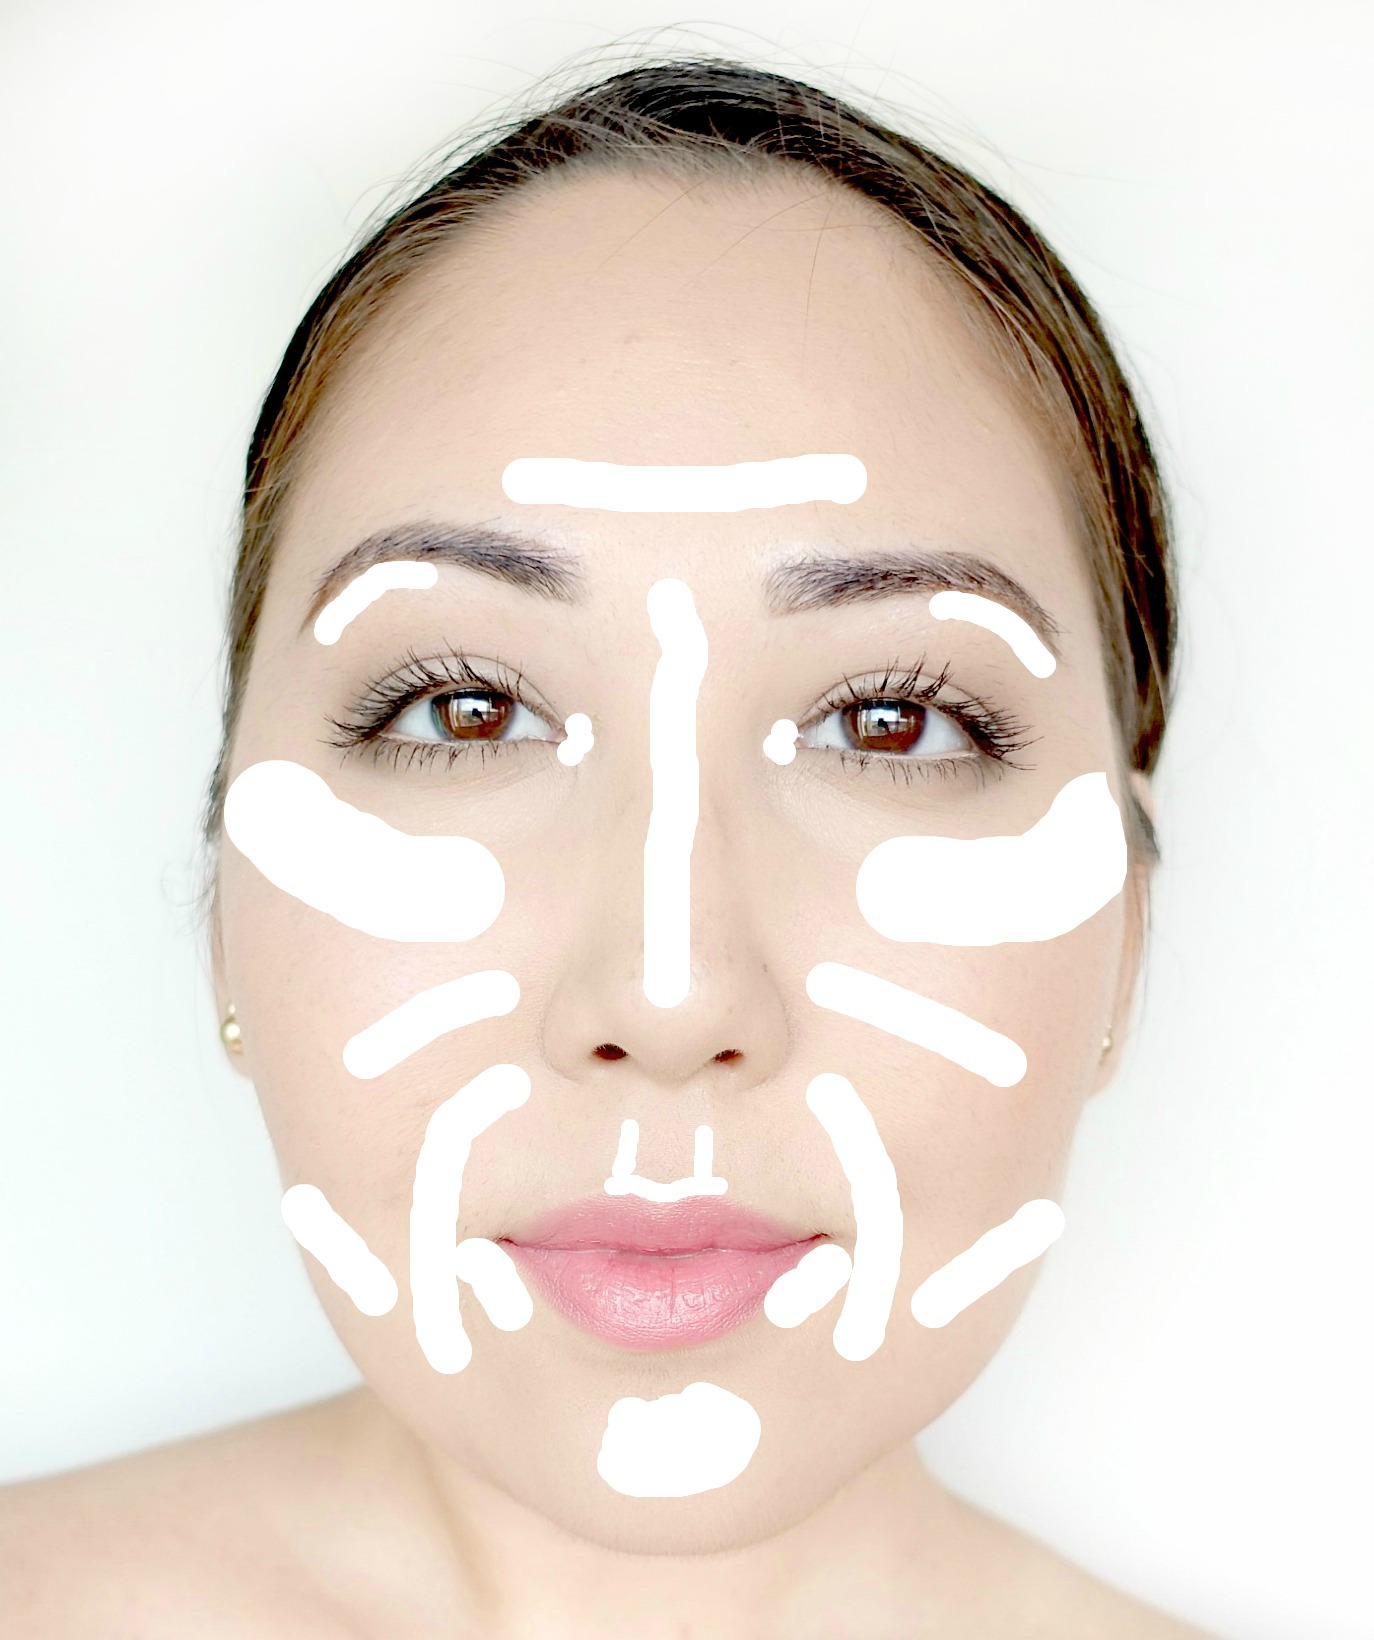
How to find where YOU should be highlighting
Imagine dividing your face into 5 zones- Cheeks, Eyes, Nose, Mouth, and Forehead & Chin. This makes it much more manageable when deciding what areas you want to highlight.
Cheeks
Let’s just all assume we’re going to highlight our cheekbones. Take a look at your lower cheek above your jaw, and the areas on either side of your nose. If the areas stand out on their own, then there’s no need to highlight. However, if either area dips, or casts shadows, then they may be places you might want to highlight.
Eyes
Like the cheekbones, we’ll all start by highlighting our brow bones, just under the brow, and our inner corners near the tear ducts. Make your eyes look as lifted as possible by highlighting beneath any area the droops down. For example, if you have downturned eyes, place a highlight just below the outer corner to give the eyes an instant lift.
Nose
The same nose highlights look very different on various nose shapes. If you want to make your nose look shorter, avoid taking the highlight all the way to the tip, and instead focus on the bridge of your nose. Likewise, if you aren’t a fan of the area between your eyes, avoid highlighting the area, and contour it instead.
Mouth
Many of us want to make our lips look fuller and the corners of our mouths look less downturned. Everybody knows to highlight their cupid’s bow, but you can also softly highlight the little ridges the lead up to your nose. This brings attention to the 3-dimentional-ness of the area, making it stand out more and look less flat. Just like we did on the eyes, highlight just below the outer corner of the lips to give a subtle lift.
Forehead & Chin
It’s all about size here. If you’ve got a huge forehead like me, you probably want to shrink it a bit. But that doesn’t mean you shouldn’t highlight. You want to avoid looking off-balance, after all. Highlight the area just above the center of your eyebrows. It will bring brightness to your eyes without drawing attention to your forehead.
For your chin, highlight the center if your chin is small compared to your forehead (like mine.) Skip highlighting if it is on the larger side.
A few helpful tips
>> Tip #1: You don’t need a “Highlighting & Contouring” palette.
These things have been all the rage recently. Every brand has one. Some brands even sell powder and cream versions.
Here’s the deal. Unless you are working on clients, you don’t need all the variety. Not to mention, you’re totally limiting yourself to some not-so-perfect matches if you can only use the highlight shades that come with the ever-popular contour shades.
Purchase your ideal products separately instead.
>> Tip #2: Look for the sheerest products possible.
Highlighting is something you definitely don’t want to go overboard with, lest you end up looking like my stripy demonstration photo above.
“Unpigmented” is pretty much the most repulsive word when it comes to makeup, but it’s actually what you want when searching for highlighting products. If a product has a ton of coverage, then it’s not the best for highlighting.
1 Minute Highlighting Routine
When I’m in a hurry but still want to look glowy and gorgeous, this is what I do.
Choose a brightening concealer that will conceal darkness and bring light to the area all in one step. Maybelline Instant Age Rewind Eraser in the Brightener shade is perfect (for my skin tone, at least) because it conceals beautifully, and has a hint of brightening pinkness in the coloration.
Next, use a brightening powder to set your concealer, and add some extra brightness on the center areas of your face. I like Laura Mercier Secret Brightening Powder, cliché, I know. It’s just so good, and it never looks like I’ve added extra powder on top of my makeup.
Finally, blend on a subtle shimmery highlighter than doesn’t require excessive blending. Incandescent from the Hourglass Ambient Lighting Palette is perfect for this. Just sweep it it on your cheekbones and across your nose, and call it a day.
Maybelline Instant Age Rewind Eraser >> [Ulta] [Amazon]
Laura Mercier Secret Brightening Powder >> [Sephora]
Hourglass Ambient Lighting Palette >> [Sephora]
6 Minute Highlighting Routine
If I have a bit more time in the morning, I love a good cream highlight to really bring forward all the precise little areas that are difficult to achieve with just powder.
After applying my foundation and under eye concealer, I’ll go in with my Sephora Collection Bright Future Gel Serum Concealer in the Shade Butter Cream. It’s a lightweight concealer that’s about two shades too light- perfect for brightening. Dot and stripe that in the areas where you want to brighten, (I go for the war-paint pattern depicted above,) and blend it in with a blending sponge.
When doing more of an all-over highlight, you want to be careful to not make yourself look too dewy so you end up looking greasy. To set all of the concealer in place, I use E.l.f. High Definition Powder because it’s super finely milled and lightweight, but it’s a bit more matte than the Laura Mercier Secret Brightening. This way, I don’t feel I look too shiny all over.
Then, I’ll top it off with Incandescent again on my cheekbones and nose.
Sephora Collection Bright Future Gel Serum Concealer >> [Sephora]
E.l.f. High Definition Powder >> [E.l.f. Cosmetics] [Amazon]
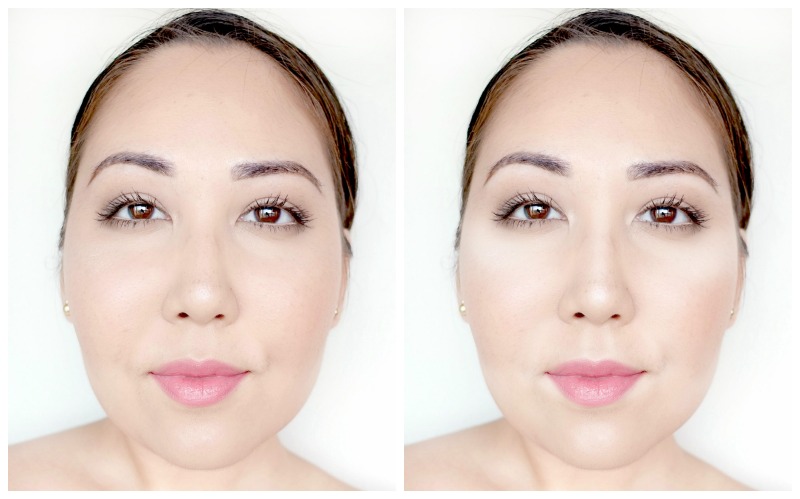
The Results
Clearly, the side-by-side photos above are the exact same picture. I added some digital highlights to the photo on the left so that you can see just how much of a difference highlighting makes.
My face looks slimmer, less flat, and perhaps I’m imagining it, but I think it looks more symmetrical too. And this is without any contouring. Add a bit of strategic contouring and the results will be even more dramatic.
Moral of the story- even if you don’t have time for a full-on contouring job, just a couple of minutes taken highlighting in the morning makes a world of difference. You’ll look so much more awake, and that’ll translate into your readiness to tackle the day.
Now what are your waiting for? Go highlight!
That’s all for today!
If you find this post interesting, informative, or just plain entertaining, tell me about it in the comments below. And don’t forget, sharing is caring. Share this post!
Till next time. ♥︎
Sign up for my free monthly e-journal, The Millennial Maven Love Letters for exclusive content + millennial inspiration and lifestyle hacks. Plus get instant access to my library of on-the-go style downloads!
FTC- Not sponsored by any brands mentioned. I purchase all products myself. All opinions are my own. Some links may be affiliated.
Good tips! This is such a great lesson on everything you’ll ever need to know about highlighting. I love that you included lots of different highlighty products and not just the trendy shimmer powders. Will share!
-Kandi
Thank you so much, Kandi! I’m glad you enjoyed, and thanks for sharing! 🙂 xoxo