This post contains affiliate links. To learn more, hop over to our Disclosure page.
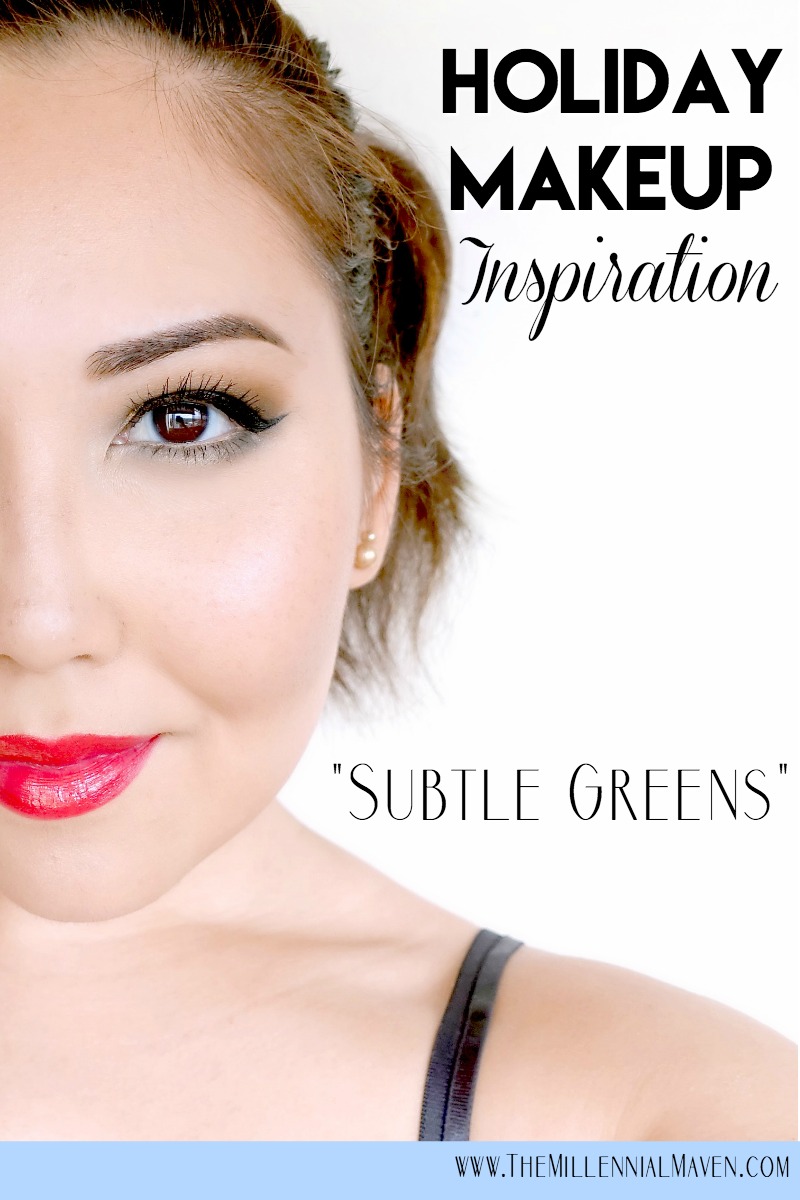
Thanksgiving is over and Christmas is finally upon us, fa la la la la, la la, la la! It’s time for Christmas makeup! Yassss.
With so many holiday parties and gatherings to attend, it gets pretty darn boring doing the same makeup look for every event. The last thing you want is to mindlessly paint on your makeup with no joy in the process. Makeup should be fun, and that’s just sad.
I wanted to create something different, but not so wild that I’d feel self conscious wearing it. Whether you’re are heading to a work party in a professional-type setting, or a dinner with family and friends, I wanted the look to embody the festiveness that we’ve come to imagine from Christmas makeup. But without looking like a glitter ball of red and green tackiness.
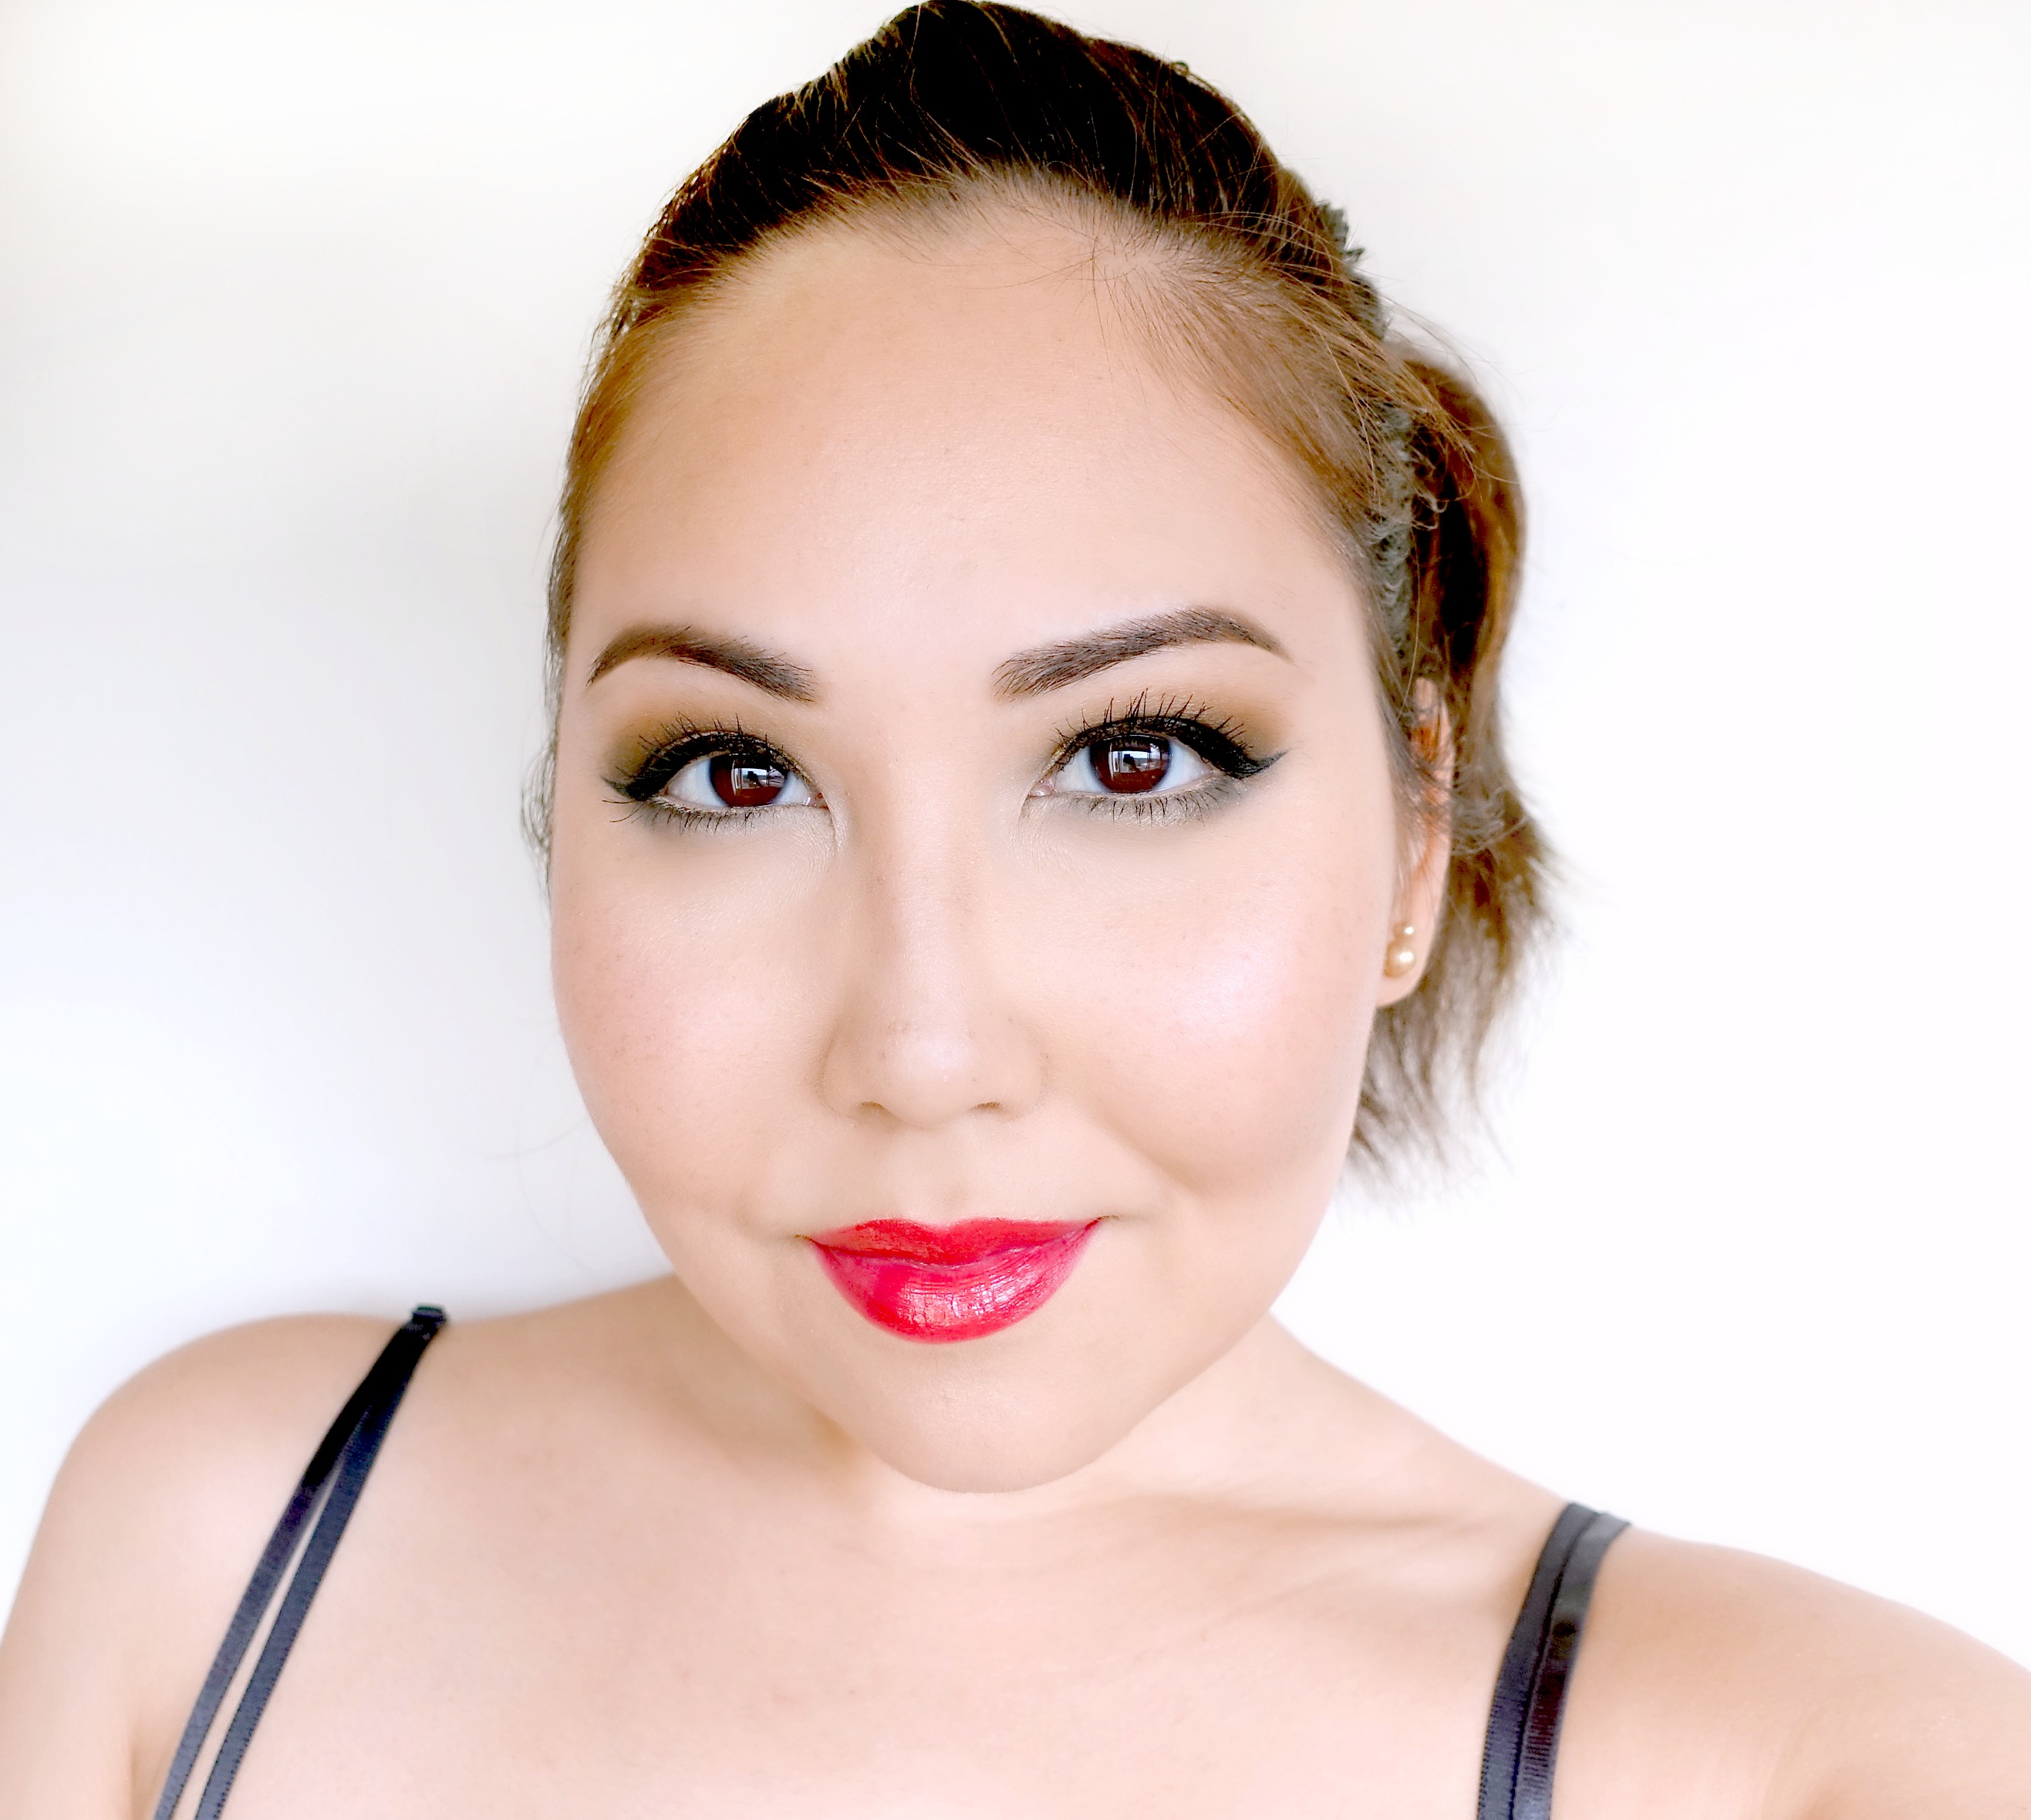
Trust me, this girl loves her bedazzled eyes, but there is a time and place for all the glitter. This look uses olive greens and gold on the eye and an orangy red on the lips to achieve a “Christmas colors” look without looking like you borrowed your makeup from Mrs. Clause.
If you’d like to have a closer look at my eye makeup, and read all about the products I used to create this look, then read on!
Starting with the eyes
As usual, I start with my eyes so I don’t have to worry about cleaning up fallout off my foundation later. The colors used in this Christmas makeup look aren’t super intense, but I’m quite a messy makeup applier, so this way works best for me.
Maybelline Brow Define + Fill Duo in Soft Brown >> Purchase on Amazon
Anastasia Clear Brow Gel >> Purchase at Sephora
Nars Pro-Prime Smudgeproof Eyeshadow Base >> Purchase at Sephora
E.l.f Smudge Pot in Gotta Glow >> Purchase at Elfcosmetics.com
Coastal Scents Hot Pots in Persian Peach and Olivewood >> Purchase Olivewood, Persian Peach
Lorac Mega Pro 2 Palette in Forest, Gold Leaf, Black, Custard >> No longer available
Kat Von D Tattoo Liner in Trooper >> Purchase at Sephora
Rimmel Exaggerate Eye Definer in In the Nude >> Purchase on Amazon
Physicians Formula Shimmer Strips Eyeliner Trio in Nude Eyes Brown >> Purchase on Amazon
Urban Decay Perversion Mascara >> Purchase at Sephora
Fill in those brows
I first fill in my eyebrows with Maybelline Brow Define + Fill Duo in Soft Brown. Of course, use whatever color works for you. (Actually, I regret going with this color, as I wish my brows looked darker and more defined for this look, but there’s always next time.) Set with Anastasia Clear Brow Gel.

Apply eyeshadow base + set
Next I prime my lids with Nars Pro-Prime Smudgeproof Eyeshadow Base to make sure my oily lids don’t gobble up my shadow by evening’s end.
For more info on the wonders of eyeshadow primer, I’ve got a full post on the topic right here >> The Ultimate Beginner’s Guide to Makeup Primers
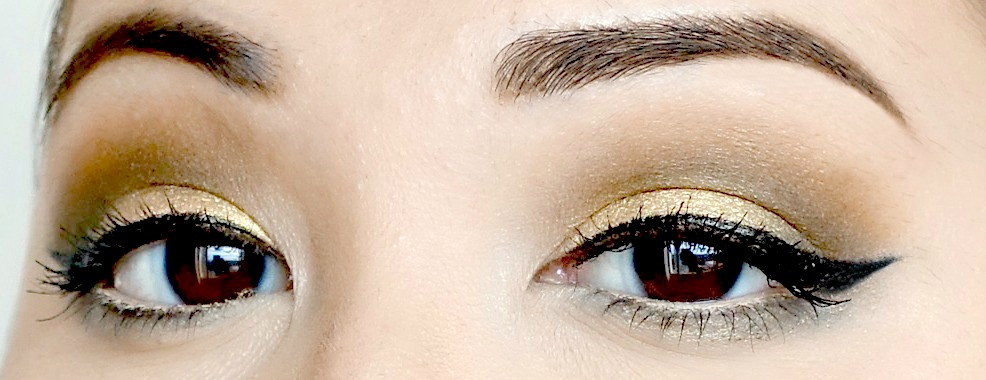
Then using a fluffy brush, I start applying Coastal Scents Hot Pot in Persian Peach to the entire upper crease area. This color is slightly darker and slightly warmer than my skin tone, and it makes a beautiful transition shade where I don’t want the color standing out too much. Feel free to substitute this color for something that’s close to your skin tone.
Don’t be shy with this color.
Begin defining the crease
Using the same brush, I pick up Coastal Scents Hot Pot in Olivewood and apply that in the crease, basically right over Persian Peach, but not blending it up as high. You just want some subtle definition to start. Don’t worry, we’ve got plenty of time for darkness later.
Try to keep the color off the lid area as much as possible to avoid muddying up the colors.
For an in-depth review and full run-down on my large collection of Coastal Scents Hot Pots, click here >> Coastal Scents Hot Pots Review + Swatches
Make your lids stand out and shine
Dip a flat shader brush (synthetic works best) into E.l.f. Gotta Glow and spread the cream shadow across the lid, being careful to stay just below the crease.
This provides a great tacky base that really intensifies gold shadow I put on top, and not to mention it helps the gold stick vibrantly to your eyes all night. Likewise, the tackiness can make the crease hard to blend if it goes too far up, so just be aware of that.
With the same brush, pack Gold Leaf from the Lorac Mega Pro 2 palette over the entire lid, again, being careful to keep it below the crease.
Give the crease even more definition
Use a bit of Forest from Lorac Mega Pro 2 on a medium sized pencil brush to transition between Gold Leaf and Olivewood. Concentrate the color on the outer half of the crease, and blend up and out slightly. Only blend Forest upward into Olivewood, not down over the gold.
Dip the same brush into Black and smudge it in the outer corner of your eye, making it as intense (or soft) as you’d like.
Go back in with Olivewood on your fluffy brush if necessary to soften any harsh lines.
Now is a good time to go and work on your face makeup. I’ll meet you back here when you’re finished! Scroll down to see specifically what I did for this look.
It’s time for wings + liner
Next, apply winged liner using Kat Von D Tattoo Liner in Trooper.
For a pop of brightness, line the lower waterline using Rimmel Exaggerate Waterproof Liner in In the Nude.
Smudge Forest across the lower lash line, stopping just shy of the inner corner. Then, pick up a small amount of Gold Leaf and blend it just in the center third of your lower lash line, just below the green. These two colors together blend into a super pretty sea-foamy green shade that complements the look nicely.
This makes your eyes look bigger and rounder.
The finishing touches
Finally, apply Custard to highlight the brow bone and inner corners. I prefer using a matte highlight shade when the lid colors are shimmery, but it’s really up to you.
Top off the look with your favorite mascara. Christmas makeup is all about the big, fluttery lashes. I like Urban Decay Perversion Mascara in Black.
Smashbox Photo Finish Primer >> Purchase at Sephora
Too Faced Born This Way Foundation in Warm Nude >> Purchase at Sephora
Maybelline Fit Me Concealer in 20 Sand >> Purchase on Amazon
L’Oréal True Match Super Blendable Powder in W2 >> Purchase on Amazon
Urban Decay Naked Skin Powder in Medium Light Warm >> Purchase at Sephora
Benefit Hoola Bronzer >> Purchase at Sephora
Sephora Colorful Powder in Tranquil >> Purchase at Sephora
E.l.f. Blush Palette in Dark (Bottom right shade) >> Purchase at Elfcosmetics.com
Wet n’ Wild Bronzer in Reserve Your Cabana (highlight) >> Purchase on Amazon
Revlon Ultra HD Lipstick in Gladiolus >> Purchase on Amazon
Moving on to the face
Apply face makeup as usual, including primer, foundation, concealer, and powder.
Using Sephora Colorful Powder in Tranquil, gently contour the cheekbones, nose, jawline, and forehead, if necessary. Then, bronze the face using Benefit Hoola Bronzer.
Add a blush of your choice. I went with a deep red shade that I blended until it’s barely there.
Highlighter is everything during the holidays
To give yourself that holiday sparkle, lightly dip a fluffy face brush into Wet n’ Wild Reserve Your Cabana and dust it all over your face, concentrating on the tops of the cheekbones, the nose, and the area just between and above the eyebrows. This highlighter gives a beautiful allover glow without being too much.
For a super dazzling highlight that’ll kick your Christmas makeup into high gear, use a flat foundation brush to swipe the highlighter over your cheekbones. Just be sure to blend it well!
Cherry red lips make for the perfect cherry on top
For the lips, I used Revlon Ultra HD Lipstick in Gladiolus. It is a orangy red that adds a different spin on “holiday red.”
There you have it, a beautiful Christmas makeup look that will definitely make you stand out. In a good way, of course.
That’s all for today!
Like this Christmas makeup look? You’ll want to check this one out too >> Thanksgiving Makeup Tutorial — “Warm Cranberry”
And while you’re in the Christmasy mood, you might as well get some awesome gift ideas too >> The Best Holiday Gift Guide: Christmas gift ideas for everyone in your life!
If you find this post interesting, informative, or just plain entertaining, tell me about it in the comments below! And don’t forget, sharing is caring. Share this post!
Till next time. ♥︎
Sign up for my free monthly e-journal, The Millennial Maven Love Letters for exclusive content + millennial inspiration and lifestyle hacks. Plus get instant access to my library of on-the-go style downloads!
FTC- This post is not sponsored by any brands mentioned. I purchased all products myself. All opinions are my own. Some links may be affiliated.
Leave a Reply