This post contains affiliate links. To learn more, hop over to our Disclosure page.
When’s a better time to break out an eyeshadow named “Pumpkin Pie?” That’s right, there isn’t.
With Thanksgiving fast approaching, like this week, (eeek!) I venture to guess many of you are on the prowl for a pretty, yet somewhat easy Thanksgiving makeup tutorial that will get you feeling glam and out the door with plenty of time to spare.
I know because that’s exactly what I look for every year. Well, these days anyway. These days, I’ve got grownup-y things to do, so I can’t spend 4 hours playing with makeup like I used to. It’s been a sad reality to swallow, for sure.
Thanksgiving has it’s ups and downs in my book, (stay tuned until the end for a quick little Kay’s Life Story snippet on that,) but the one thing that always makes me feel festive is the warm, cozy, and sweet color palette.
Like, c’mon, does all that orange not remind you of candied yams and fresh cranberry sauce? Mmmm.
Before I run off in search of a Pumpkin Spice Latte and real-life Pumpkin Pastie, let’s get started with this sweet Thanksgiving makeup tutorial!
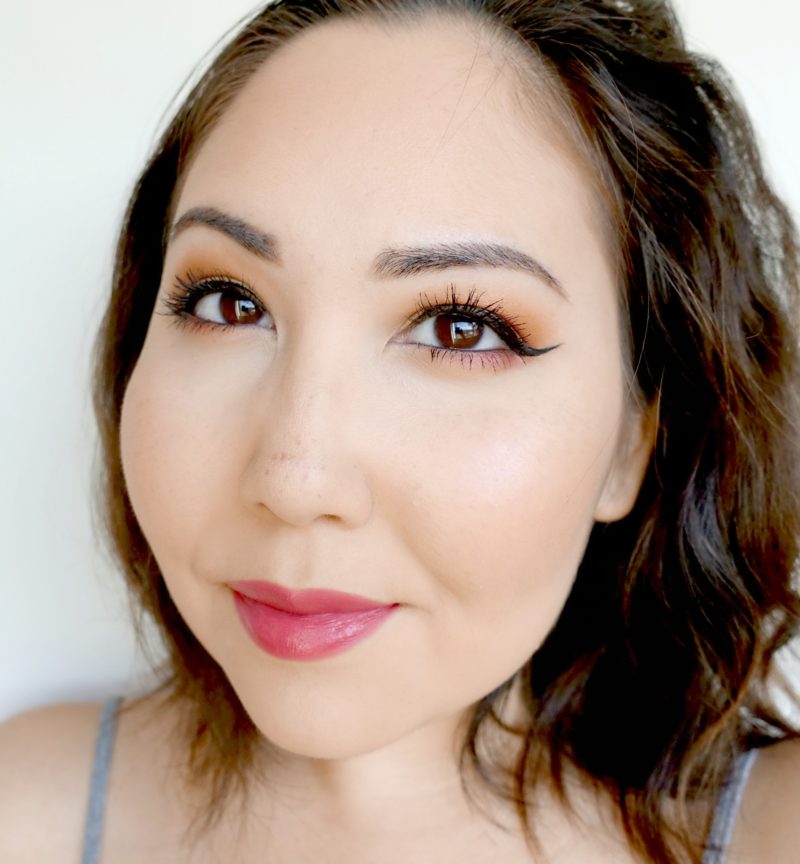
My inspiration for this Thanksgiving makeup tutorial
Pumpkins and cranberries, obviously.
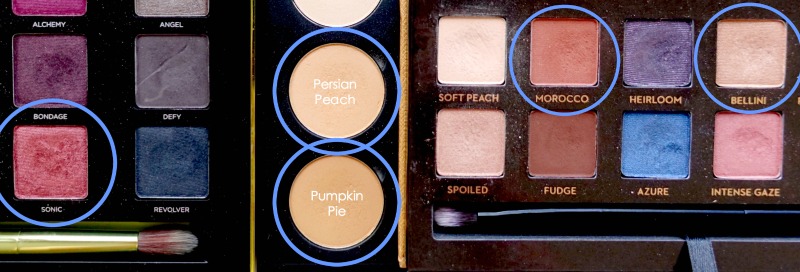
Actually, I happened to be sifting through my palettes, and I came across one I haven’t used in a while- the Anastasia Beverly Hills World Traveler Palette. I took one look at the shade Morocco and I knew I had to use it somehow.
I then went hunting for basically all the warm-toned shadows I could find in my collection. Quite a few turned up, all in different palettes. How convenient.
If you own the Anastasia Beverly Hills Modern Renaissance Palette, now is an awesome time to go and grab it. This Thanksgiving makeup tutorial look comes together beautifully with colors from that palette alone.
But don’t worry, I’ll still let you know what mishmash of shadows I’m using as we go along, just in case you’re curious.
Anastasia Beverly Hills Modern Renaissance Palette >> Purchase at Sephora
Starting with the eyes
Define your eyebrows first; having the ends of your brows defined will help provide a clear boundary of where your shadows should start and stop. If you’d like, just create a basic outline if you don’t want to completely fill in your brows right this moment.
Next, apply your favorite eyeshadow primer set it with a matte eyeshadow roughly matching your skin tone.
My favorite eyeshadow primer is, no surprise, the Nars Pro-Prime Smudgeproof Eyeshadow Base. It’s a must try if you deal with oily lids.
To set, I dusted Persian Peach from Coastal Scents all over my lid.
Nars Pro-Prime Smudgeproof Eyeshadow Base >> Purchase at Sephora
Persian Peach >> Purchase from Coastal Scents
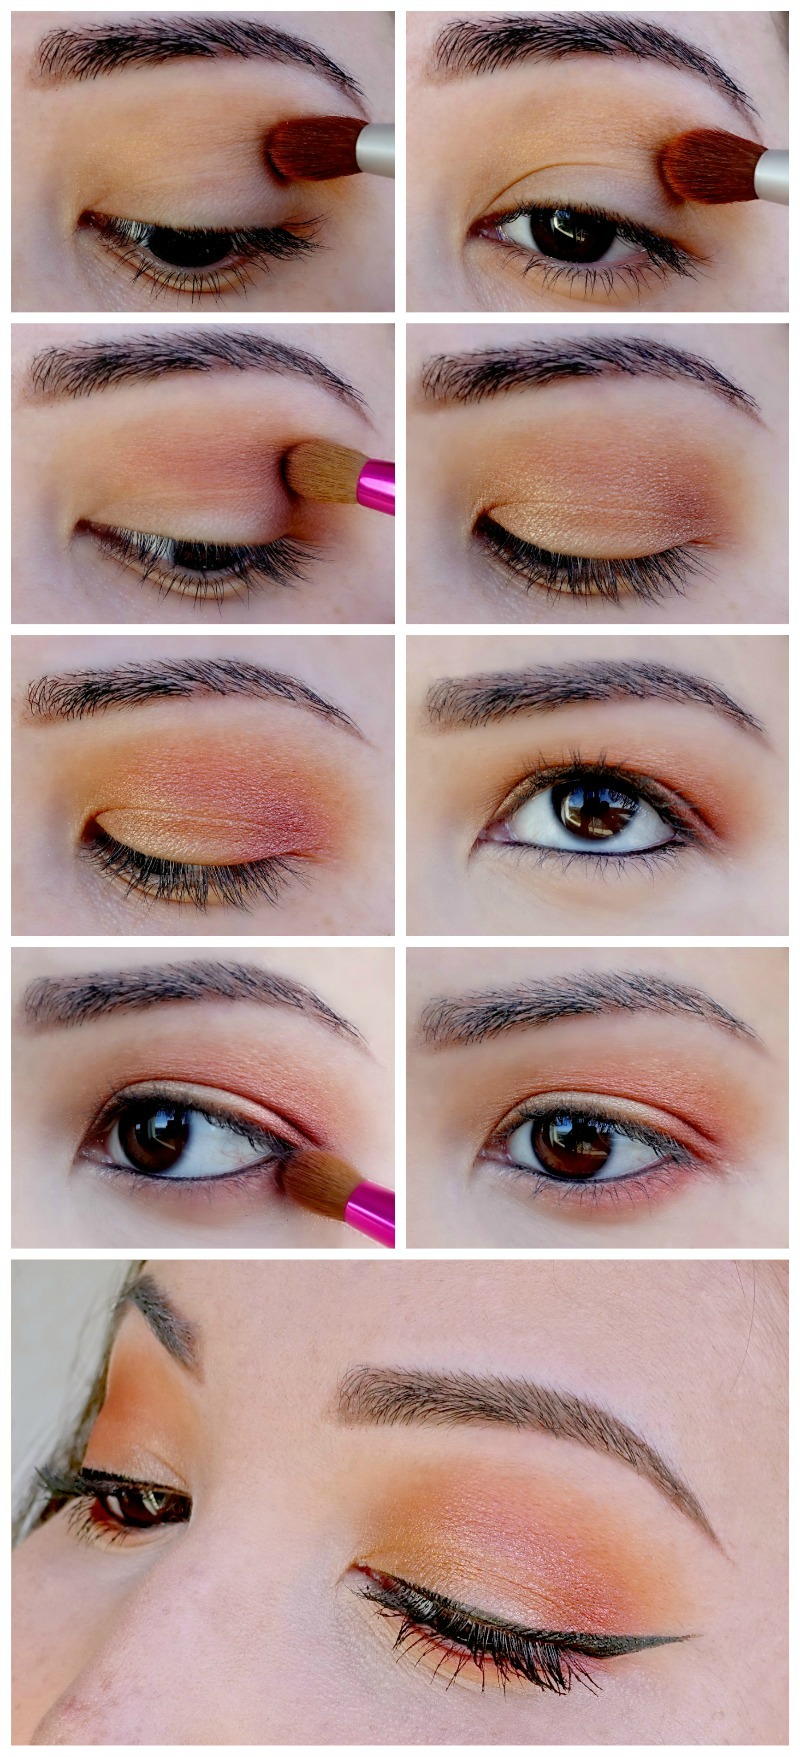
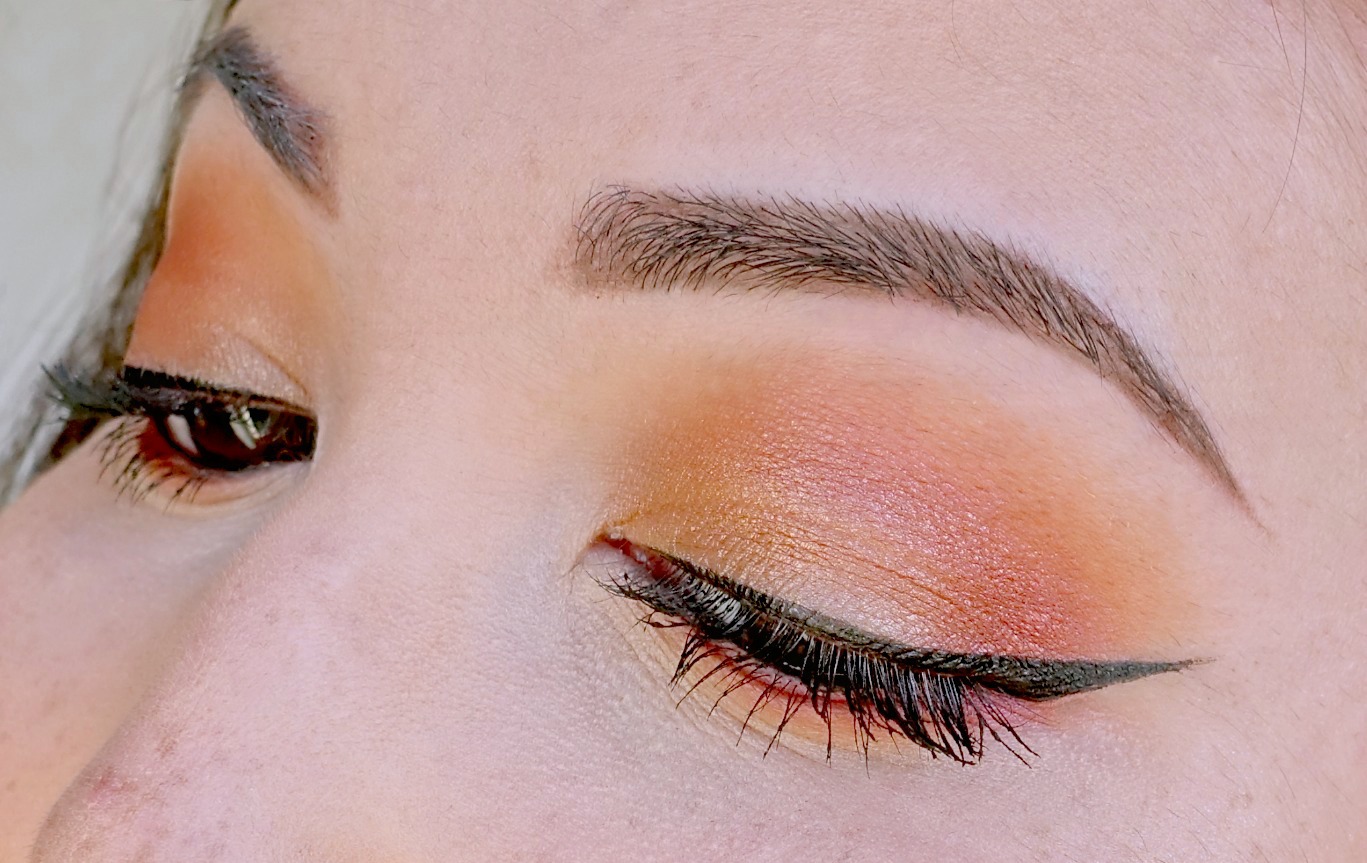
Begin layering warm, orangy crease colors
Start by laying down the lightest crease color. Dip your fluffy blending brush into Persian Peach (or equivalent) and buff that all over your crease area. There’s no need to be too precise with this, though try not to get the color up onto the high point of your brow bone too much.
Next, dip the same fluffy brush into a slightly darker orangy-tan shade and blend over top of the first shade. I’m using Pumpkin Pie, also from Coastal Scents. Concentrate the color slightly lower in your crease to create a smooth gradient.
Keep building up the gradient by going back and forth between the first two colors. Since we’ll be adding some pretty intense colors on top, we need the gradient to be pronounced enough so the deeper colors blend in seamlessly.
Pumpkin Pie >> Purchase from Coastal Scents
Deepen the crease with a warm matte red-brown
Pick up a medium-deep warm red brown color on a smaller blending brush. I’m using Morocco from the World Traveler palette. If you’re using the Modern Renaissance palette, Red Ochre mixed with a bit of Cyprus Umber looks beautiful.
Place this color at the outer corner of your eye, and blend in a “V” shape. Once most of the color is off the brush, begin dragging the brush up into the crease area. Bring the color about 3/4 of the way in, and then blend lightly the rest of the way. Repeat until you reach the desired crease depth.
Add your sparkly champagne lid color
Using a flat shader brush, pick up a warm champagne color and blend it across your entire lid. I’m using Bellini from the World Traveler Palette, but Primavera from the Modern Renaissance palette works too. Build the color up so it’s extra shiny.
Intensify the outer corner with a glimmering red
We want the look to stand out against all the other brown and champagne looks, right?
Dip into Venetian Red from the Modern Renaissance palette, and place the color right over the areas with your red-brown color. Personally, I’m using Sonic from the Urban Decay Vice 3 palette, however I’m not counting on the majority actually having that palette.
Blend carefully so the red stays within the brown areas. Too much red all over the place screams “eye infection” more than “intentional glam.”
The brown gives the look depth, and the red spices it up. They make the perfect pair.
Take a break from the eyes and work on your face
Apply your favorite face primer and foundation that suit your needs.
For more info on choosing the perfect foundation for you, check out this post all about it!
I’m using my E.l.f Mineral Face Primer in Clear just to smooth out my pores and 20-something wrinkles. For foundation, I’m using, what else, Too Faced Born This Way Foundation. Hey, it looks nice in photos.
BTW, if you’re interested in Born This Way, I’ve got a in-depth review that’ll answer pretty much any questions you may have on it. Check it out right here!
It’s up to you how you want to conceal- there are just so many options! I wanted a strong highlight, so I went with a very light colored liquid concealer, Make Up For Ever Ultra HD Concealer. Admittedly, this one isn’t my favorite >>See my review here<< but it gets the job done for serious highlighting on not-super-long days.
For some subtle definition, I applied the contour shade from my Wet N’ Wild Contouring Palette in Caramel Toffee lightly under my cheekbones and on my forehead. I wanted to avoid looking overly bronze for this look, so I just went around my face lightly with the contour powder and I didn’t add any additional bronzer.
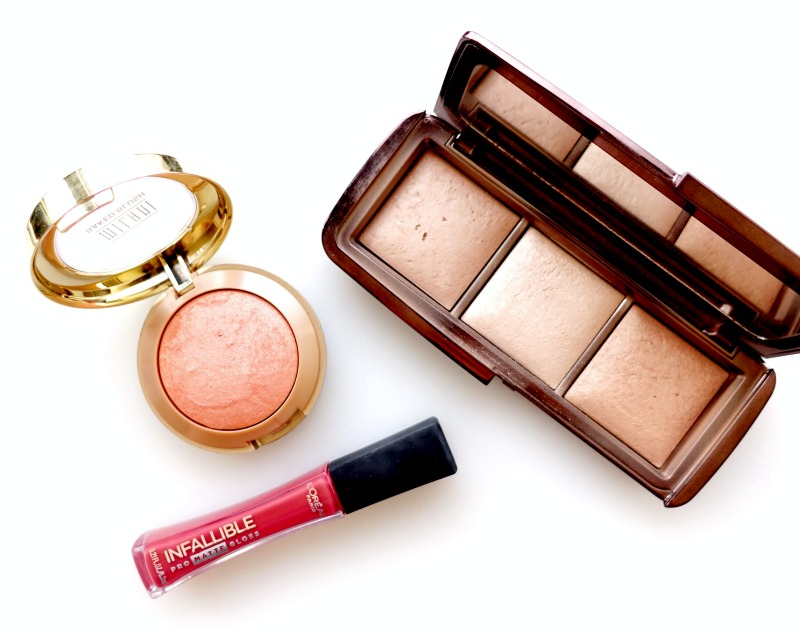
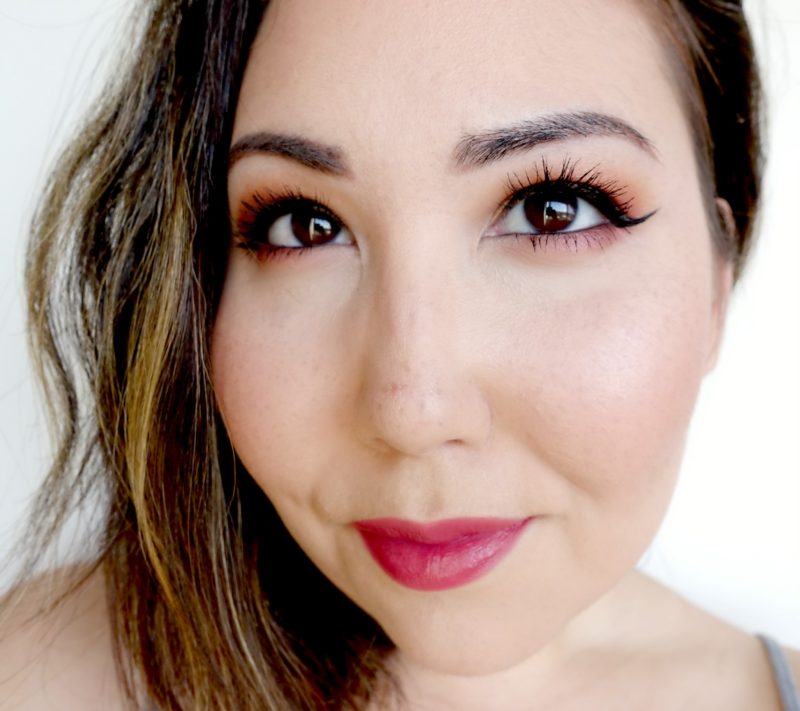
For blush, I’m wearing our old favorite, Luminoso by Milani. The muted peach color and fine shimmer complements this look on any skin tone.
To top off the look, apply a subtle highlight that let’s your eyes steal the spotlight. I’m wearing the OG Incandescent from the Hourglass Ambient Lighting Palette.
E.l.f. Mineral Face Primer >> Purchase at Elfcosmetics.com
Too Faced Born This Way Foundation >> Purchase at Sephora
Make Up For Ever Ultra HD Concealer >> Purchase at Sephora
Wet N’ Wild Contouring Palette Caramel Toffee >> Purchase on Amazon
Milani Baked Blush in Luminoso >> Purchase on Amazon
Hourglass Ambient Lighting Palette >> Purchase at Sephora
Ok, it’s time to line your eyes
Line your waterline and tightline with a creamy pencil liner. I’m using Marc Jacobs Highliner Gel Eye Crayon Eyeliner in Blacquer.
I know, tightlining is treacherous, but we can get through it together.
I think this look calls for a dramatic wing, so I went for it. Do whatever size wing you feel comfortable with.
I’ve even got a tutorial to help you perfect your wings so they fly strong! Click here to check that out.
Marc Jacobs Highliner Gel Eye Crayon Eyeliner in Blacquer >> Purchase at Sephora
Blend your lower lash line with shadows
Using a pencil brush, apply a small amount of your matte red-brown shade to the outer half of your lower lash line. Just like we did in the crease, begin dragging the color toward the inner corner about 3/4 of the way once most of the color leaves the brush.
Wipe off your brush and dip it gently into one of your first crease shades. Blend this color below the darker color to tie everything together.
You could stop here, or go one step further and add a touch of your glimmering red to the outer edge for some extra shine, like I did.
Add the finishing touches
Pair a matte brow bone and inner corner highlight with the bold eye to balance everything out. I had my Wet N’ Wild Contouring Palette out, and so I just used the matte highlighting shade provided in there. Any light colored matte eyeshadow will work too.
Pile on your favorite mascara. Here, I’m wearing Sephora Collection Outrageous Curl Mascara. If you haven’t tried this one, you should check it out. It’s amazing, plus it’s super affordable.
Sephora Collection Outrageous Curl Mascara >> Purchase at Sephora
Optional- Intensify it even more
Of course, there are plenty of ways to boost the drama!
Falsies look amazing with this look, especially if you’ve got a huge wing to match.
If you want it darker and smokier, add another layer of your matte red-brown over the outer corner, and then layer your shimmery red lightly on top. If you want it really dark, add a teeny bit of black to your outer corner using a small pencil brush.
A nude-ish lip to match this bright-ish eye look
Thanksgiving centers around food. This is a good thing, unless you’re having a “Most Outstanding Lipstick Wearer” contest among your family, but really, who does that?
For a pretty and still practical Thanksgiving meal lip, you want a formula that’s easy reapply and that you don’t have to constantly worry about as you gobble down your stuffing.
L’Oréal Pro-Matte Gloss comes in a bunch of pretty, dinner-approved colors, plus it’s very comfortable and doesn’t dry my lips out. >> See my review on L’Oréal Pro-Matte Gloss <<
I’m wearing the shade Nude Allude. It’s not super bold, but it’s not, like, a colorless nude either.
L’Oréal Pro-Matte Gloss >> Purchase on Amazon
And that’s it for this Thanksgiving makeup tutorial. I told you it’s easy.
And so what were you saying about your Thanksgiving woes?
Quick story time. My mom always made a huge deal out of Thanksgiving when I was a kid. Like, the entire neighborhood infiltrated my house. Like, in the kitchen, in the dining room, in the living room, on the back patio, everywhere.
Some of those nosey butts even helped themselves to walking tours of my mine and my brother’s bedrooms.
I hated it.
It wasn’t even so much that people were everywhere, it was more all the unnecessary pseudo pleasantries, bear hugging and cheek kissing. Ask my mom and she’ll tell you that even from “baby-days,” I was just never a cuddly kid. I didn’t (and still don’t) like being hugged, kissed, or basically touched at all.
In an attempt to diffuse the “obligation” my mom put me under, I turned to makeup, specifically sticky lip gloss. And hair spray. And perfume.
I pancaked the makeup on my face, gunked up my hair so it became super stiff and sticky, and loaded up the goopy lip gloss and bright lipsticks.
I used the excuse, “Oh I wish I could hug you, but I don’t want to get my makeup on your spiffy clothes.”
It worked like a charm. Sometimes.
And that is why, my friends, adult me takes her annual out-of-state vacations over the Thanksgiving holiday.
That’s all for today!
Like this Thanksgiving makeup tutorial? You’ll definitely like this post too >> Warm Purple & Gold Fall Makeup Tutorial
If you find this post informative, interesting, or just plain entertaining, tell me about it in the comments below! And don’t forget, sharing is caring. Share this post!
Till next time. ♥︎
Sign up for my free monthly e-journal, The Millennial Maven Love Letters for exclusive content + millennial inspiration and lifestyle hacks. Plus get instant access to my library of on-the-go style downloads!
FTC- Not sponsored. I purchased all products myself. All opinions are my own. Some links may be affiliated.
Leave a Reply