This post contains affiliate links. To learn more, hop over to our Disclosure page.
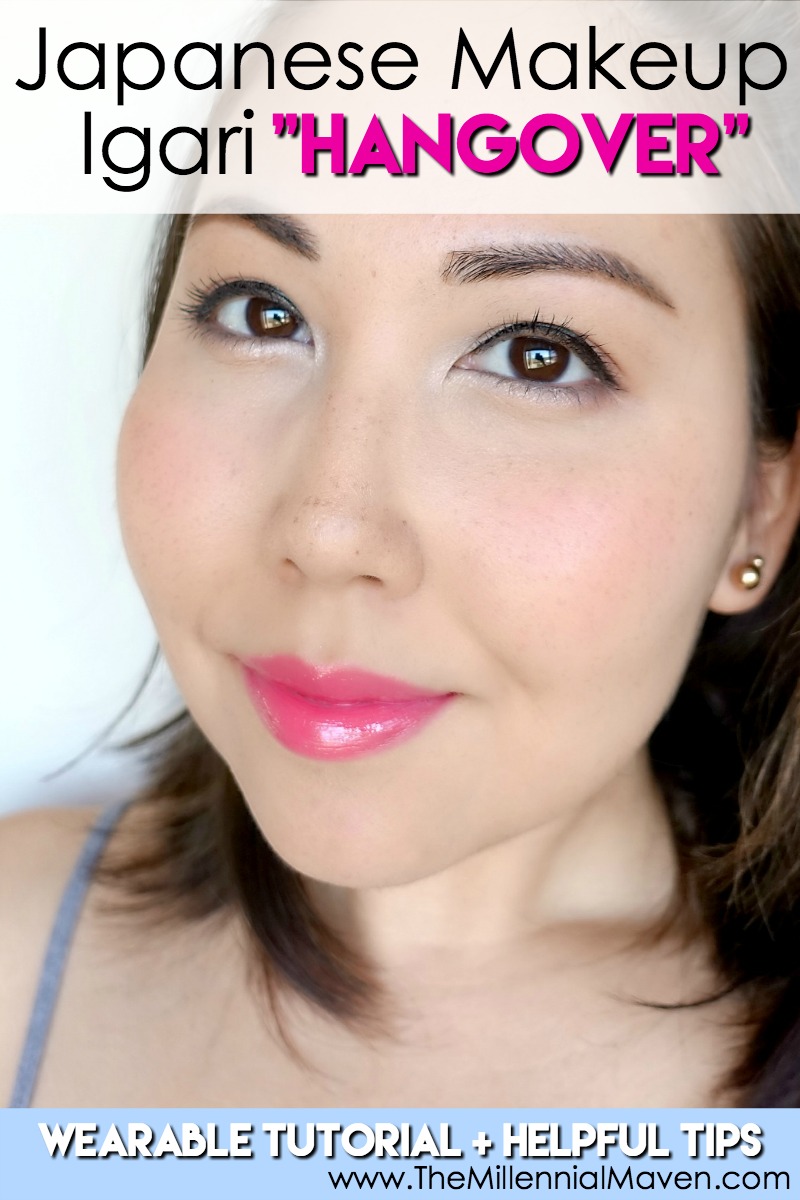
Lately, I’ve been super obsessed with everything Japanese– Japanese food, Japanese cartoon characters, Japanese hairstyles, and of course, Japanese makeup.
I’ve also been trying to change up my look recently, and its been fun. I’ve experimented with some Japanese makeup looks that to be quite honest, aren’t all that wearable in Hawaii-land. As cute as the Japanese Igari, or “hangover,” makeup look seems in the photos, I can’t imagine walking around intentionally looking like I partied my face into submission.
Keep reading to find out how I turned this wacky makeup trend into a look that still looks Japanese-inspired, but is much less intimidating!
Read on to see how to achieve this super cute look!
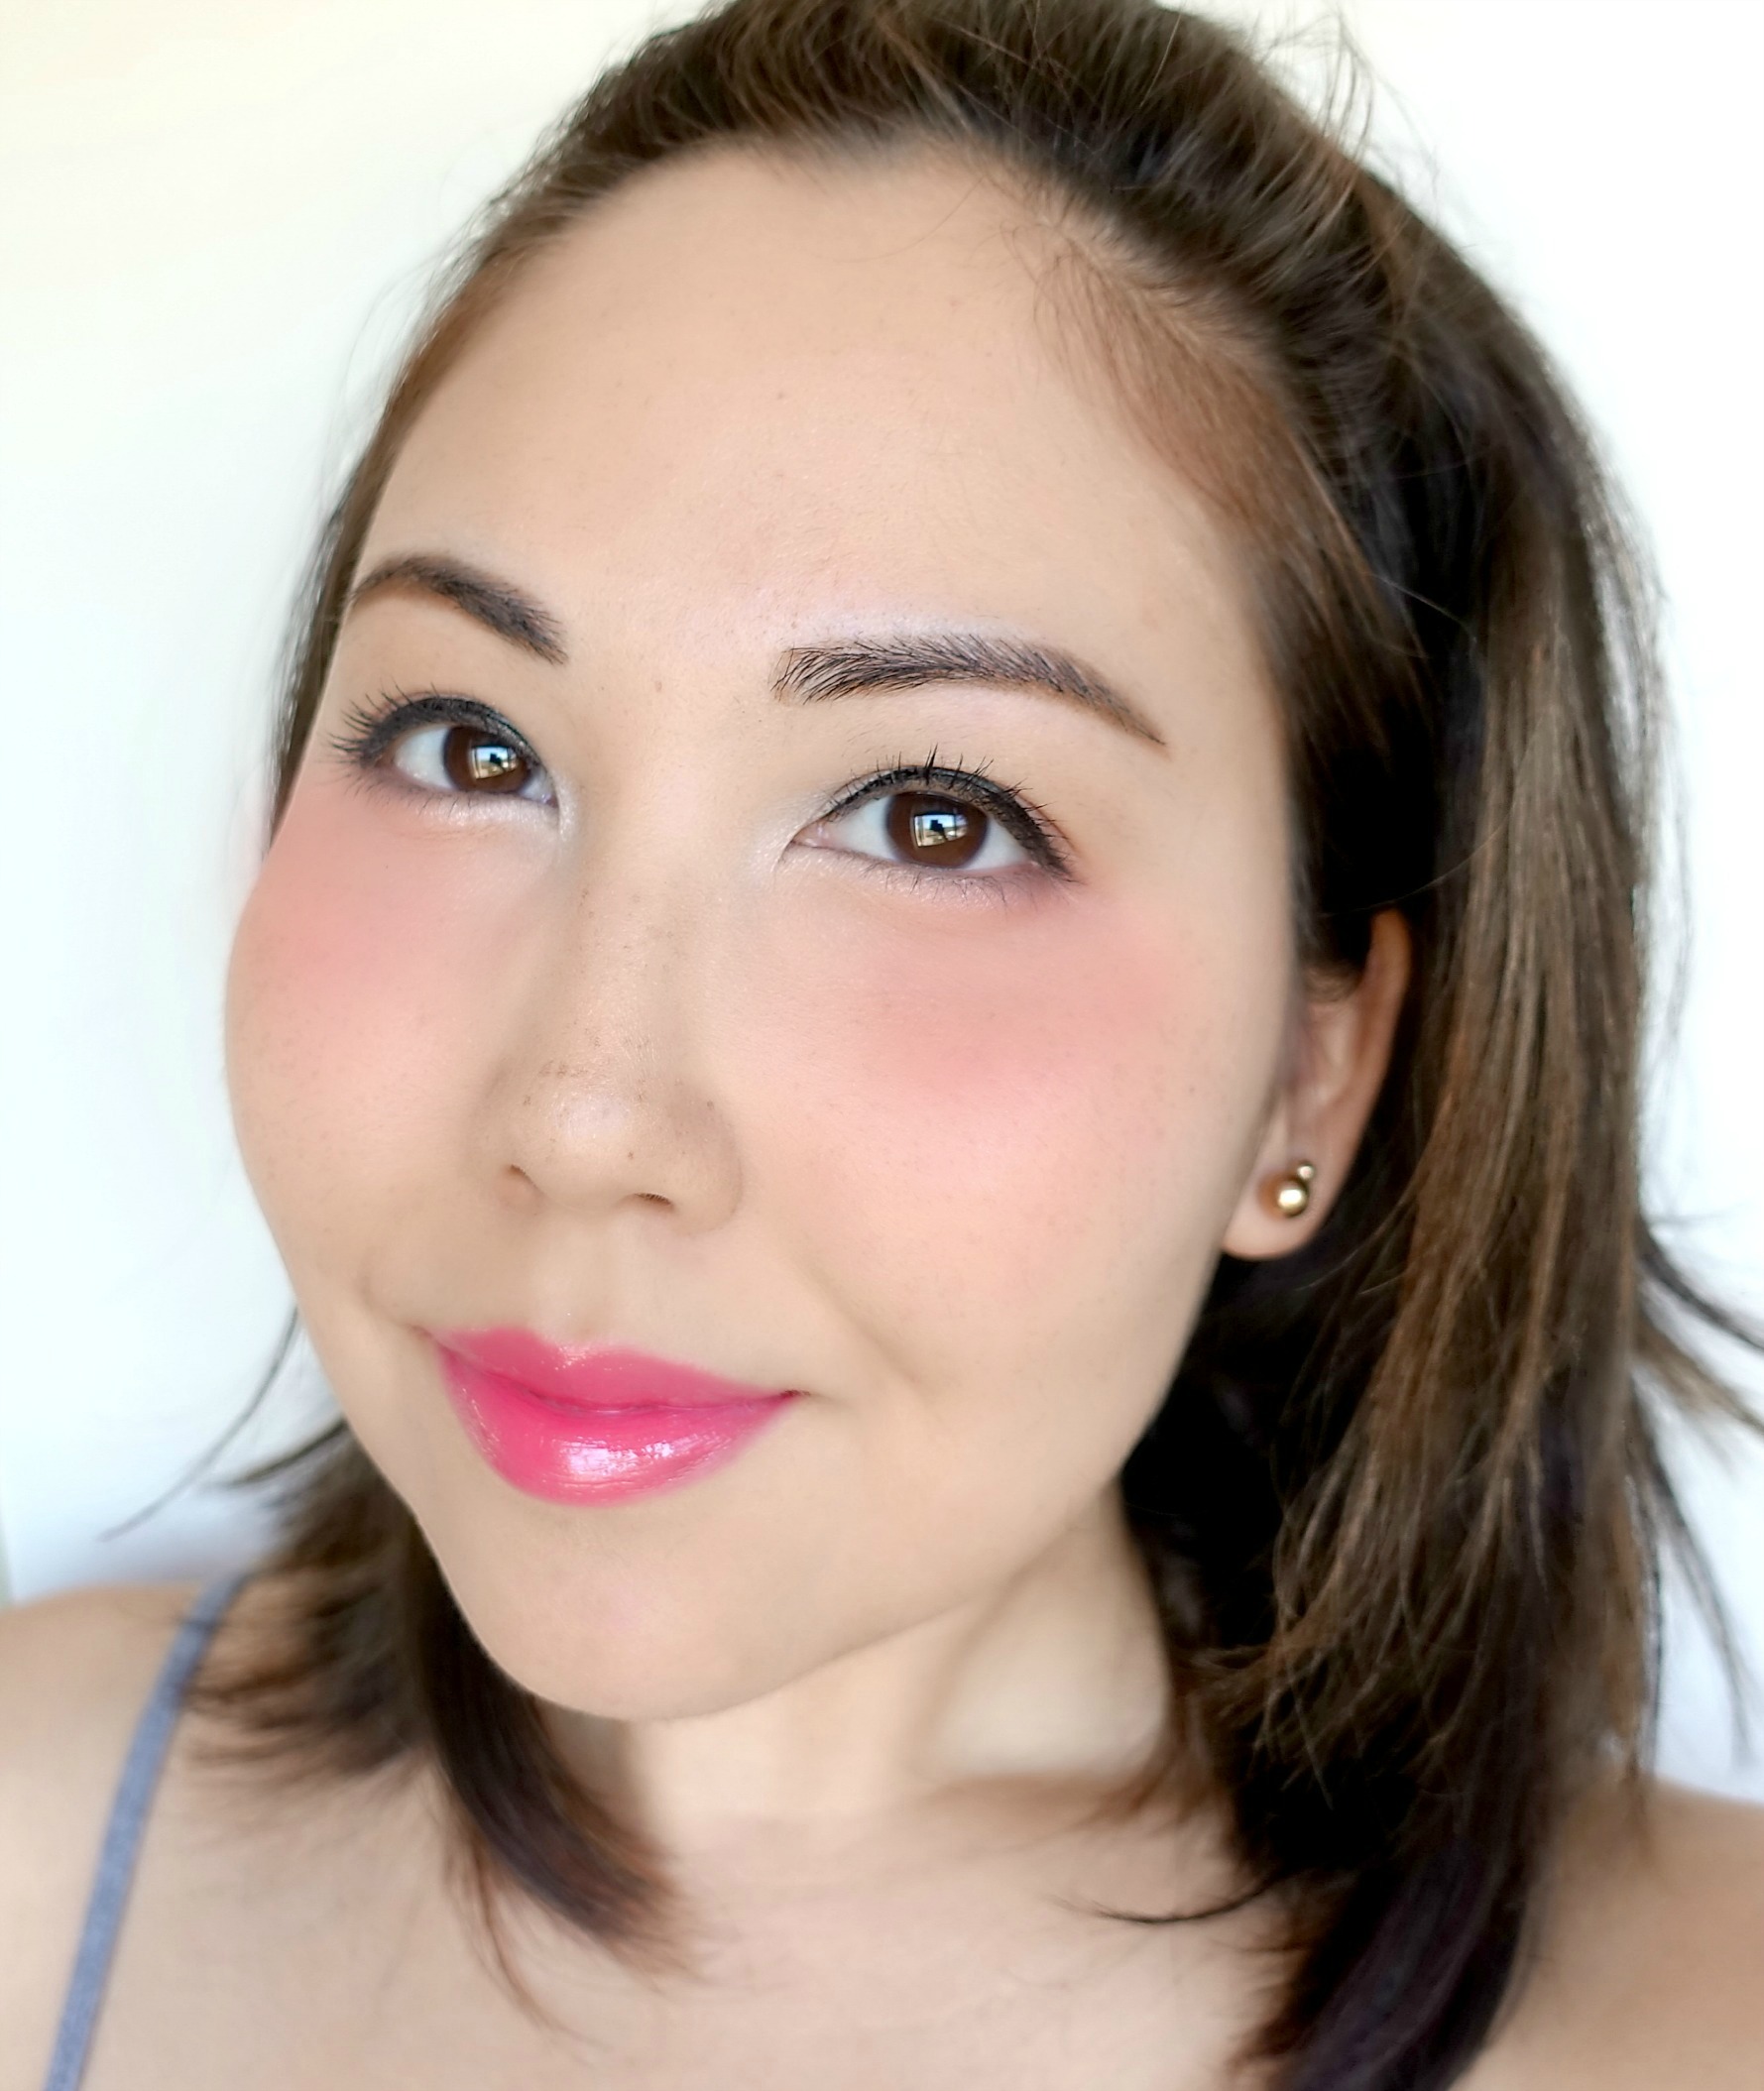
What is this “hangover makeup” trend anyway?
In case you need a refresher on what this “hangover makeup” entails, I took the liberty of digitally altering the photo above to show you exactly what I mean. I would have done it for real, but I had places to be, and I couldn’t afford to destroy my makeup. Nor could I go out looking like I was awake until some ungodly hour. Trying to look somewhat professional, you know?
Basically, the Igari, or “hangover makeup” trend is a makeup style where women apply blush and eyeshadow around the eyes in order to intentionally look red and puffy, like they are hungover. The look is intended to profess vulnerability, like one is in need of care. (I don’t mean to offend anybody with this description, and please correct me if I am wrong.) But regardless of what the meaning behind it is, it is a cute look.
The Beginnings of a Hangover
We all know knows how to give ourselves real hangovers, but faking the look is not as simple. Just like a real hangover, there are several steps necessary in order to get that perfect hangover. Not enough drinking water will help puff up your face, and not sleeping will give you those oh-so-glamourous purple bags under your eyes. But to get the look without the physical misery, let’s get down to business.
Foundation
The Japanese really focus on having flawless, naturally radiant looking skin. To get this look, I first applied a layer of Cover FX Illuminating Primer all over my face to help keep that pretty, dewy appearance alive after I apply everything on top of it. Next, I took a small dab of E.l.f. Mineral Face Primer, a silicone-y smoothing primer, and pressed it into areas of my face that tend to be a little less than smooth– the pores on the sides of my nose and cheeks, my forehead, and my chin.
I also used it for smoothing down any flaky bits I have around my mouth. Finally, I applied a very thin coat of my Chanel Perfection Lumiere (discontinued) foundation using a damp Beauty Blender. I chose this foundation because it is one of the lighter shades I own. You’ll want to look like a somewhat washed-out version of yourself for this particular look.
Cover FX Illuminating Primer >> Purchase at Sephora
E.l.f. Mineral Face Primer >> Purchase at Elfcosmetics.com
Beauty Blender Original >> Purchase at Sephora
Concealer
I used Make Up For Ever Ultra UD Concealer. Like the foundation, it is one of the lighter shades of concealer I own. Not to mention, this one really gives you a natural, non-makeup-y look when blended.
As you can see in the photo above, I applied the concealer differently than I normally would. Instead of drawing a triangle shape with the concealer and focusing on highlighting the cheekbone, I applied the concealer in a rounded shape going about halfway down my cheek. This style really brings forward the puffiness of my cheeks, which is what I wanted in this case.
Remember, you aren’t trying to make your self look chiseled here, you’re trying to look bloated. (That sounds terrible, but it’s true.)
Make Up For Ever Ultra HD Concealer >> Make Up For Ever Ultra UD Concealer
Creating those hangover eyes
Let’s dive into how to create the focal point of this look.
the Brows
How you do your brows is entirely up to you, as they don’t play a crucial role in how well this makeup look works. Perhaps this look would be more wearable if you did your brows how you normally do them.
I chose to fill in my brows in a way that gave me a more Japanese-esque look. I usually like to enhance the arch of my brows, but here I gave them more of a straight shape. Using a somewhat lighter, more warm-toned brown than I usually do, I filled them in slightly thicker than normal. For this, I used Maybelline Define + Fill Duo in Soft Brown.
Maybelline Define + Fill Duo >> Purchase on Amazon
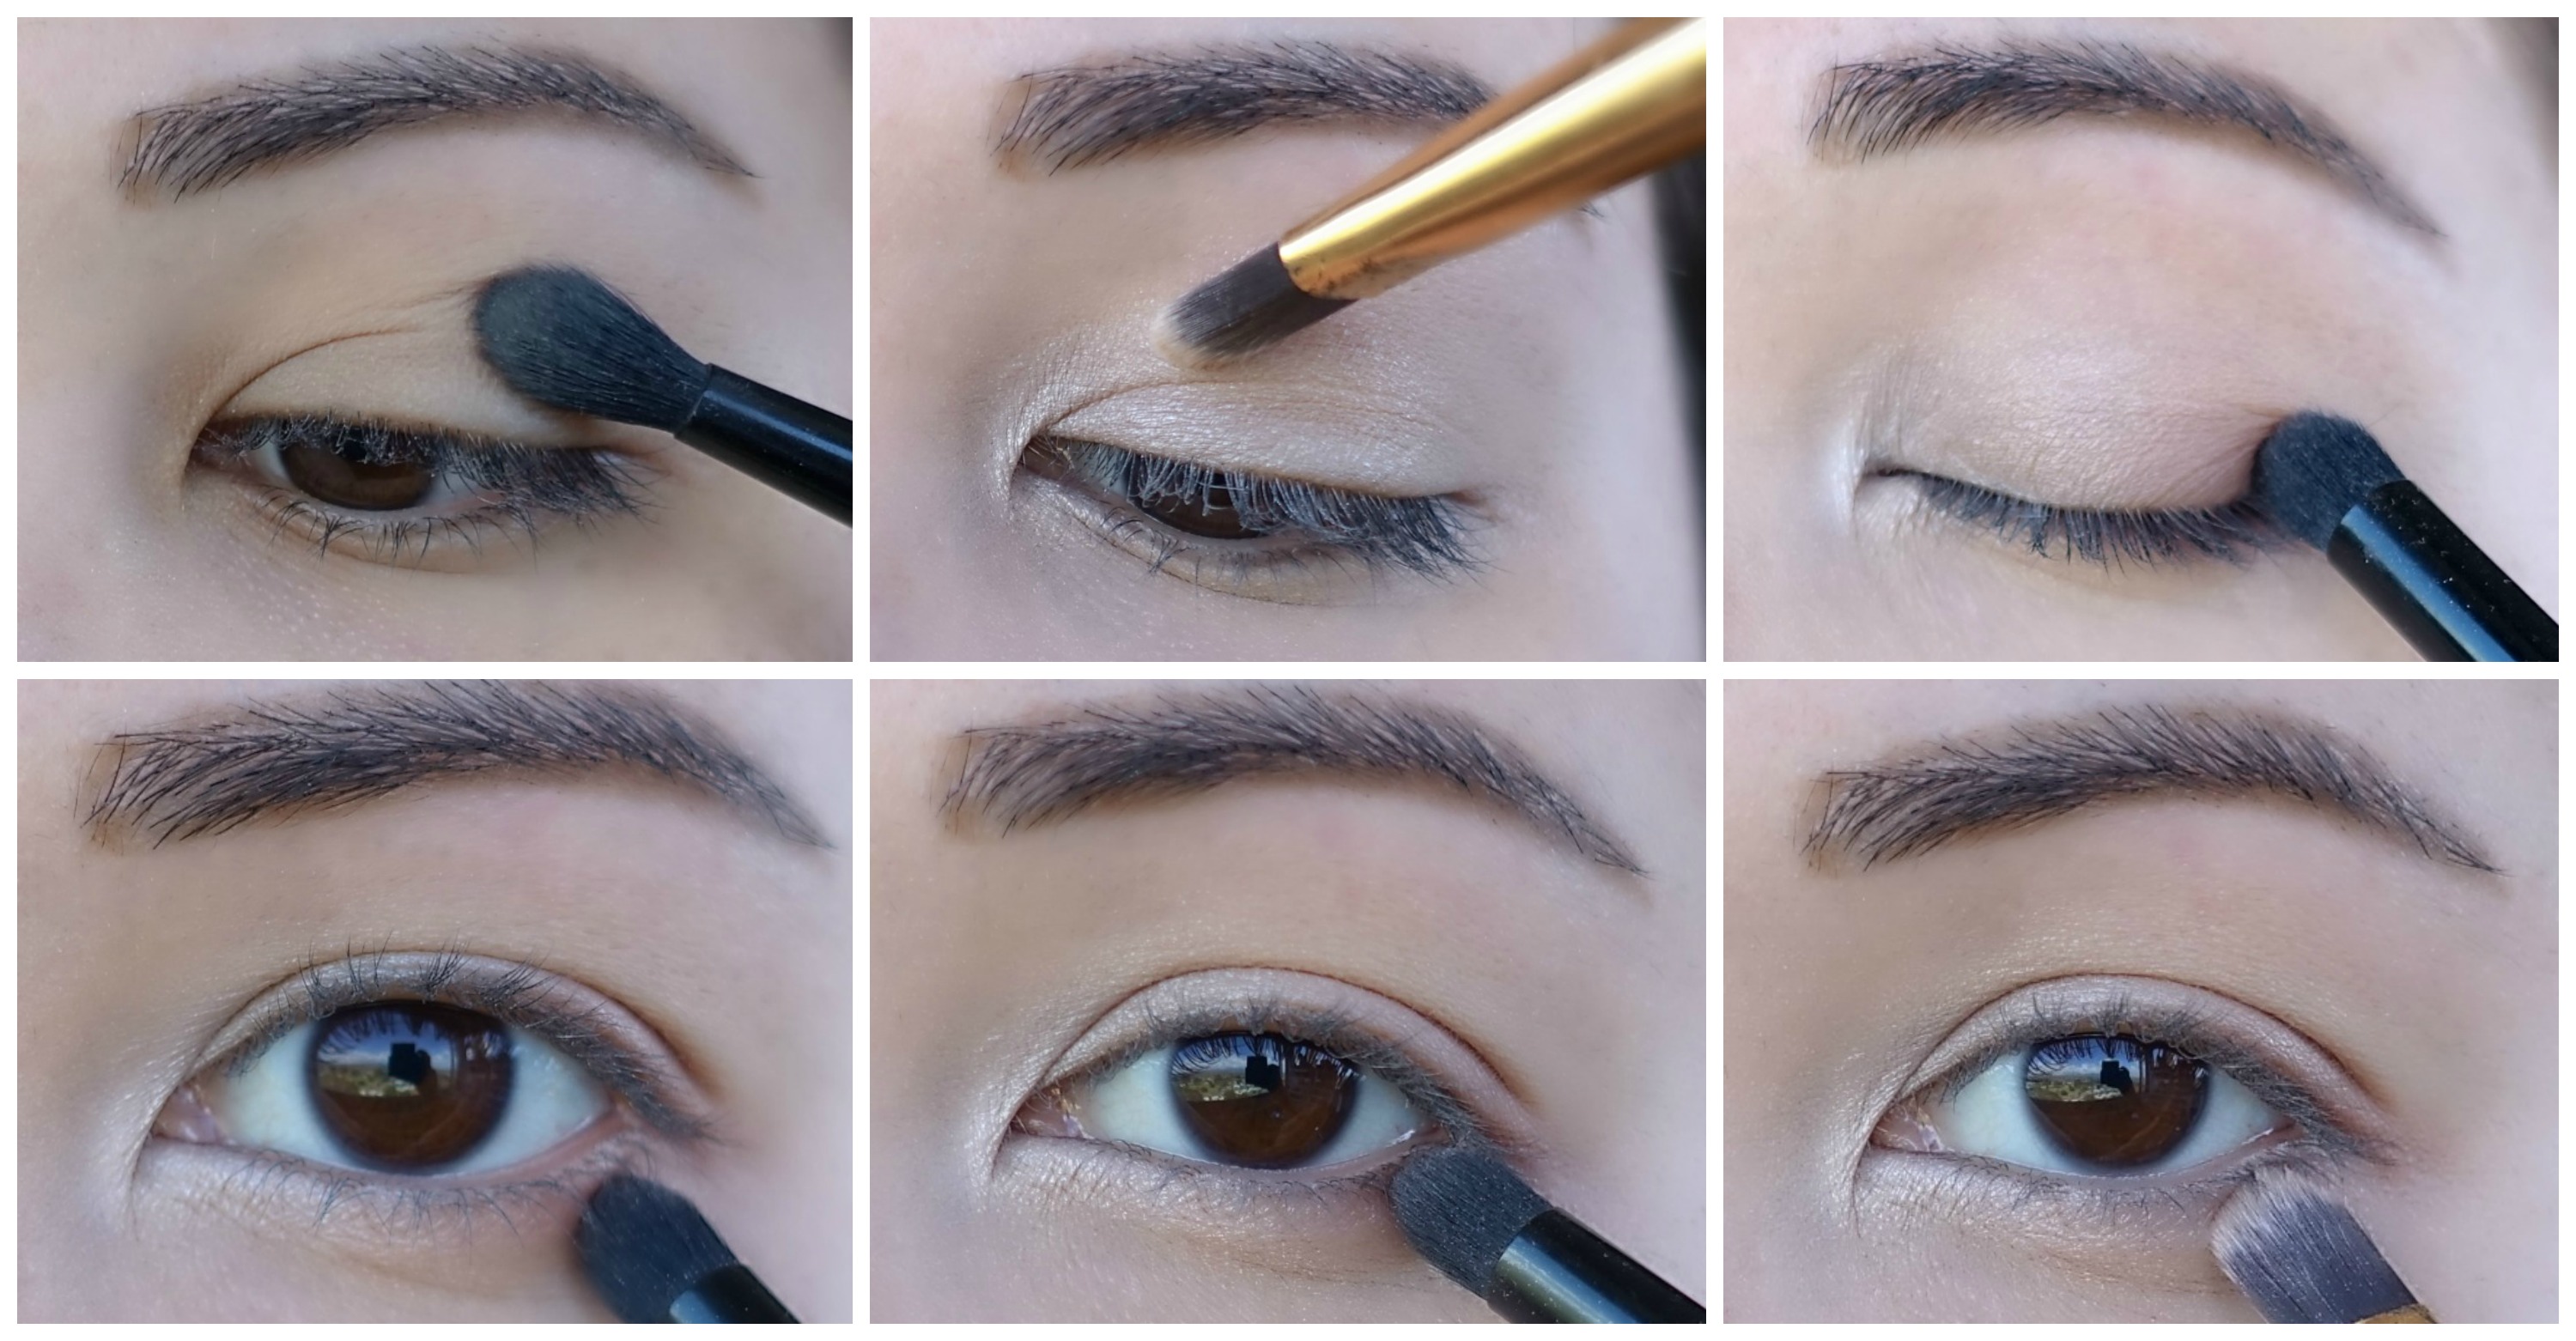
the Eyeshadow basics
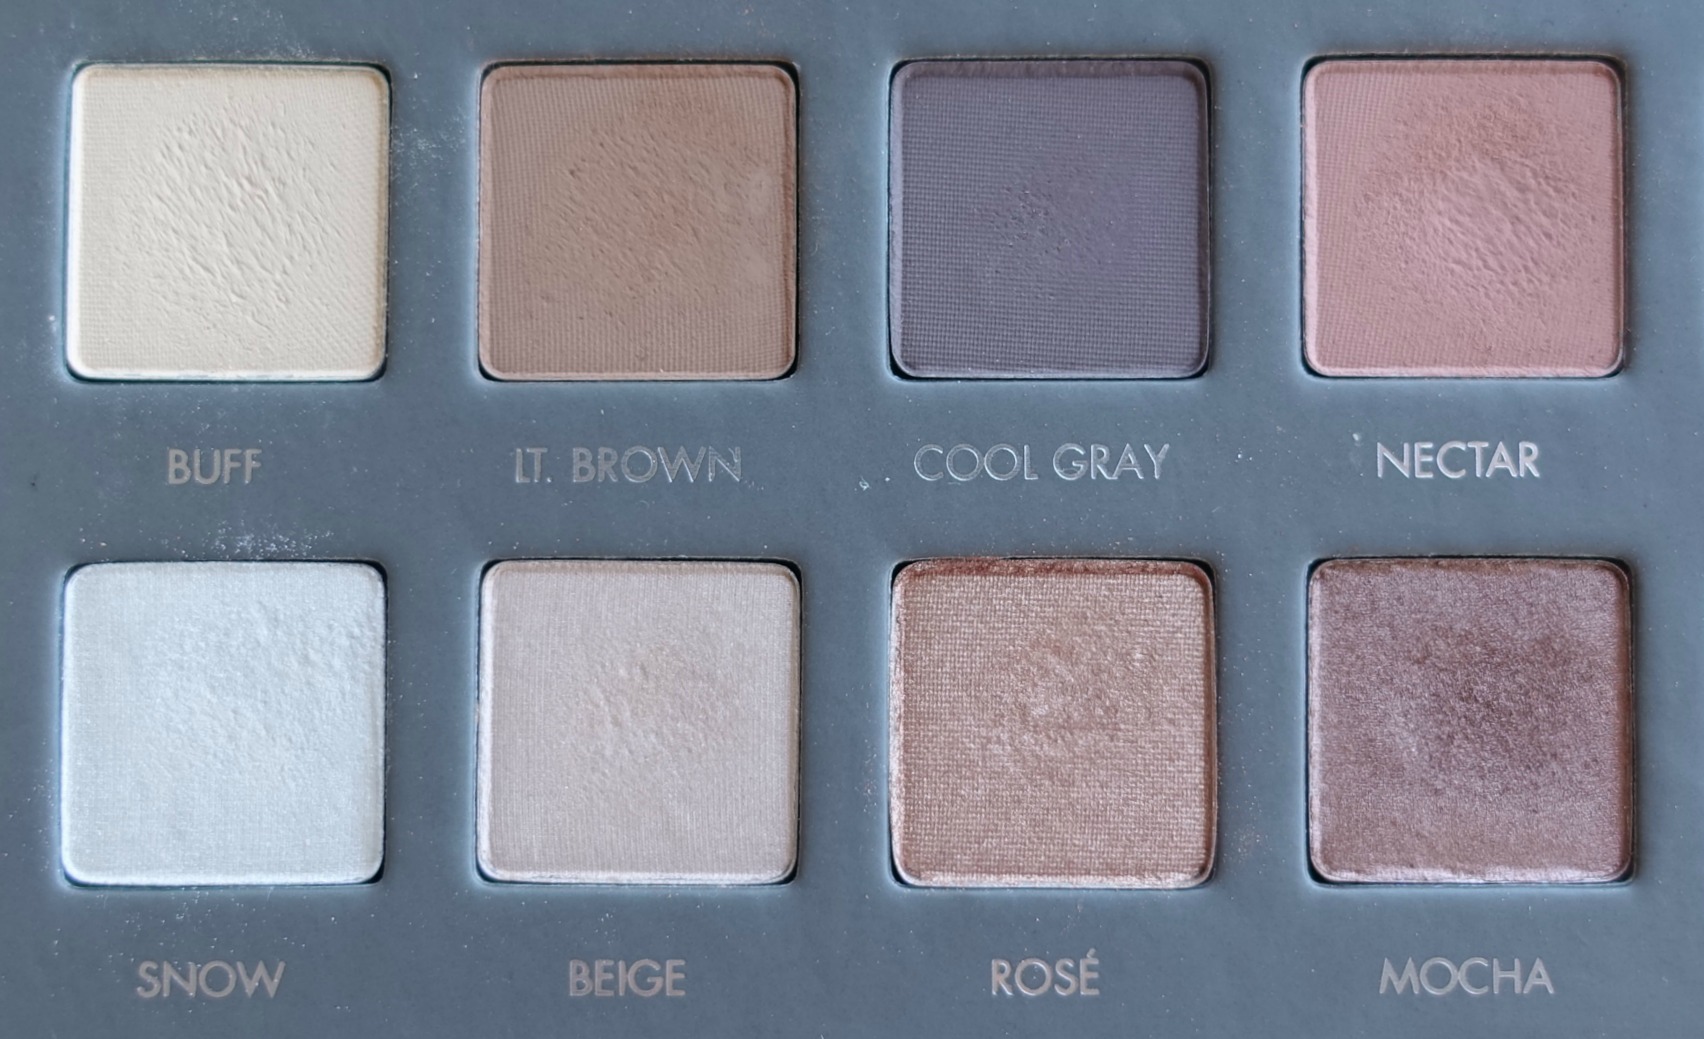
The Igari “hangover makeup” trend uses shimmery pink and cream colored shadows in order to highlight the eye’s puffiness. There are plenty of options to achieve this look, but for today, I am using the Lorac Pro Palette 2.
I primed my eyes with Nars Pro-Prime Eyeshadow Base to prevent smudging, smearing, creasing, and all the other activities my eyeshadow likes to partake in when I’m not looking.
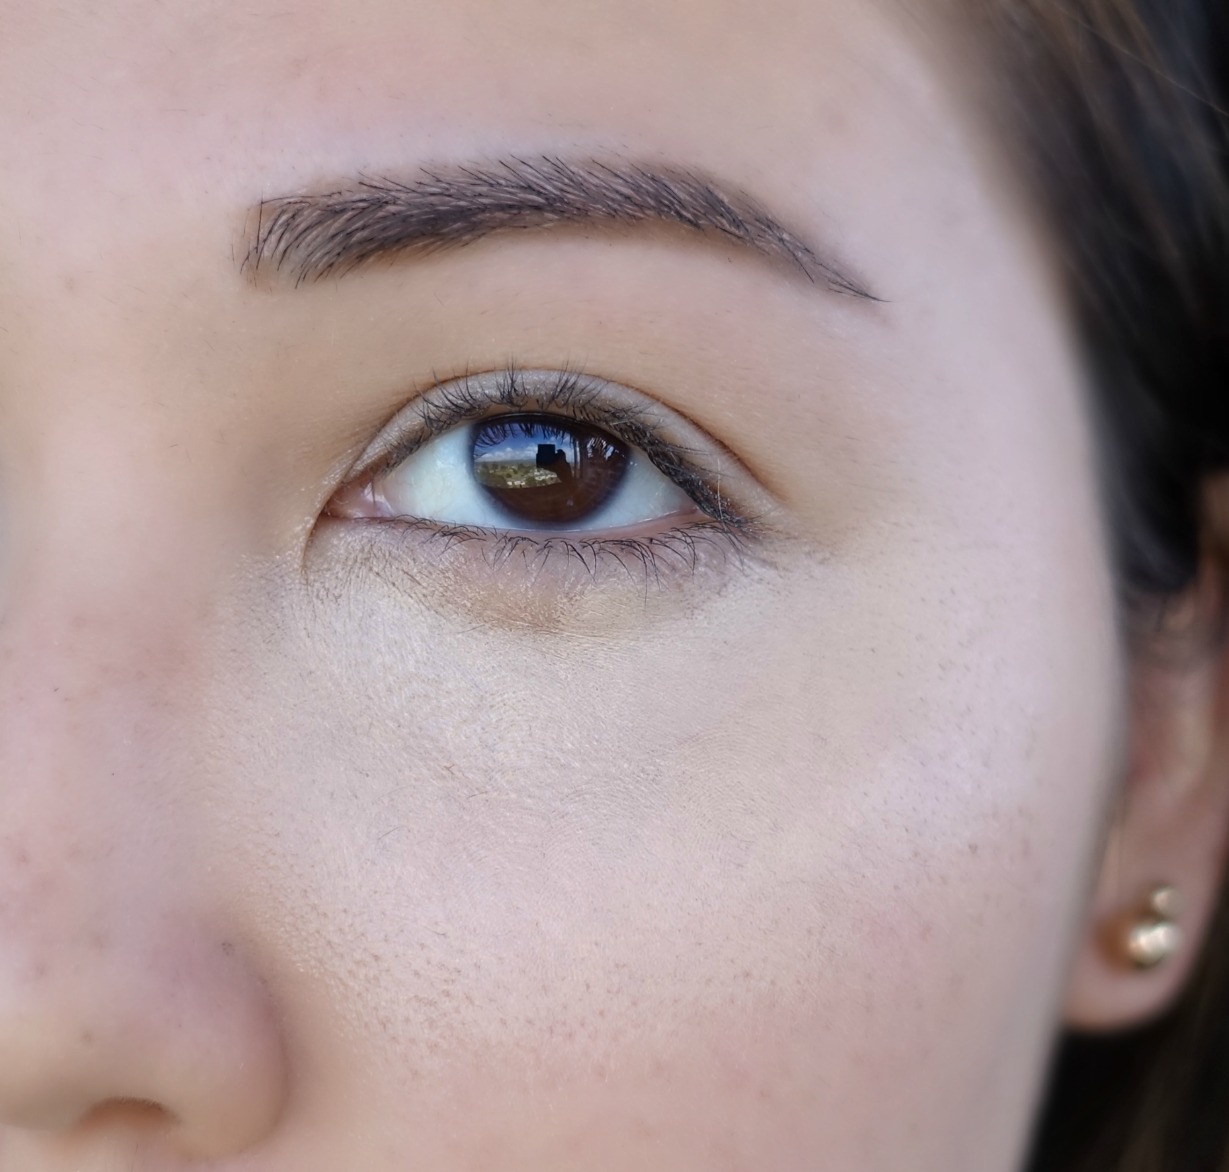
First, I applied Buff into the lower part of my crease to help with blending. In order to keep the hooded look to my eyes, I did not apply the transition shadow up near the brow bone as I normally would. I left that area blank today. This shade really isn’t meant to be seen, so use a color that is close to your own skin tone. You can always use a face powder if that works best.
Next, I used a flat shader brush to apply Beige onto the inner portion of the lid. I also took it around the inner corner, and down onto the inner half of the lower lash line. Don’t be afraid of making a mess– apply it everywhere and we’ll clean up later.
Lorac Pro Palette 2 >> Purchase on Amazon
Nars Pro-Prime Eyeshadow Base >> Purchase at Sephora
Adding in some color
Third, dip a smudge brush into Nectar and apply that to the outer half of the lid, around the eye and onto the outer half of the lower lash line. This color may need to be built up depending on your skin tone and how pronounced you want it to be. Just keep working at it.
Then, I dipped that same brush lightly into Rosé, and applied that over Nectar, but this time sticking closer to the lash line. Overall, blend the shimmers somewhat lower down than you normally would; you want to accentuate that little puff beneath your eye.
Finally, I applied a teeny amount of Cool Gray onto the lower lash line using the same flat shader brush in order to add some soft definition. Try to keep this color as close to the lower lash line as possible.
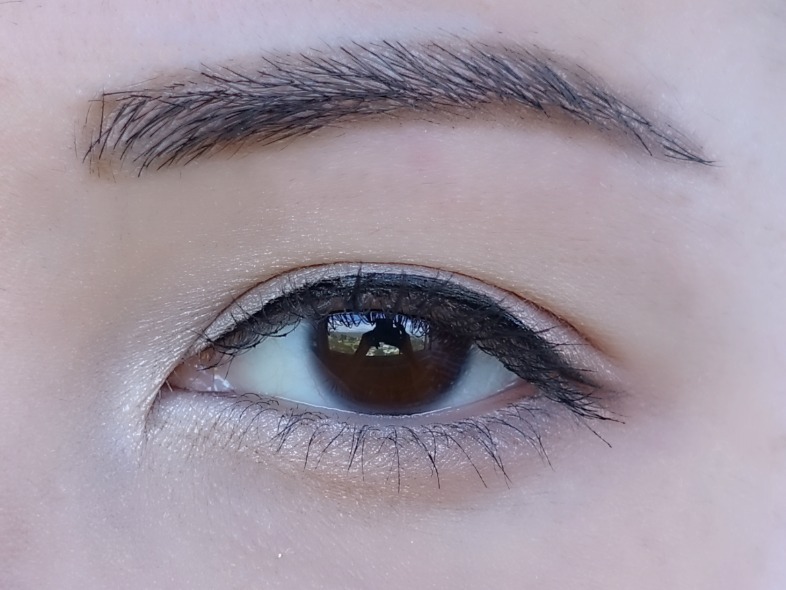
Liner & Mascara
To finish off the eye look, I used Kat Von D Tattoo Liner in Trooper to define the upper lash line. I drew the line slightly thicker in the middle (right at the top of the curve,) in order to give myself a round, doe-eyed effect. Also, I extended my eyeliner slightly beyond my natural lash line in keeping with other Japanese-inspired eyeliner styles.
For mascara, I used my Kat Von D Immortal Lash Mascara because that is what I have open.
Bonus- Want to know more about Kat Von D Immortal Lash Mascara? I’ve done a full review and demo right here on the blog. Click here to check it out!
There’s really no other reason. Use whatever you have. Though, I was careful to not apply too much, as this look is not known for its voluminous, prom-like lashes. Keep you lashes looking natural, but with just a little bit of spring in their step.
Kat Von D Tattoo Liner in Trooper >> Purchase at Sephora
Kat Von D Immortal Lash Mascara >> Purchase at Sephora
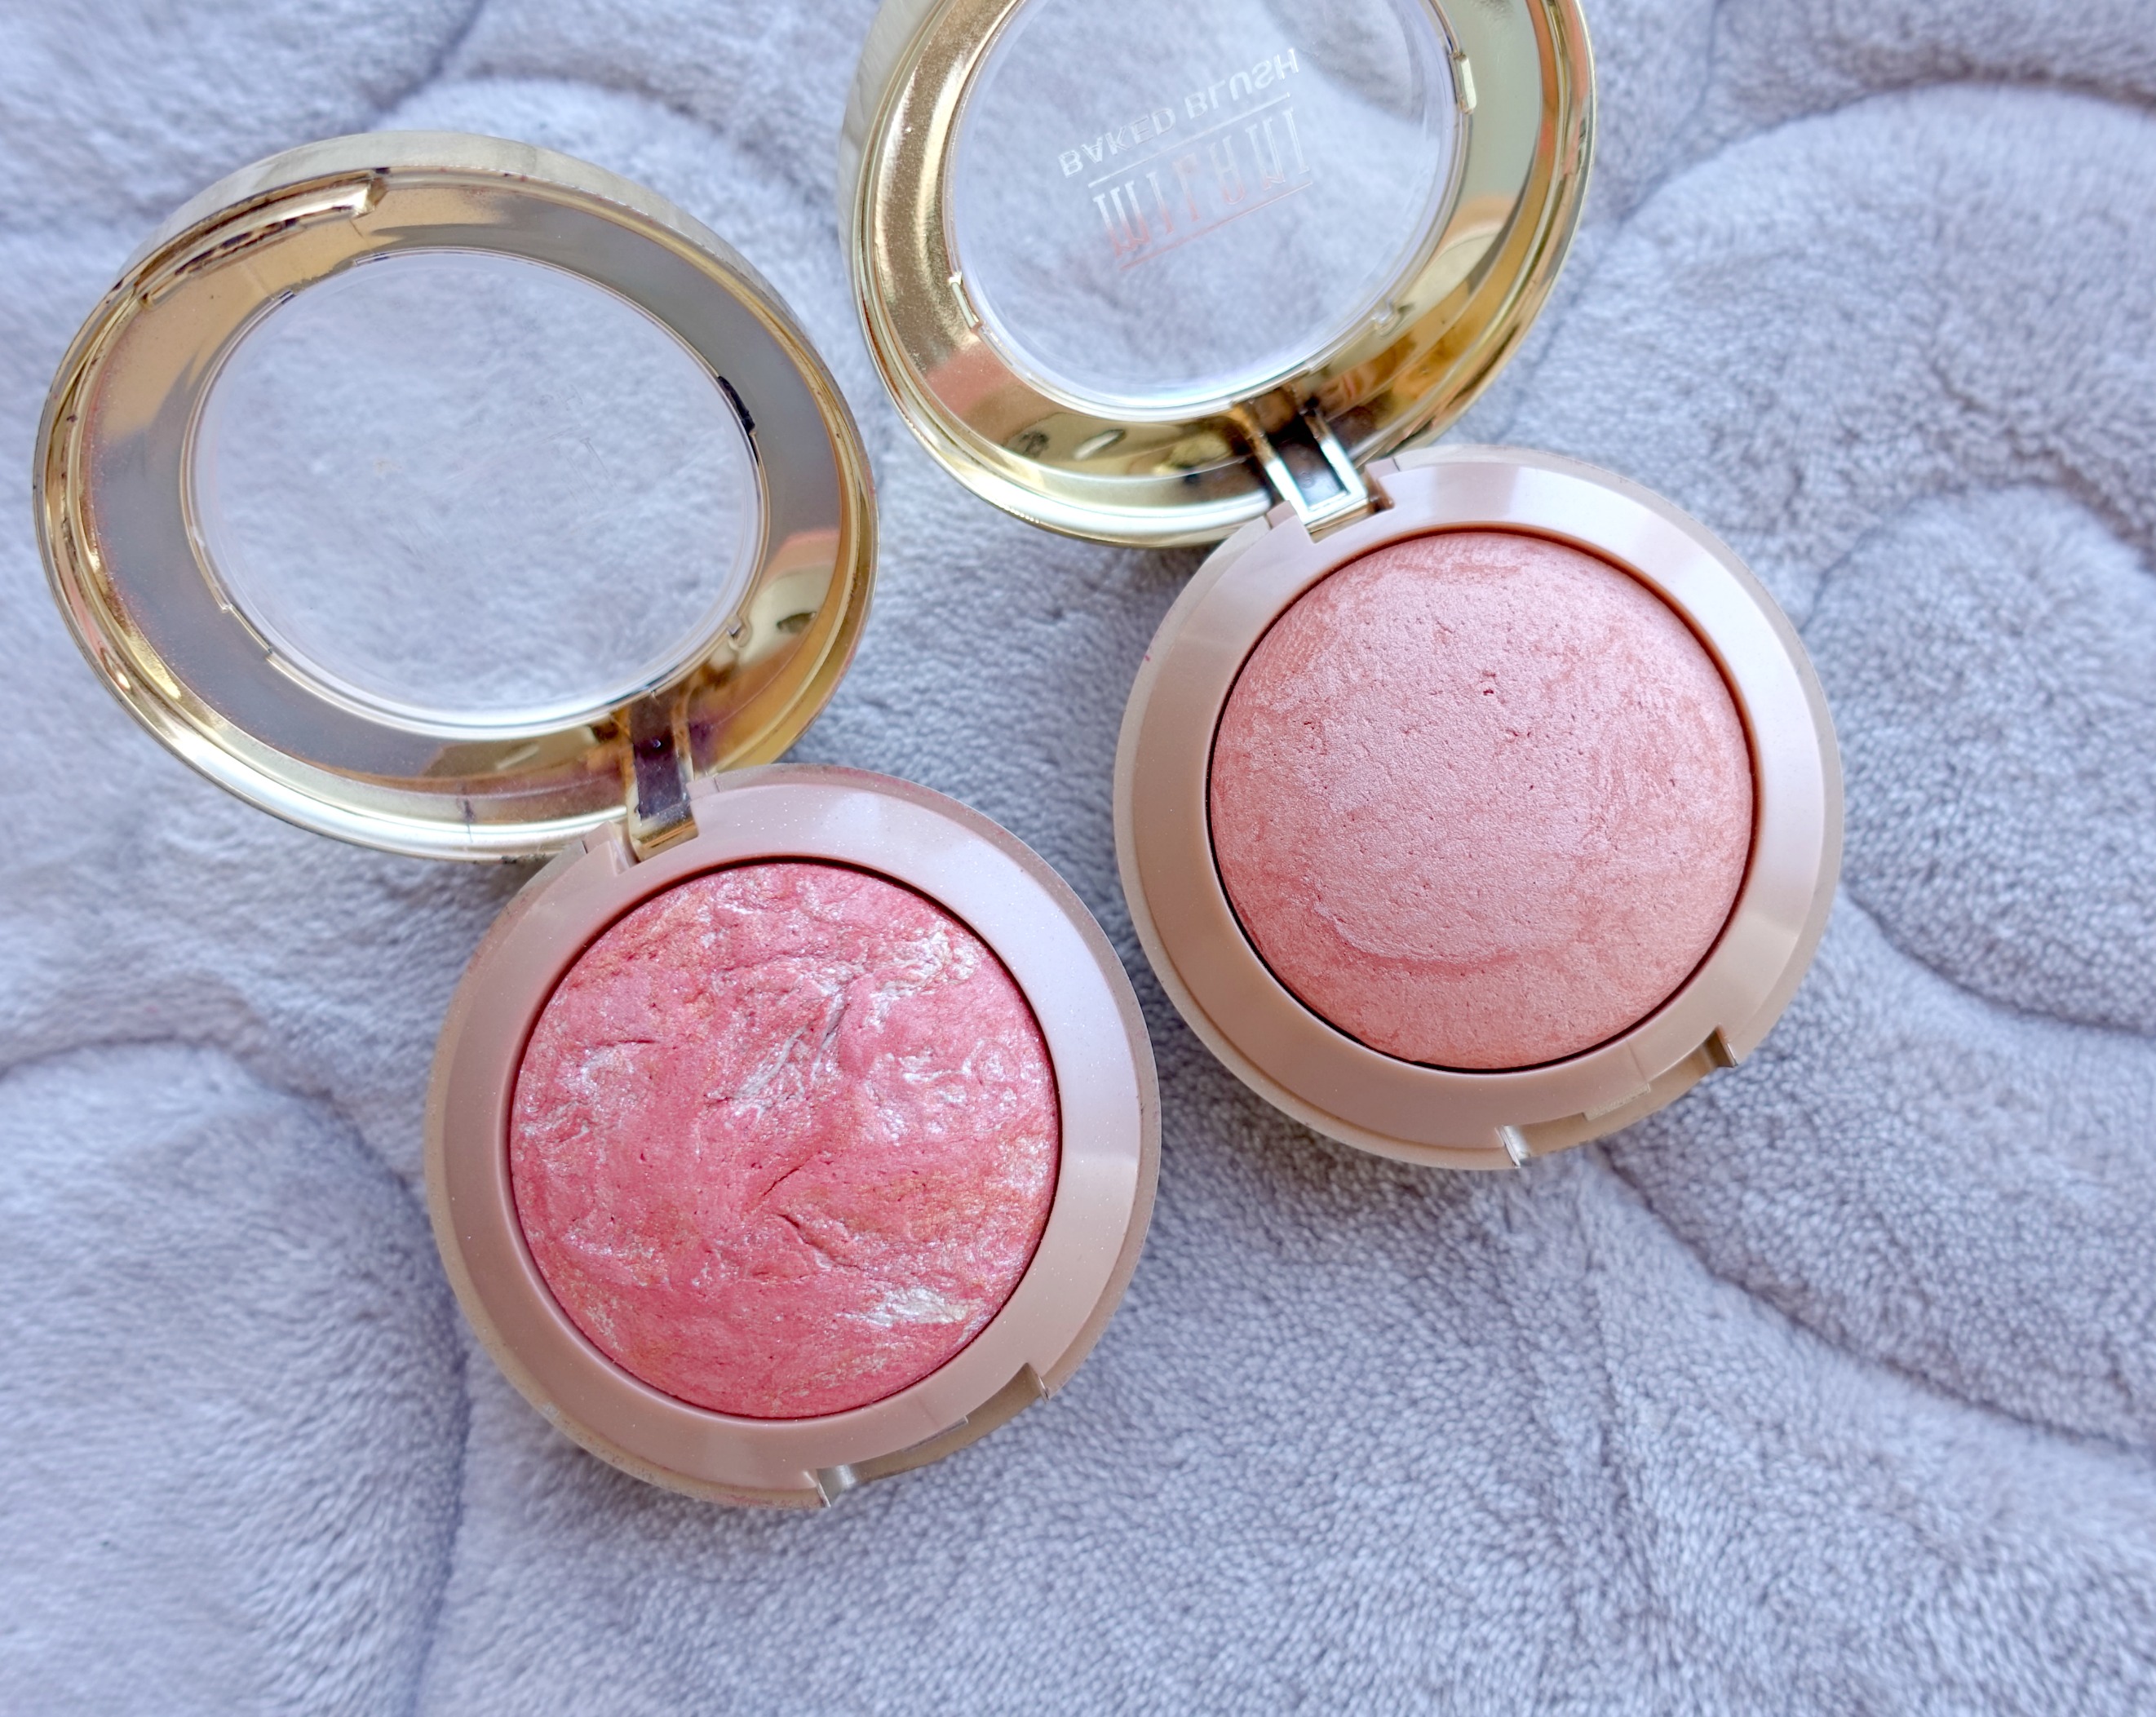
Here comes the fun part — the blush
I used two blushes to create this look– Milani Baked Blush in Corallina and Luminoso.
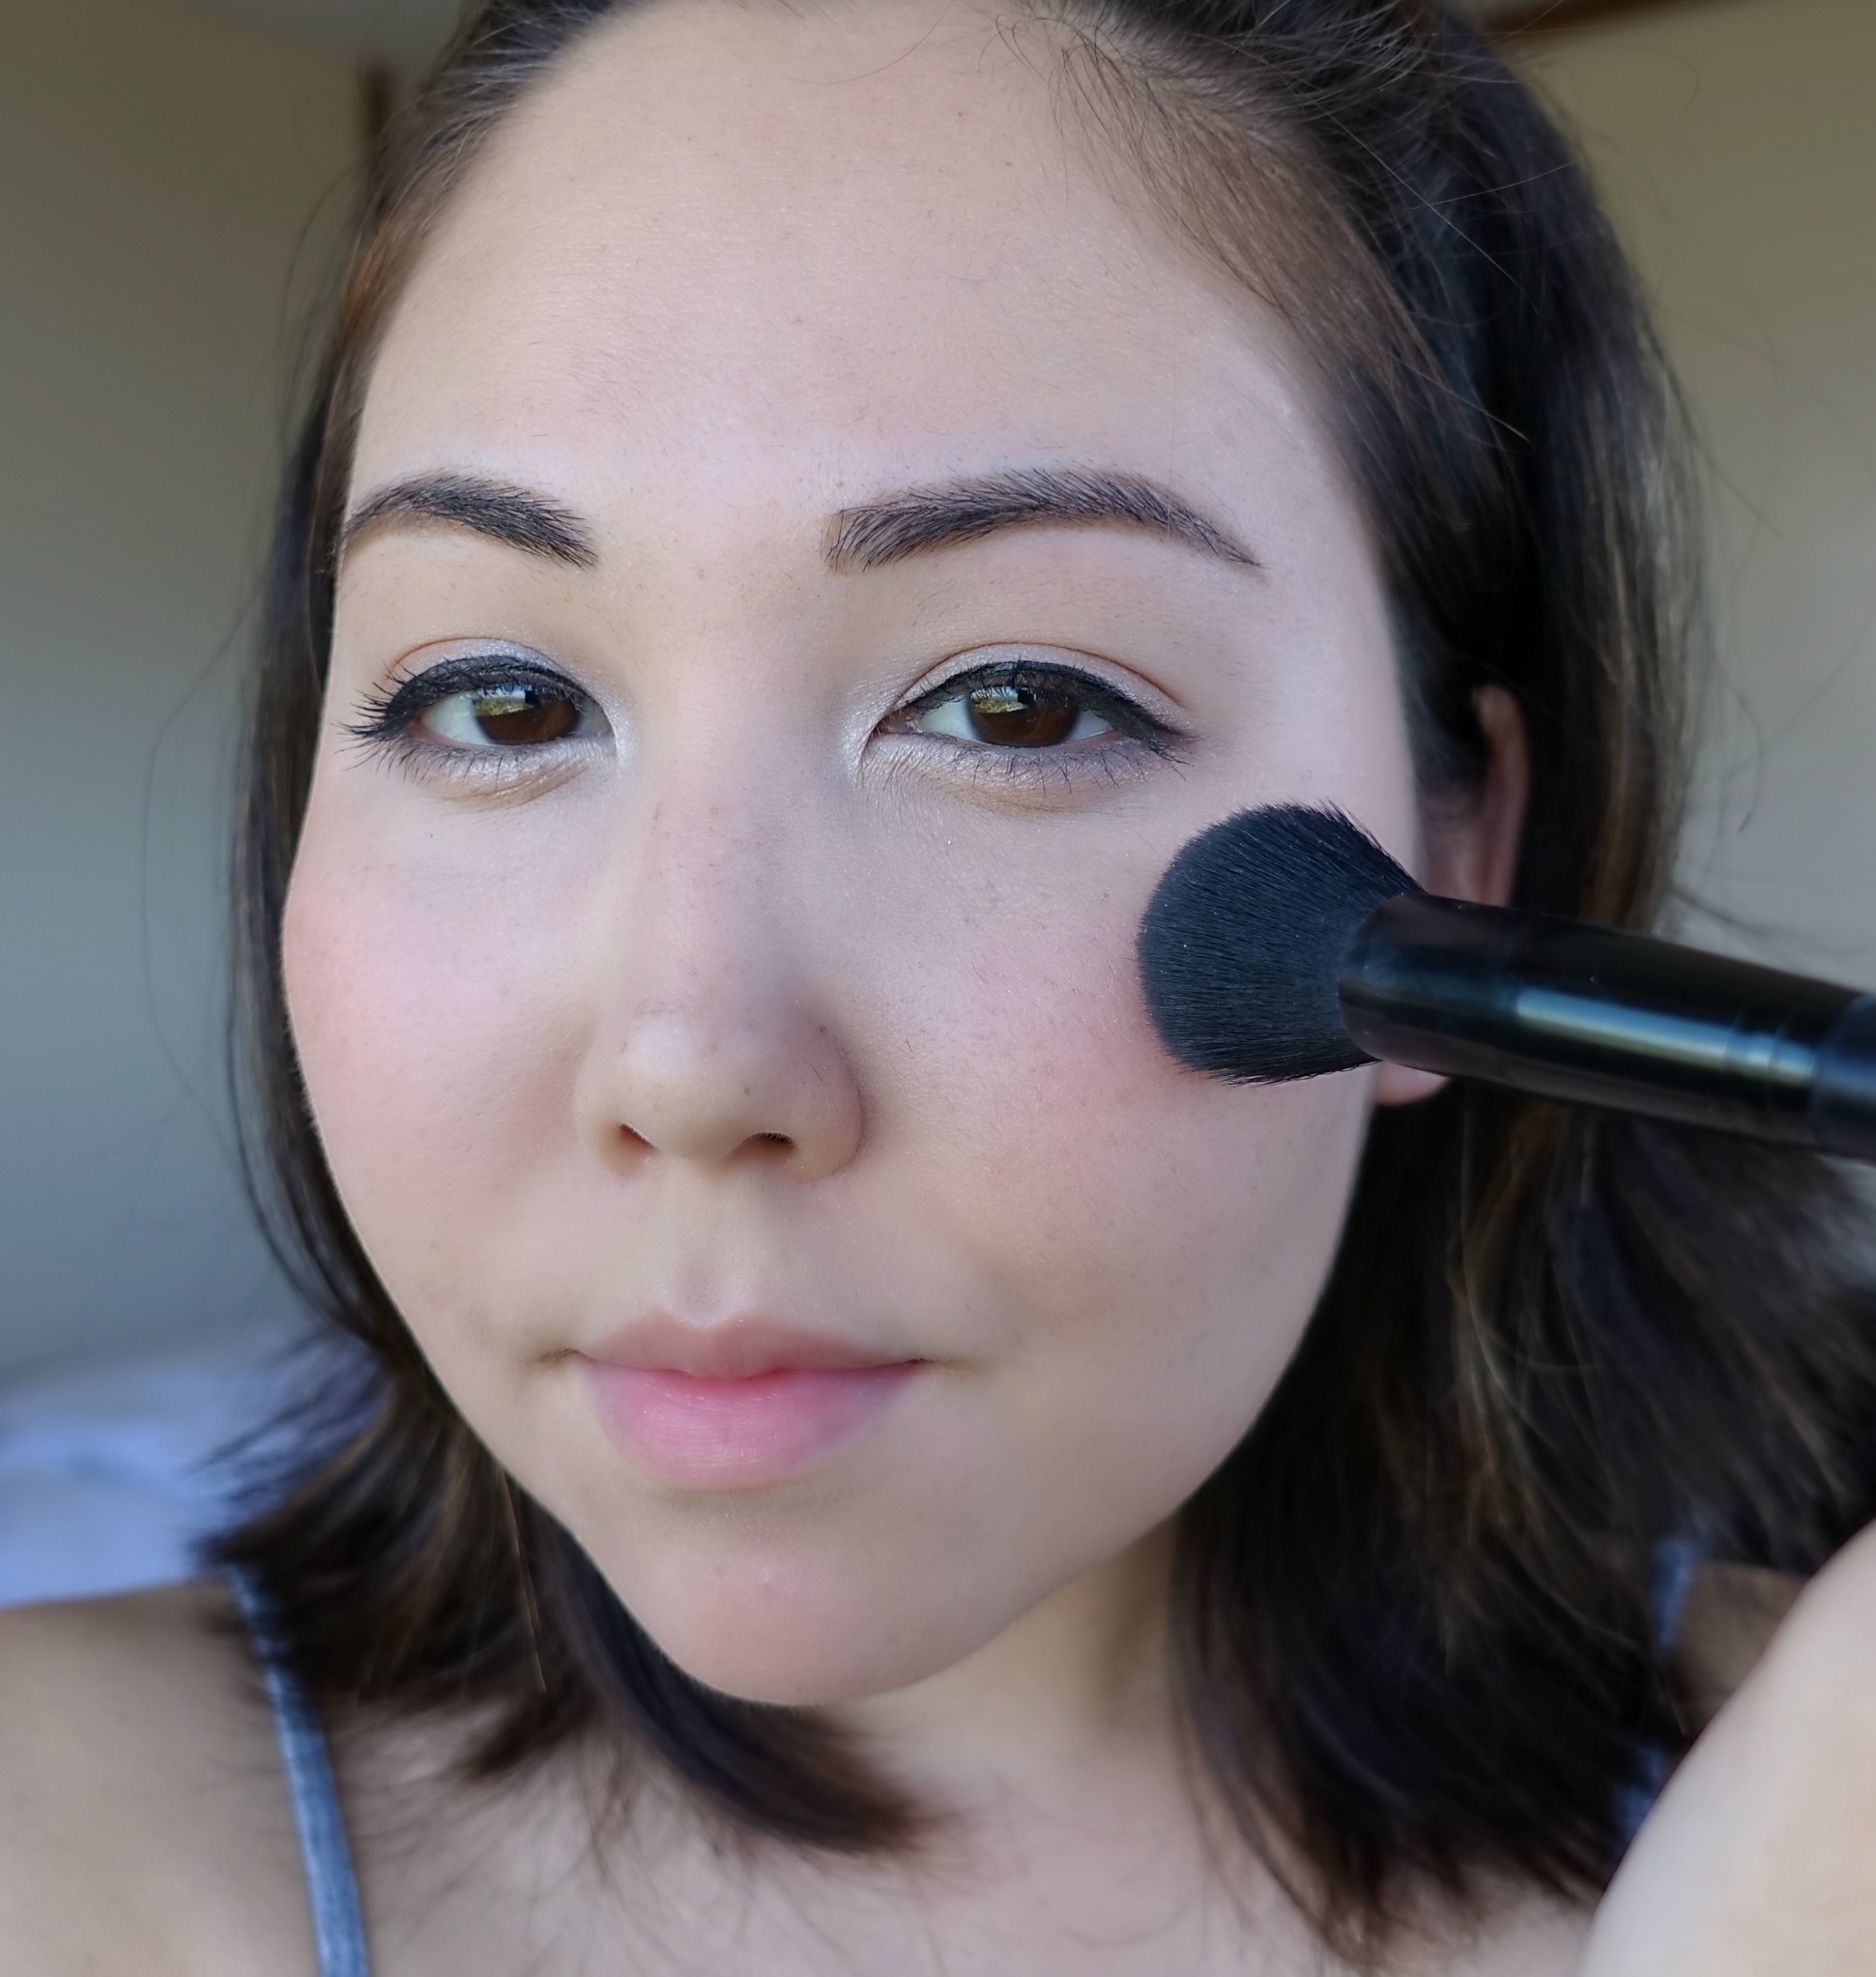
To really keep in control of where the color was deposited, I used a somewhat dense buffing brush to apply Coralina. To keep the look somewhat authentic, yet still wearable, I chose to apply my blush around the same area I would generally apply a highlighter. I placed the brush down right on the top of the apple of my cheek, and blended the color upward along the top of my cheekbone. I very faintly connected it with the outer corner of my eye.
Once the first color was down, I went back in with Luminoso. The slightly lighter colors helps blend everything so it looks more like a natural flush.
To top everything off, I applied a soft dusting of Wet n Wild Coloricon in Reserve Your Cabana to my entire face to enhance my dewy flush. I applied a more concentrated dusting right on top of the blush and around my entire under eye area. This is to further bring forward and highlight the puffiness.
Milani Baked Blush in Corallina >> Purchase on Amazon
Milani Baked Blush in Luminoso >> Purchase on Amazon
Wet n Wild Coloricon in Reserve Your Cabana >> Purchase on Amazon
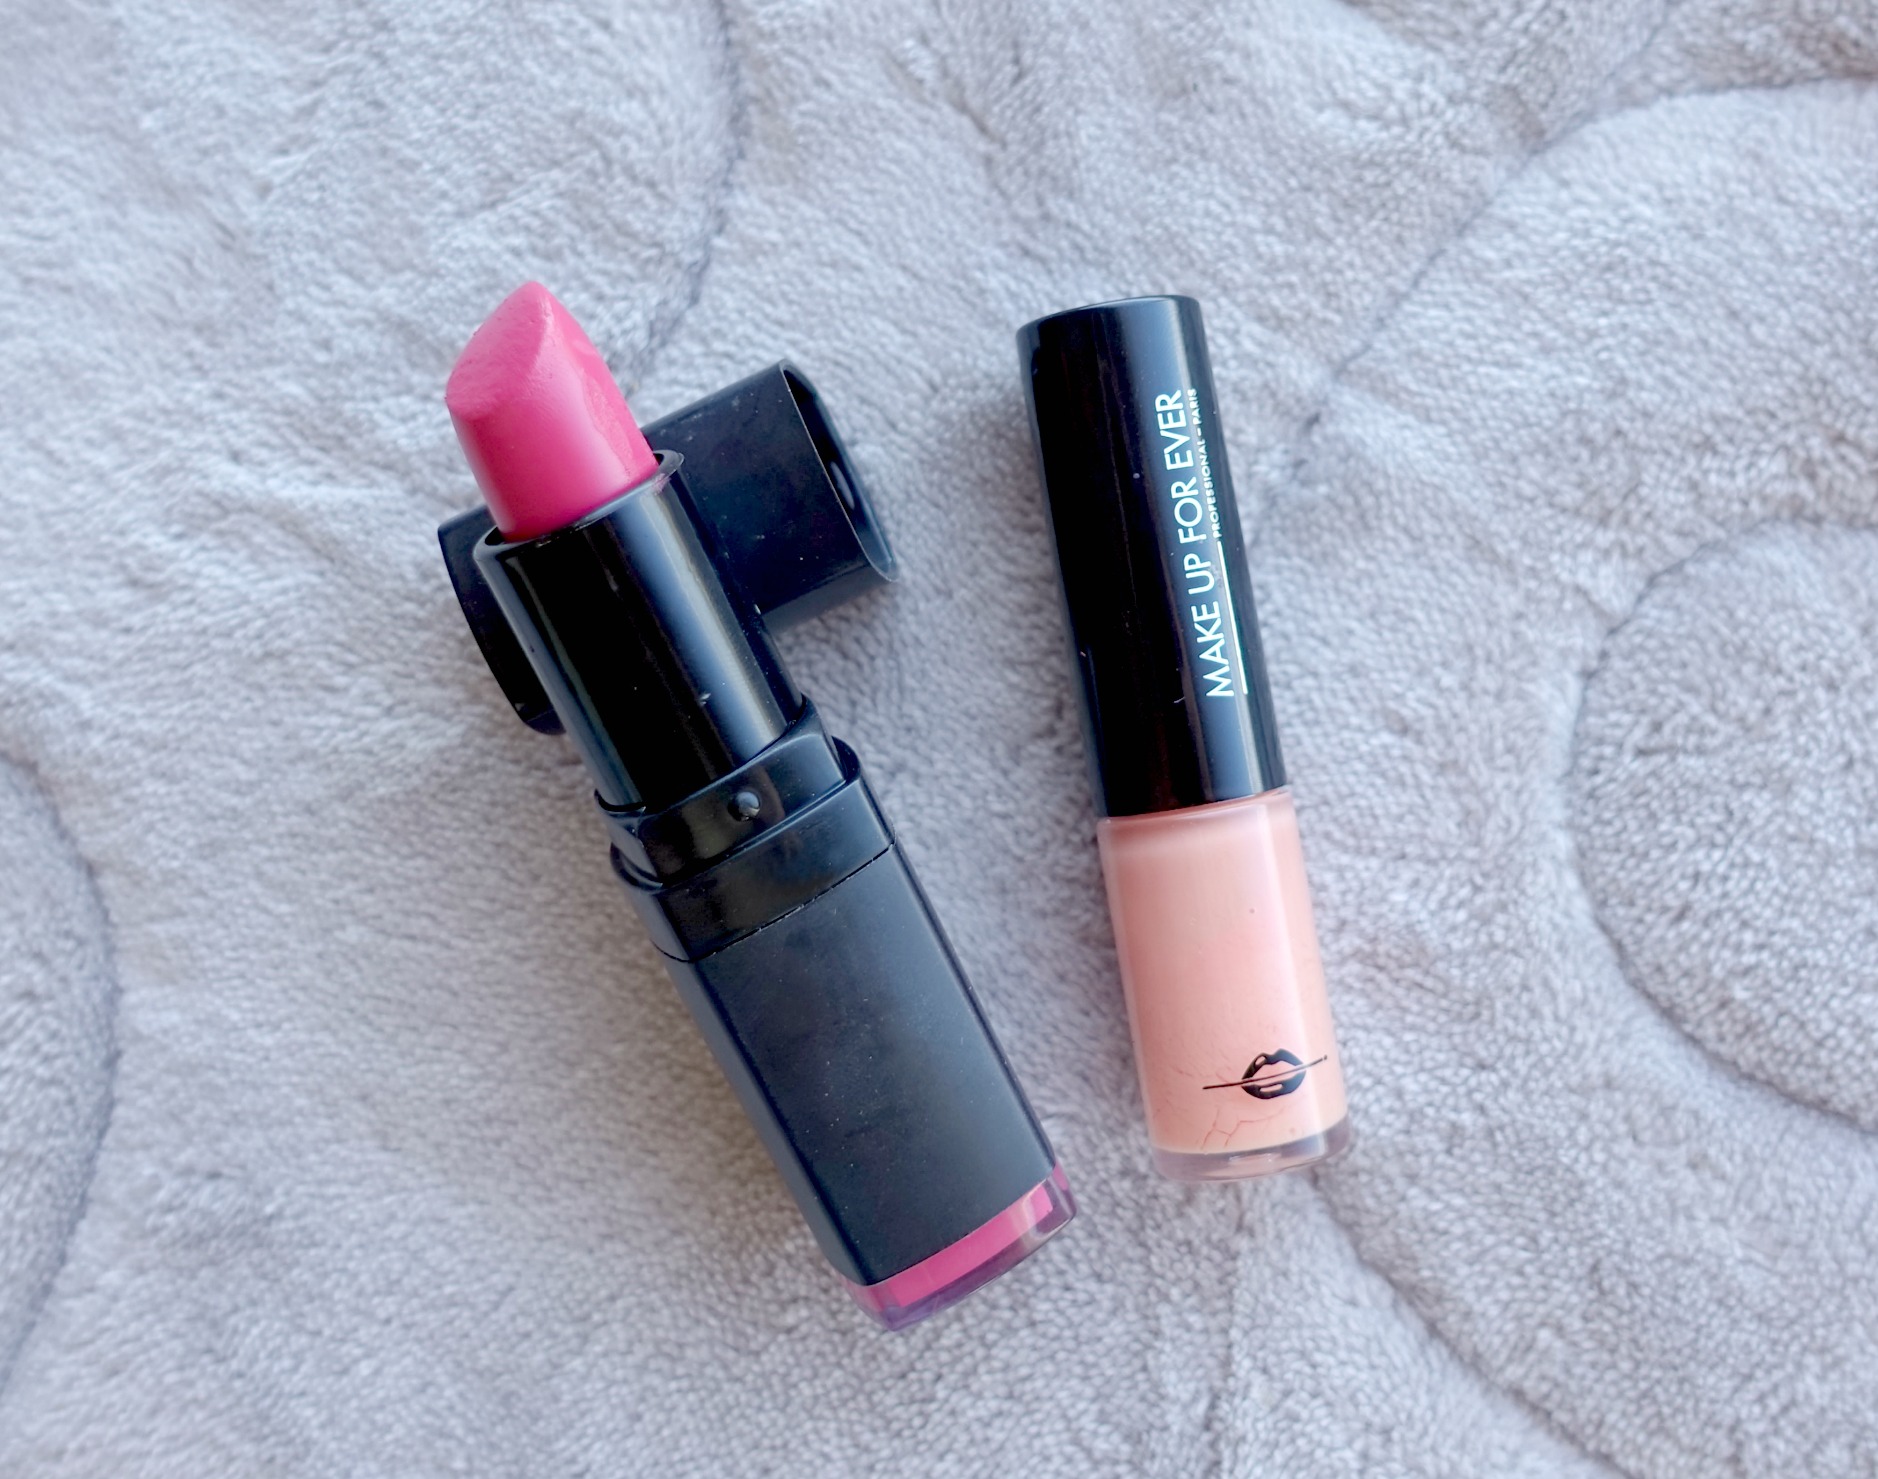
For the Lips
I applied a thin coat of E.l.f. Moisturizing Lipstick in Rosy-Go-Round over my entire lips, and blended it with my finger. Then, I applied a second layer just to the inner rim of my lips. I wanted a look that says, I’ve-been-sucking-on-a-cherry-lozenge.
To make it look more playful, I topped it off with a coat of Make Up For Ever Artist Plexi-Gloss in 202 Sweet Pink.
E.l.f. Moisturizing Lipstick >> Purchase on Elfcosmetics.com
Make Up For Ever Artist Plexi-Gloss >> Purchase at Sephora
Try this look out for yourself, and don’t forget to tag me on Instagram @themmaven so I can see your creations!
That’s all for today!
Related: Adaptable Travel Makeup + Easy Travel Makeup Routine
If you found this post interesting, informative, or just plain entertaining, please let me know below, and share this post.
Till next time. ♥︎
Sign up for my free monthly e-journal, The Millennial Maven Love Letters for exclusive content + millennial inspiration and lifestyle hacks. Plus get instant access to my library of on-the-go style downloads!
FTC- This post is not sponsored by any brands mentioned. I purchase all products myself. All opinions are my own. Some links may be affiliated.
I live in Singapore and i am a contented lady in the present day?
Thanks very nice blog!
As a Beginner, I am always checking out websites for ideas on how to improve my makeup skills. I never thought of doing a look like this, but it might be fun to experiment 🙂
I’m glad my blog is helpful for you, Arletha! Keep coming back for more! Thanks for reading 🙂 xo
Hmmm, this is interesting. The idea is that they want to look sick? That’s funny because we’re the exact opposite. We pile on the concealer and mascara and highlighter so that we look healthy and rested even when we’re not!
Yeah, it’s a cultural thing. Who am I to judge? Thanks for reading! 🙂 xo
Thanks for showing this very interesting makeup style! It’s different, but cute in it’s own way. Prolly wouldn’t do it myself though 😉
I totally understand. TBH, I wouldn’t go out on a non-Halloween day wearing this look, but it’s fun to play at home. Thanks for reading! 🙂 xo
Awesome look.
You’re so cool! I don’t suppose I’ve read anything similar to this before. So nice to discover somebody with original ideas. Keep creating!
Why thank you, Kira, but trust me, I’m really not all that cool. Just ask my high school classmates, lol. Thanks so much for reading! 🙂 xo
Nice post. I learn something new things everyday, and this is something I think is totally worth trying! Super cute!
Thanks for sharing. -Chanda
Thanks for reading, Chanda! 🙂 xo
I really enjoy your blog!
Pls check out my site too and tell what you think.
Hi Selena, I’d be happy to check out your site! Just leave me the link and I’ll pop right over! Thanks for reading. 🙂 xo
Nice post, thanks for sharing. Super creative. Would it be ok for me to use your content on my website? Of course credit will be provided.
Of course you may use my content, but please do include my link. 🙂 Thanks for commenting!
Thank you for giving the info. It will help me bunch.
You are very welcome! Thanks for commenting, and I hope you enjoy. 🙂