This post contains affiliate links. To learn more, hop over to our Disclosure page.
Just the thought of attempting winged eyeliner used to give me a headache. But it doesn’t anymore!
Today we are discussing a conundrum faced by so many makeup lovers, and that is how to apply winged liner on hooded eyes. If your eyes aren’t hooded, then lucky you! This tutorial will totally work for you as well!
I’ve always loved the look of a crisp, black wing, but I could never seem to get it quite right; I always looked like I had a runaway checkmark cowering on my eye. It just never looked like that bold, flowing line that my non-hooded-eyed compatriots could achieve.
But since I’m stubborn, I knew there had to be a way to make winged liner look good on my hooded eyes. After lots of trial and error, I’ve figured out the trick to making my wings like perfect little angel wings, and not checkmarks, every single time.
To see how I apply my winged liner to my hooded eyes, plus some bonus tips, click below to keep reading!

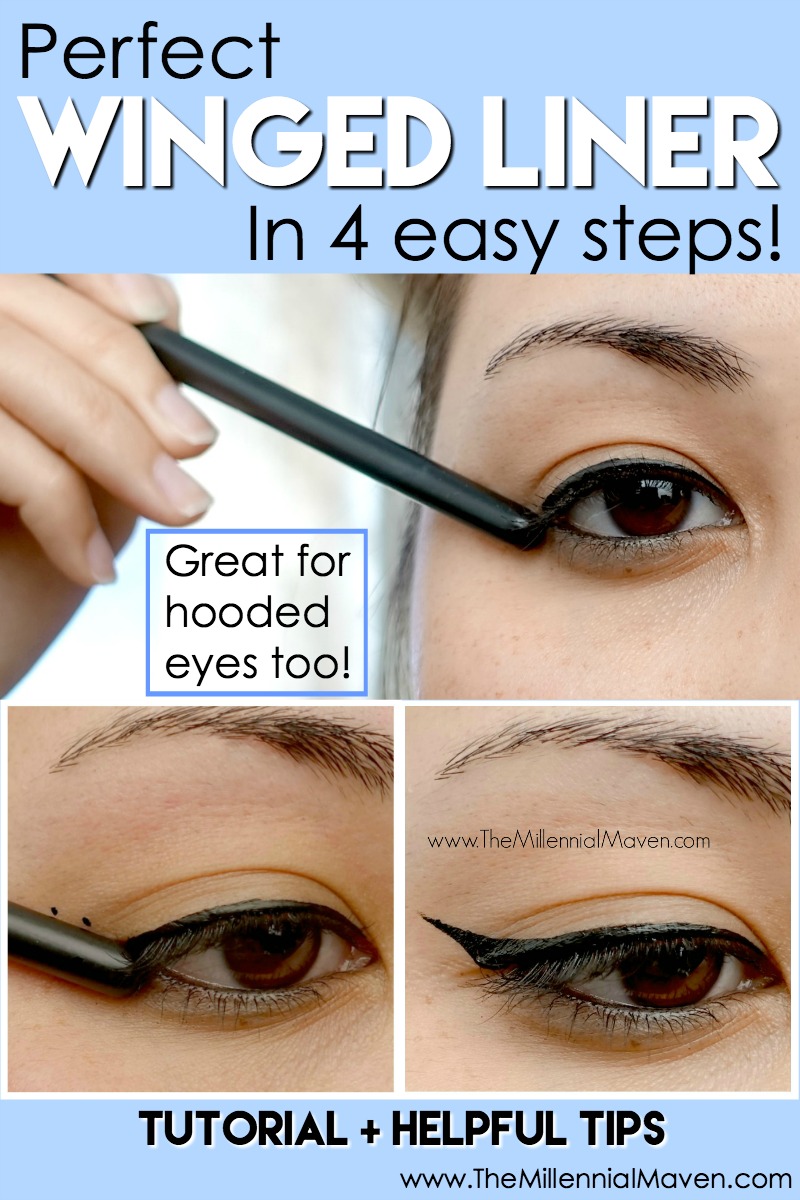
Step 1 — get the easy part out of the way
Look straight in the mirror, and apply one even line of eyeliner to your top lash line. (I am using a brush-tip liquid liner here, but you can use whatever you are comfortable with.)
The mistakes I made in the past started with this simple step. When I watched winged liner tutorials from women with non-hooded eyes, they would draw the wing first. Then, they dragged the line inward and across the upper lash line.
The problem with this is that since you are doing it with your eyes closed, you can’t see where your hood lands or how much visible lid space your have. When you open your eye, the wing is often much bigger and thicker than you anticipated, overwhelming your hooded eye. By applying a base line first, I can be sure that things don’t get out of hand later.
Recommended — Kat Von D Tattoo Liner in Trooper >> Purchase at Sephora
Step 2 — evaluate your perfect angle
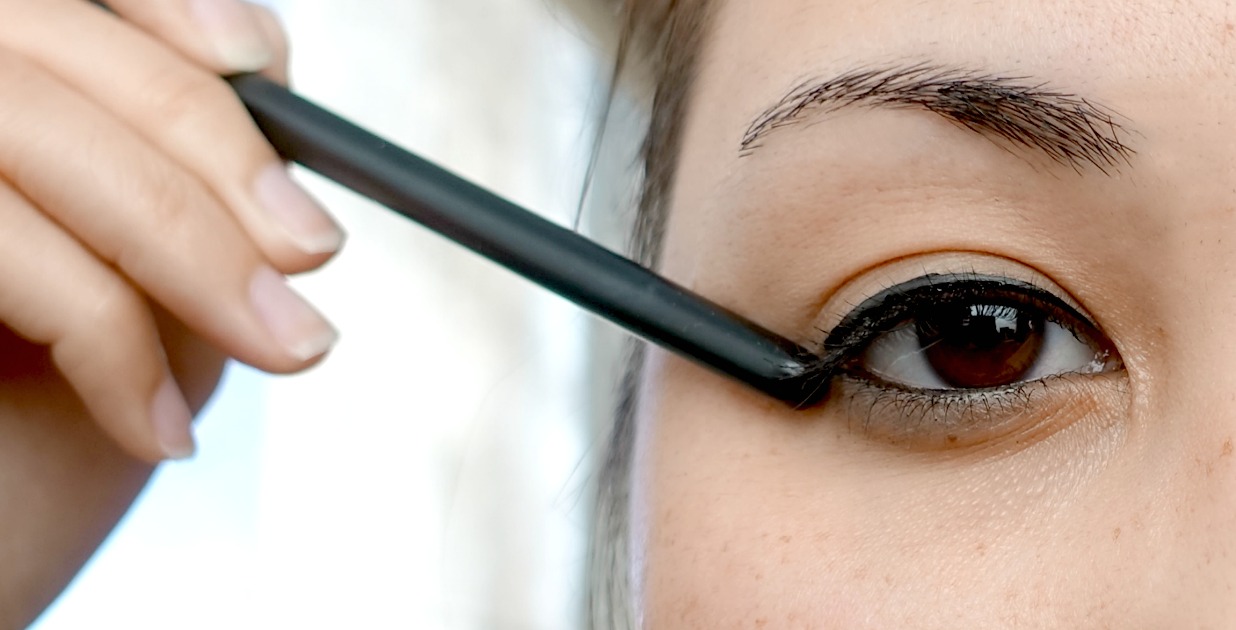
Next, decide on the angle of your wing. I use a brush handle to help me with this. Place the end of the brush at the corner of your eye, lining it up with the slant of your lower lash line. Place two small dots along the brush line– one just at the hood fold, and one slightly before the point where you want your wing to end.
This is important, so pay attention— be sure that the imaginary line you create with the brush handle does not cross over the hooded part of your eye. You want the initial line you draw to be on a flat surface. If this line crosses over your hood, then there won’t be space to smooth out the line on the top side of your wing. Without smoothing the top, the wing will look like a checkmark. If you attempt to smooth it but take the liner across your hood, it will still look like a checkmark. It’s really just a lose-lose situation.
Keep the wing below the hood, being careful to not let your wing point down, as this can make your eyes look droopy. Straight out to the sides is fine, and necessary even, if your eyes are completely hooded, but please not down.
It’s just a matter of trial and error to see which angle works for you. For me, using a black brush handle, as silly as this sounds, helps me to visualize the wing. This helps me get the angle correct on the first side, and then get the angle the same on the second side.
Step 3 — let’s play connect-the-dots
Make sure that the line you draw is completely visible when you open your eye. It should not be obstructed by your hood falling over it.
I find that I get a better result when I start this line slightly above the corner of my eye, rather than right at the corner. I then start filling in the wing from the bottom. I’ll draw a line from the actual corner of my eye, and flick it upward just past the second dot to conceal the dot and give my wing a nice, fades into nothingness look. This is where having a liner with a super precise tip, like Kat Von D’s Tattoo Liner does is so helpful.
Fill in the triangle if necessary.
Dupe alert! For an inexpensive (but just as awesome) alternative to the Kat Von D Tattoo Liner, try Physicians Formula Eye Booster Eyeliner Plus Serum. It features a very similar brush tip, not to mention a super black, long lasting formula.
Physicians Formula Eye Booster Eyeliner Plus Serum >> Purchase on Amazon
Step 4 — smooth and perfect
Smooth out the top edge of the wing with your liner, being careful to stay below the hood. Stop periodically when you are doing this and check your progress in the mirror. If there are any parts of your liner that you can’t see, then you’ve gone too far. If this happens, don’t panic. There are several, ways to fix this discussed below.
That’s it! Easy, right!?
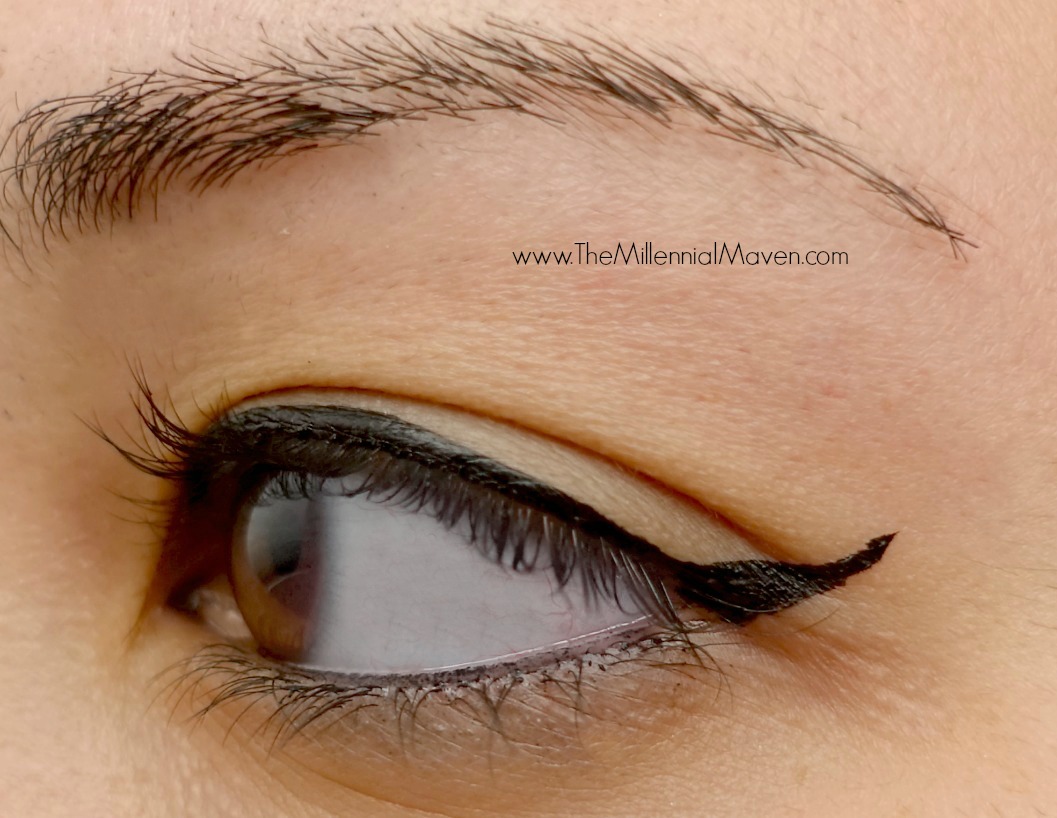
what not to do
This photo is an example of what will happen if you draw your initial line over your hood. Believe it or not, the top edge of that wing is in fact straight. However, it looks all curved and deformed because my hood is distorting it. In this case, I should have paid more attention to where I was drawing my guideline.
a few helpful tips for perfect winged liner
Avoid rounded wings — I actually don’t think these look good on anybody, but they can look especially strange on hooded eyes. Aim to keep your wings as straight as possible. Adjust the angle of the line to avoid the hood, rather than trying to curve around it.
The less visible eyelid space you have, the thinner the line should be — Adjust the size of your wing to the amount of space you have. I have a medium amount of lid space, so I can do a medium-sized line. Figure out a wing size that looks proportionate to your eye, and avoid pushing the limits too much, at least for everyday wear.
Buy an E.l.f. Makeup Remover Pen — These things are so simple, yet so amazing! The precision felt tip dispenses the perfect amount of makeup remover to clean up any smudges or jagged lines without melting away all your hard work. They’re $3.00. I can’t recommend them enough.
E.l.f. Makeup Remover Pen >> Purchase at Elfcosmetics.com
That’s all for today!
If you liked this post, check this one out too –> Kat Von D Immortal Lash Review: A “Scary” Good Mascara
If you found this post interesting, informative, or just plain entertaining, tell me about it in the comments below, and share this post on social media!
Till next time. ♥︎
Sign up for my free monthly e-journal, The Millennial Maven Love Letters for exclusive content + millennial inspiration and lifestyle hacks. Plus get instant access to my library of on-the-go style downloads!
FTC- This post is not sponsored by any brands mentioned. I purchase all products myself. All opinions are my own. Some links may be affiliated.
This is a really good tip. Short and to the point! I can see this being useful to a lot of people.
Lorraine
Thank you, Lorraine! Glad you enjoyed 🙂 xo
You’re not the only one, I’ve heard that too. The more people tell me I can’t do something, the more determined I become. It’s the stubbornness from my dad, haha. Thanks for reading! 🙂 xo