This post contains affiliate links. To learn more, hop over to our Disclosure page.
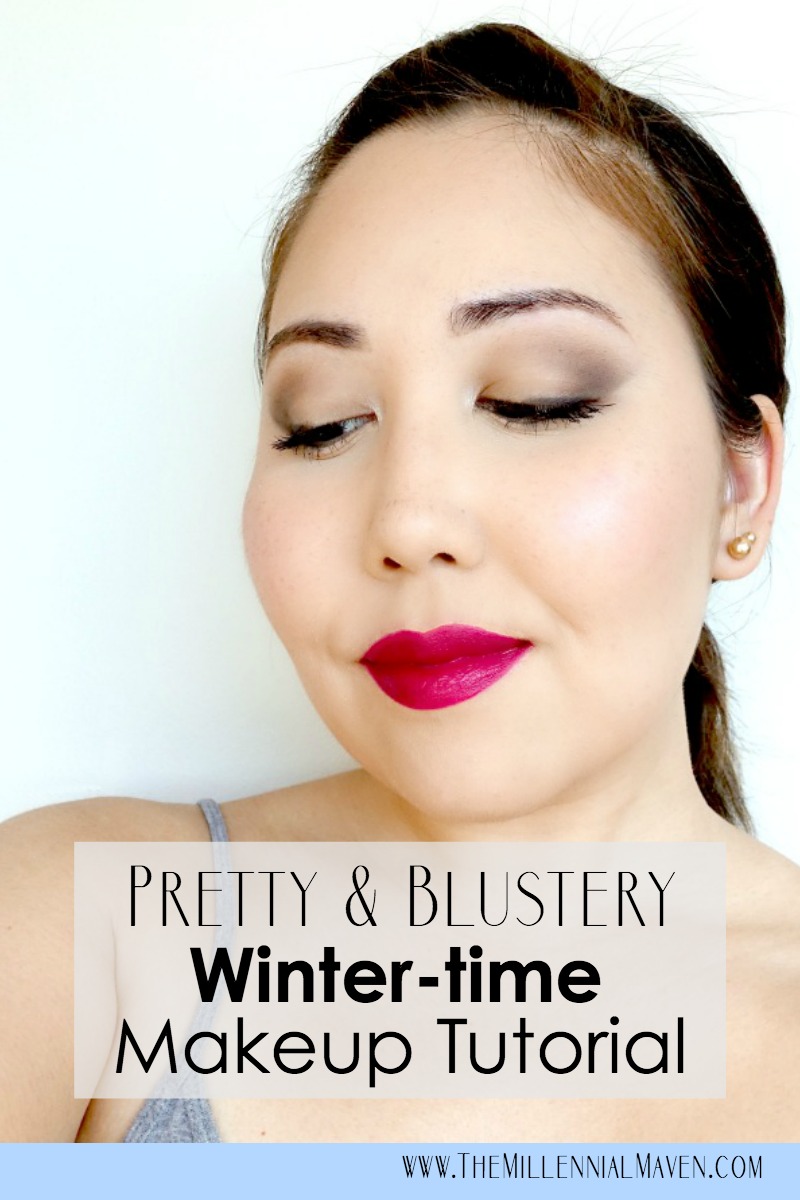
Winter is my favorite season, if not for the comfortably-chilly weather, than definitely for the makeup!
Cool smoky eyes paired with statement lips are totally my jam. I wear this look year round anyway because I’m a rebel like that, but something about it just feels so special in the winter time.
When the winter gets cold, skin often loses the luster it has in the warmer months. We’re taking care of that!
This winter makeup tutorial includes plenty of moisture, shimmer, and color that’ll keep you looking fresh, alive, and stylish all winter long.
I promise, you won’t be blending into the grayness wearing this winter makeup!
Ready to get started?
p.s. If you don’t have time to devour the entire post right this minute, (though I know you want to 😉 I’ve included a handy PDF download so you can take a condensed version of this tutorial on the go with you! Super convenient, if I do say so myself. >>

Moisturize, moisturize, moisturize
This should go without saying, but it’s especially important in the winter. The cold temperatures and wind wreak havoc on our faces, as your face is the one area of skin that is almost always exposed to the elements.
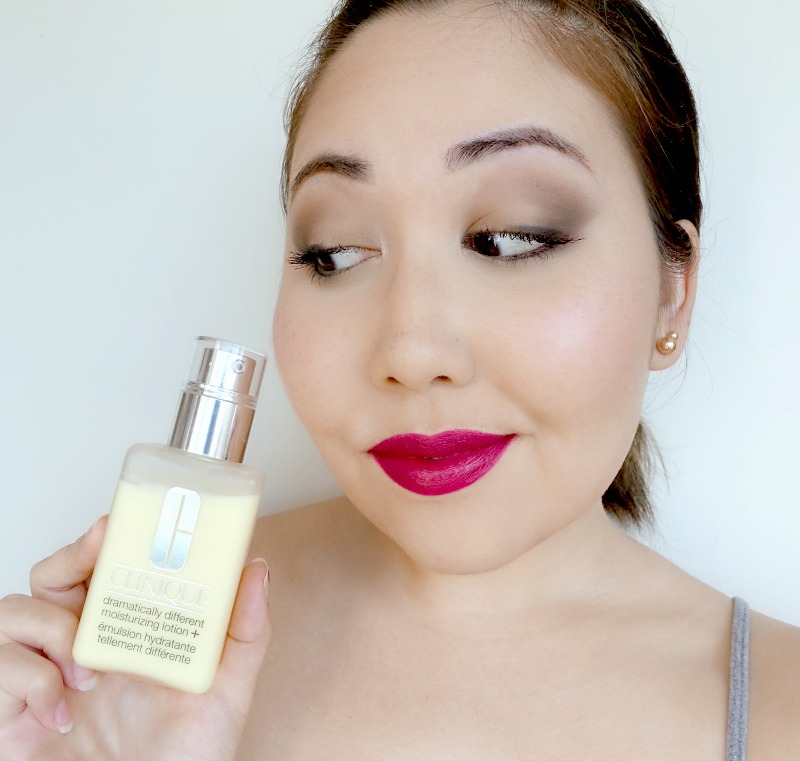
Before you apply any makeup, massage a generous amount of moisturizer over your entire face. Then, go and grab a warm cup of tea. No, seriously.
Allowing the moisturizer a few minutes to mesh with your skin ensures that it won’t interfere with your makeup’s blendability. Plus, you can definitely use the warmth, hydration and yummy goodness tea provides.
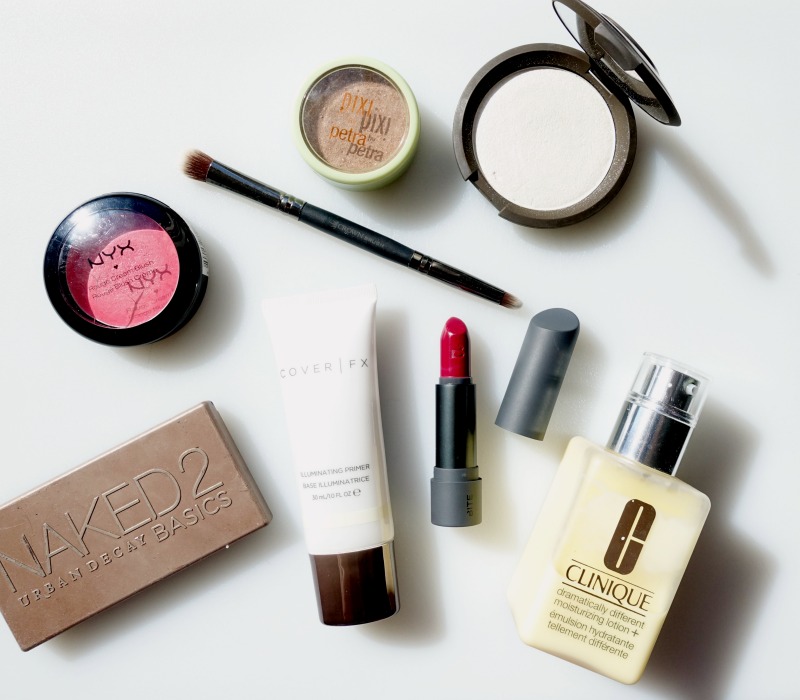
Clinique Dramatically Different Moisturizing Lotion+ has been my go-to for ages, but use whatever moisturizer you like.
Clinique Dramatically Different Moisturizing Lotion+ >> Purchase at Sephora
Fill in your brows and prime those eyelids
I opt for a more natural brow style when pairing it with a statement lip. I feel like it keeps the overall look more wearable. Today, I’m wearing Sephora Retractable Brow Pencil in Midnight Brown . Fill in your brows however you see fit. Make the look your own, you know?
Now is also the perfect time to prime your eyelids for eyeshadow. We won’t be applying very much eyeshadow today, making this step especially important.
My Nars Pro-Prime Eyeshadow Base guarantees even the lightest application of eyeshadow will stay put without fading all day long.
Sephora Retractable Brow Pencil >> Purchase at Sephora
Nars Pro-Prime Eyeshadow Base >> Purchase at Sephora
Shade the upper crease with a light gray shadow
Using a fluffy blending brush, liberally sweep a light gray eyeshadow all over the upper crease. This acts as a transition shade, plus it adds the first layer of definition to the crease. I’m using the shade FRISK from the Urban Decay Naked2 Basics Palette.
Urban Decay Naked2 Basics Eyeshadow Palette >> Purchase at Sephora
E.l.f. Crease Brush >> Purchase at Elfcosmetics.com

Deepen the outer crease
Next, pick up a slightly darker grayish brown shade on a medium dome brush and starting at the outer corner of the eye, carefully blend up and out. The goal is to create a wispy cat-eye effect using shadow instead dramatic eyeliner.
Once you’ve achieved the angle you like, gently drag the color into the crease. For a more daytime-ish look, I prefer to bring the color in only half way. However you can bring it all the way toward the bridge of your nose for a smokier effect.
For this step, I’m using PRIMAL from the Urban Decay Naked2 Basics Palette.
E.l.f. Contour Brush >> Purchase at Elfcosmetics.com
Darken the outer corner
Finally, add as much depth as you’d like to the outer corner using a charcoal gray shadow on a small smudge brush.
TIP: Keep the color in the smallest area possible for a daytime appropriate look. I’m taking an area not much bigger than the tip of the brush. Dab the color on, and carefully blend the edges, being careful to not spread the color too far.
I’m using UNDONE from the Urban Decay Naked2 Basics Palette.
Clean up for a slick cat-eye effect
To achieve the overall cat-eye shape I like, I use my E.l.f. Makeup Remover Pen to clean up the lower edge of the shadow. You could use tape or even Post-it notes if you are so inclined, but I didn’t feel it would be necessary for a simple look such as this one.
E.l.f. Makeup Remover Pen >> Purchase at Elfcosmetics.com
Enhance your smoky cat eye with black liner
Line your waterline and tightline using your favorite black pencil liner. I’m currently in love with Marc Jacobs Highliner in Blacquer, as you can probably tell if you’ve seen a number of my recent tutorials.
For a bit more drama, add some liner to the upper lash line. Since my eyes are rather close-set, I like lining only the outer half of my lash line to give my eyes a more spread out effect.
Blend the liner slightly with a pencil brush.
Marc Jacobs Highliner in Blacquer >> Purchase at Sephora
Add life to your face with an illuminating primer
Now that your moisturizer has had plenty of time to set, we can start on the face.
First things first- we must combat the dullness winter weather so graciously affords us. An illuminating primer is a must.
Apply a smallish pea sized amount of Cover FX Illuminating Primer to your face. Concentrate the product on the tops of your cheekbones, and anywhere else you like highlighting. This gives you a little boost in the glow department.
Cover FX Illuminating Primer >> Purchase at Sephora
Even your skin with a moisturizing BB cream
Since the air is so dry, the last thing you want to do is to enhance the dryness with a super heavy, cakey foundation. Plus, I feel like the light coverage lends itself well to the “blustery” look I’m trying to achieve.
Apply a light coverage, moisturizing BB cream, such as Urban Decay Naked Skin One & Done all over your face and blend well.
Don’t worry if you need more coverage, the next step will take care of that. Promise.
Urban Decay Naked Skin One & Done >> Purchase at Sephora
Add concealer only where necessary
Dot concealer under your eyes and over any blemishes, and blend using a brush or BeautyBlender. No surprise, I’m going with my favorite concealer of all time, Urban Decay Naked Skin Concealer.
FYI- Curious about your best options when it comes to BeautyBlender dupes? Check out these posts on the Real Techniques Miracle Complexion Sponge and the RickyCare NYC Classic 3D Blender to see how these “dupes” stack up!
Try to apply as little concealer as you feel comfortable with. You want as much of your pretty skin as possible showing off it’s radiance for this winter makeup look!
Urban Decay Naked Skin Weightless Concealer >> Purchase at Sephora
Beauty Blender Original >> Purchase at Sephora
Real Techniques Miracle Complexion Sponge >> Purchase on Amazon
Even winter makeup needs setting powder
Rule of thumb- the more moisturizer you apply, the more powder you can apply without looking too dry and cakey. Since we emphasized the moisture earlier, we’ve now got plenty of leeway to add powder for a smooth and flawless finish.
I’m using E.l.f. High Definition Powder because it’s super finely milled, and it gives a very natural finish without ever looking too powdery.
Apply the powder heavily under your eyes and wherever you want to highlight. Allow it to set for a minute while you apply a light dusting of powder over the rest of your face. Sweep off any excess powder.
E.l.f. High Definition Powder >> Purchase at Elfcosmetics.com
A bit of shimmery bronzer goes a long way
For a bit of extra glow, try using a lightly shimmery bronzer in your winter makeup routine. You don’t want something super glittery, but a subtle bit of shimmer can really liven up your face.
I apply a gentle sweep of Pixi By Petra Summertime Bronzer to my cheeks and forehead for subtle definition.
(I’m not contouring with this, in case you’re wondering. If you’d like to contour, try something like Benefit Hoola Bronzer.)
Pixi By Petra Summertime Bronzer >> Purchase on Amazon
Benefit Hoola Bronzer >> Purchase at Sephora
Recreating a naturally flushed glow on the cheeks
I rarely use cream blushes, but I feel like winter makeup is the perfect opportunity to break out the products that tend to melt off in the summer.
NYX Rouge Cream Blush in Glow is the perfect rosy shade that’ll make your cheeks look perfectly flushed from the cold, in a good way!
To apply, lightly dip a stippling brush into the cream and dab onto the apples of your cheeks. Most of the time, one dip is good enough for both cheeks. Make sure most of the color is off your brush before you begin blending.
Focus the color on the apples of your cheeks, and blend the color upward and back toward the tops of your ears. (Don’t blend down, though.) This blush technique definitely covers more surface area than usual, but you end up with a really cute, flushed look that I think matches perfectly.
NYX Rouge Cream Blush in Glow >> Purchase on Amazon
E.l.f. Small Stipple Brush >> Purchase at Elfcosmetics.com
Highlight basically everywhere
Okay, I suppose you’ve heard me saying this enough, but no dull skin here!
I’m choosing Becca Shimmering Skin Perfector in the shade Pearl because it’s super shimmery, and plus the white color just screams “winter makeup” to me.
Lightly brush the highlighter on the tops of your cheekbones, on your forehead, the bridge of your nose, chin, and cupid’s bow. Dust it all over if you’d like. I often do. #highlighterpride
Becca Shimmering Skin Perfector in Pearl >> Purchase at Sephora
Finishing touches on the eyes
While you’ve got your highlighter open, dab a small amount on the inner corners of your eyes and on your brow bone to bring a little extra light to your eyes. They’ll stand out beautifully.
Throw on your favorite mascara and some falsies if you are so inclined, and you’re done!
Nars Audacious Mascara >> Purchase at Sephora
Swipe on a statement lip color
The lips truly are the star of this look!
I’m wearing my absolute favorite berry-red lipstick, Bite Beauty Amuse Bouche in Beetroot. The shade is perfect, plus the formula is super moisturizing and rich. It’s the perfect complement for your winter makeup look for multiple reasons.
Just swipe on the lipstick straight from the tube and clean up the edges with a small lip brush to perfect the look.
Fin.
FYI- I love the Amuse Bouche lipsticks so much that I’ve got an entire post dedicated to them in the works right now! It will be posted next week. Keep an eye out!
Bite Beauty Amuse Bouche Lipstick >> Purchase at Sephora
That’s all for today!
Like this winter makeup tutorial? You’re sure to love this look too >> Daytime Smoky Eye feat. Tarte Tartelette In Bloom Palette
If you find this post interesting, informative, or just plain entertaining, tell me about it in the comments below! And don’t forget, sharing is caring. Share this post!
Till next time. ♥︎
Sign up for my free monthly e-journal, The Millennial Maven Love Letters for exclusive content + millennial inspiration and lifestyle hacks. Plus get instant access to my library of on-the-go style downloads!
FTC- Not sponsored by any brands mentioned. I purchase all products myself. All opinions are my own. some links may be affiliated.
That red lipstick looks flawless on you! Gorgeous babe xo
Why thank you, Millie! Thanks for reading, and for the sweet comment 🙂 xo