This post contains affiliate links. To learn more, hop over to our Disclosure page.
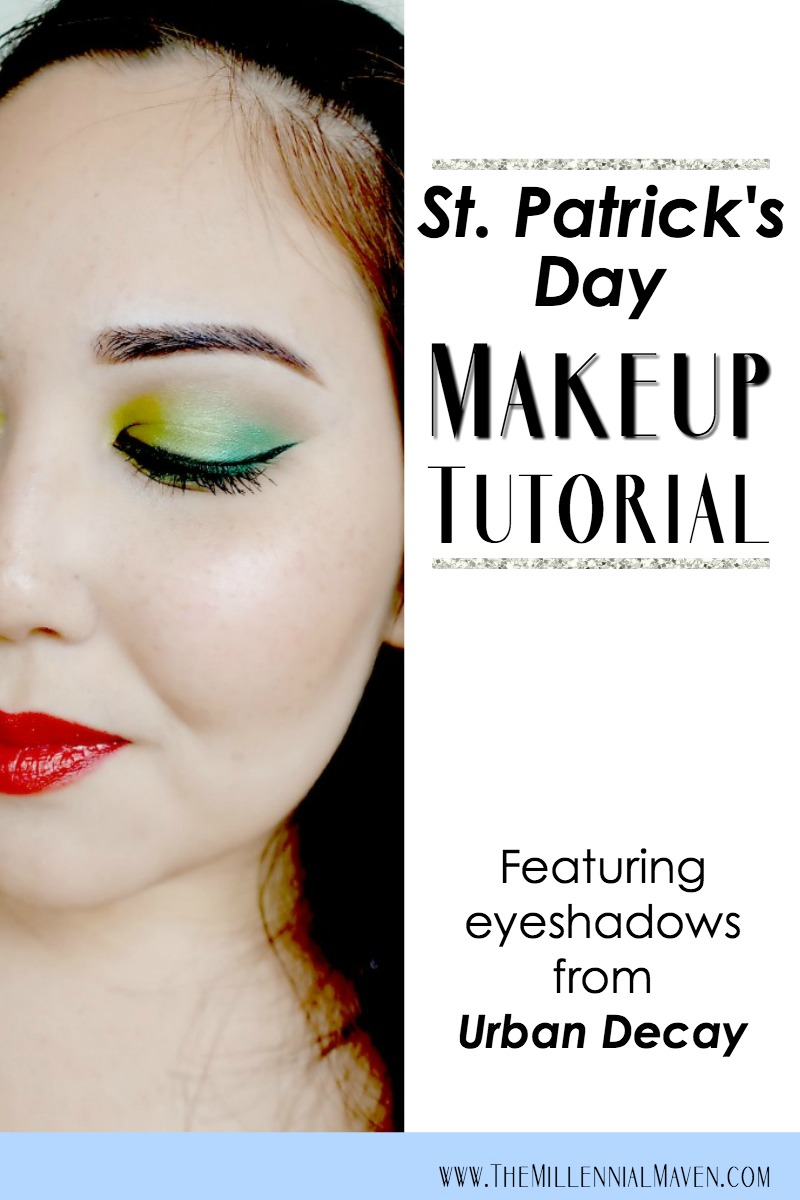
Spring is officially here! You know what that means- it’s time to break out all the bright and fun eyeshadows! And what better an occasion to start with than St. Patrick’s Day?
Now, I’m usually more of a natural makeup kind of girl, but something about St. Patrick’s Day really gets me in the mood to break out the green eyeshadows I shy away from all year long.
Perhaps it’s the four leaf clovers that have me feeling lucky.
Or the fact that I didn’t own a single green item in elementary school and so I got pinched a lot.
So now, I wear my greens loud and proud.
Keep reading to see how you can recreate this bright and fun look with minimal effort!
Eyes
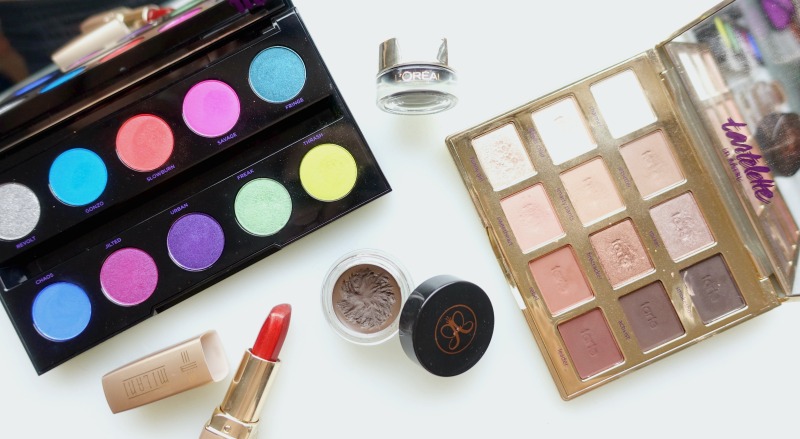
Urban Decay Electric Palette >> [Sephora] (50% off!)
Tarte Tartelette In Bloom Clay Eyeshadow Palette >> [Sephora]
Urban Decay Eyeshadow in Dragon >> Limited edition, substitutions below
Urban Decay Primer Potion Original >> [Sephora]
Anastasia Beverly Hills DipBrow Pomade in Dark Brown >> [Sephora]
L’Oréal Infallible Lacquer Eyeliner 24H in Blackest Black >> [Amazon]
Face
IT Cosmetics Your Skin But Better CC Cream >> [Sephora]
Maybelline Fit Me Concealer >> [Amazon]
Maybelline Fit Me Matte Plus Poreless Powder in Translucent >> [Amazon]
NYC Smooth Skin Bronzing Powder in Sunny >> [Amazon]
Clinique Cheek Pop Blush in Peach Pop >> [Sephora]
Becca Shimmering Skin Perfector Pressed in Opal >> [Sephora]
Lips
Milani Color Perfect Lipstick in Bonfire >> Discontinued, substitutions below
Starting with the eyebrows
As always, we start by defining the eyebrows. Figure out exactly where you want your brows to begin, where your arch should be, and how far you want to extend the tail.
Having this structure in place helps tremendously when you go in with your eyeshadows. It helps keep everything in line so your final look ends up looking defined and tidy.
For a more dramatic look such as this one, I recommend extending the tail of your brow just a bit farther out than usual. This helps to keep everything looking proportionate.
Anastasia Beverly Hills DipBrow Pomade in Dark Brown >> Purchase at Sephora
Apply eyeshadow primer & your shadow guide of choice
A good eyeshadow primer is a must for dramatic going-out looks like this one! Apply an even coat over your entire eye area, from your lash line, all the way up to your eyebrow.
On the outer edge of your eyes, blend the primer out just past where you think it should end. This makes blending the edges of your eyeshadow so much easier. Eyeshadow sits differently over primer than it does on bare skin, and you definitely don’t want to see the boundary.
Next, line up an eyeshadow guide of your choice from your lower lash line, up toward the tip of your eyebrow. I like using mini Post-It notes because they provide a larger surface area for catching fallout, but you can also use clear tape, masking tape, or even an old credit card if you don’t mind holding it in place.
Urban Decay Primer Potion Original >> Purchase at Sephora
Define the crease with matte taupe-brown shade
Begin by laying down a matte, taupe-brown in the crease. This provides some shadowy definition, and acts as a transition shade. I’m using the shade JETSETTER from the Tartelette In Bloom palette, but any cool-toned medium matte brown will work.
Apply the color liberally and blend until there are no harsh edges. But don’t worry, we’ll come back later to add more definition.
Tarte Tartelette In Bloom Clay Eyeshadow Palette >> Purchase at Sephora
Press bright green shade onto the inner third of the lid
Using a small shader brush, begin packing the bright green shade on to the inner third of your lid. Try to keep as much of the color as possible on the inner third, but don’t worry if goes a bit too far toward the center.
Urban Decay Electric Palette (Thrash) >> Purchase at Sephora
Press light green shade onto the center of the lid
Next, pick up your lightest green shade on the same brush, (wipe it off first,) and apply that to the center of your eyelids. Keep the color below the crease, and confine it to jus the middle as much as possible.
We can always add more of this highlight shade later, so it’s best to start small.
Urban Decay Electric Palette (Freak) >> Purchase at Sephora
Add the deepest green to the outer corner
Finally, wipe off your brush one more time, and add your deepest green eyeshadow to the outer corner. The eyeshadow guide we applied earlier is super helpful to make sure this color stays just where you want it.
The exact shade I’m using is discontinued, however there are plenty of beautiful alternatives. Make Up For Ever makes a beautiful and highly-pigmented green that works perfectly for this look. For a more inexpensive option, or if you just prefer creamier eyeshadows, Milani Shadow Eyes in Green Safari looks amazing too.
Make Up For Ever Artist Shadow Eyeshadow in Mint Green >> Purchase at Sephora
Milani Shadow Eyez Eyeshadow Pencil in Green Safari >> Purchase on Amazon
Create the perfect wing using the eyeshadow guide
Now let’s add a slick wing before we remove that eyeshadow guide and reveal our handiwork! Use a gel eyeliner to draw a thick & dark wing, or go a little lighter and smudge the line for a bit of smokiness. I prefer using a gel liner for this reason, but you could use a black liquid eyeliner too if you want a more defined line.
L’Oréal Infallible Lacquer Eyeliner 24H in Blackest Black >> Purchase on Amazon
Mimic the same pattern on your lower lash line
Remove your eyeshadow guards and check out your look! If necessary, use a pointed cotton swab dipped in makeup remover, (or my personal favorite, the E.l.f. Makeup Remover Pen,) to sharpen your eyeliner or to clean up any green eyeshadow residue that’s below your wing.
For your lower lash line, apply your bright green to the inner half, and your darkest green to the outer half. Then, take your lightest green and place it right down in the center and blend in both directions. Finally, add a touch of your matte brown to the lower edge to bring it all together.
E.l.f. Makeup Remover Pen >> Purchase at Elfcosmetics.com
Re-blend the crease to soften any harsh lines
Now is the time to go back in and soften those edges. Using a fluffy crease brush dipped once again in JETSETTER, carefully re-blend through the crease to help the greens transition seamlessly into the brown.
Be careful to not extend the brown past the imaginary line extending out from your wing tip. In other words, imagine your wing kept going all the way to your temple. Wherever that line is, don’t let your eyeshadow pass that. The structure is what makes colorful looks like this one look chic, and not messy.
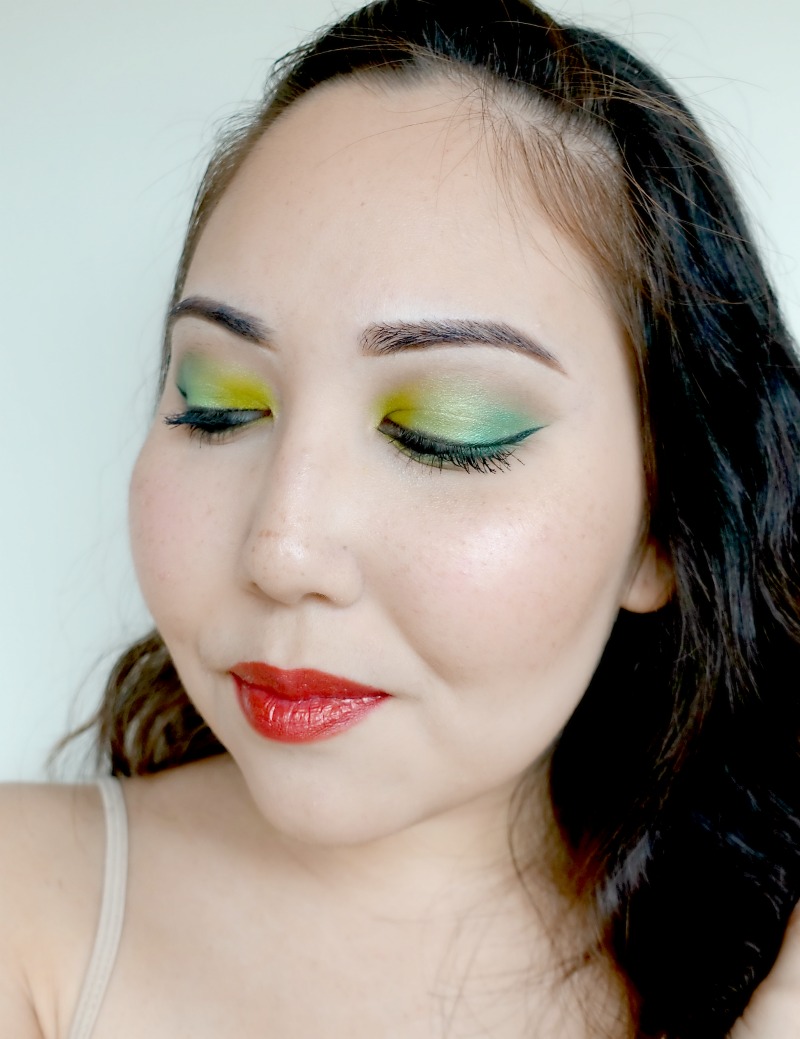
Add the finishing touches
We all know what to do here. Add a highlighter of your choice to your brow bone. I just used the matte white from the Tartelette In Bloom palette to keep it simple, and to balance out the shimmer I already had on my lids.
Apply mascara to your top and bottom lashes, and apply falsies if you want some extra volume.
Apply your foundation, concealer, & powder
I was in a light foundation kind of mood when I created this look, so I used a CC cream just to even out my skin and dull my minor redness.
Follow up with a lightweight concealer to match the coverage level. Maybelline Fit Me concealer is my favorite for this. If you have severe discoloration, just color correcting concealer or creams just where you need them.
Pssst! Need help figuring out just how you should be color correcting? Check out this detailed guide >> The Ultimate Beginners’ Guide to Color Correction
Finally, set all of your hard work with a translucent powder.
IT Cosmetics Your Skin But Better CC Cream >> Purchase at Sephora
Maybelline Fit Me Concealer >> Purchase on Amazon
Maybelline Fit Me Matte Plus Poreless Powder in Translucent >> Purchase on Amazon
Lightly bronze & add blush
Feel free to contour for a more dramatic look, but keeping with the “natural” look, I skipped contouring and went straight to bronzing. I find this is a great way to make an overall look more wearable.
Apply a peachy blush that complements the green eyeshadow nicely. Start towards the back of your cheeks and slowly blend the color inward toward the apples of your cheeks. This gives a slightly “contoured” effect so you’re not completely devoid of definition.
NYC Smooth Skin Bronzing Powder in Sunny >> Purchase on Amazon
Clinique Cheek Pop Blush in Peach Pop >> Purchase at Sephora
Highlight the face liberally
This cool eye makeup look calls for super dewy, on-trend skin. Using a fan brush, dip into Becca “Opal” and apply it on the tops of your cheekbones, down the bridge of your nose, on your temples, on your chin, and on your cupid’s bow. Basically everywhere.
Becca Shimmering Skin Perfector Pressed in Opal >> Purchase at Sephora
Top it off with lipstick
Finish the look with a shimmery red-orange lipstick. The red-orange complements the green in the eyes beautifully, while staying in the same color family as the peachy blush. The shimmer finish adds that bit of something extra to the completed look!
I’m wearing Milani Color Perfect Lipstick in Bonfire, though this one is sadly discontinued. On the bright side, Revlon offers a nearly identical shade.
Revlon Super Lustrous Lipstick in Abstract Orange >> Purchase on Amazon
That’s all for today!
Like this St. Patrick’s day makeup look? Check out this tutorial too >> Romantic Valentine’s Day Makeup Tutorial
If you find this post interesting, informative, or just plain entertaining, tell me about it in the comments below! And don’t forget, sharing is caring. Share this post!
Till next time. ♥︎
Sign up for my free monthly e-journal, The Millennial Maven Love Letters for exclusive content + millennial inspiration and lifestyle hacks. Plus get instant access to my library of on-the-go style downloads!
FTC- Not sponsored by any brands mentioned. I purchase all products myself. All opinions are my own. Some links may be affiliated.
Leave a Reply